I had so much fun creating my altered project this month. I used the Create-A-Frame plain white frame which you can find at Scrapbooks Plus. The frame will hold a 4 x 6 photo and you can design it so that it can work for a horizontal or vertical photo – what more can you ask for in a frame?
When you open the frame, it is not assembled which makes it easier for altering. I chose to use a the orange paper from the Bloom & Grow paper to dub as a photo mat. I then covered the front of the frame with a more colorful paper from the same line. I used my ATG to adhere the paper and then used my X-acto knife to trim off the excess. I then filed the edges and applied some ink. I chose to “junk” it up a little with some accents from the chipboard like stickers and some Bazzill Pom-Pom ribbon.
This project went together in less than 30 min. and if I do say so myself I love the way it turned out. You could use this frame for all sorts of different occasions and you could definitely use it as a super fun, easy, economical gift for somebody special. The best part about this project is that everything is found at Scrapbooks Plus!
***for some reason Blogger will not allow me to add photos, please stay tuned***

Thursday, April 30, 2009
Wednesday, April 29, 2009
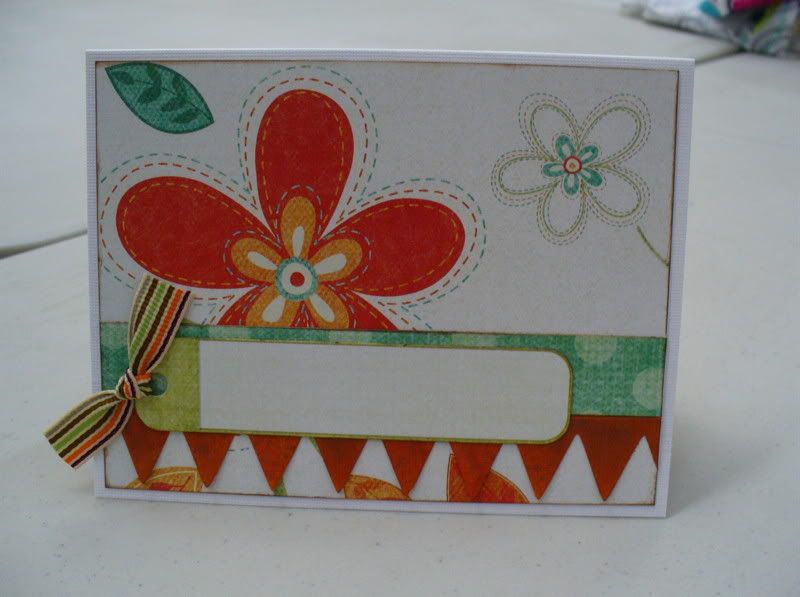
Quick and Easy Card
I am *not* a card afficionado... but because I am a scrapbooker with tons of extra bits and pieces of patterned paper I feel obligated to make cards. It's kind of expected, right?
When I find a card design that I like, I use it over and over with different scraps and for different occasions. This month I created a card that I really *love* using one of the tags from the Bloom & Grow die-cut sheet. I always have extra tags from those sheets... I probably have tons of Basic Grey ones... and this is a great way to put them to use.
I started with a basic rectangle of patterned paper cut just slightly smaller than my blank card base. I added a strip of coordinating patterned paper from my scrap pile and a piece of the Bazzil just the the edge. The Bazzil looked too bright, so I toned it down with some Glimmer Mist (Simply Khaki - my favorite... little specks of gold, silver, and platinum). I tied a piece of ribbon onto the tag and placed it over the seams. Voila! Instant cute card... and with the tag blank I can fill it in for whatever I need: congrats, thank you, birthday, maybe even Mom? :)
thanks for stopping by!
erin
Tuesday, April 28, 2009
Spring Door Plaque

When I saw this rectangle hanger, I thought of the door knob hangers with a name used to label one’s room. Why not welcome spring on the door knob. It could have also been made of chipboard with holes punched and a hanger added. The beads and jute were already on this hanger.
The edges of the chipboard petal pieces were colored with a green marker. The shapes were traced onto orange paper from the Bloom & Grow group and cut to fit the chipboard shapes. Glue these to the chipboard shapes. If there are jagged edges, sand them.
To make the curves for the spring landscape, I used a flexible curve to shape the papers that were left from my other projects using Bloom & Grow. Scrapbooks Plus has a flexible curve that you can bend to get the shape desired. The curves were cut, layered and glued to show contrast; then cut into a rectangle. A gold marker was used to follow the curves and heighten contrast.
Wording was done on the computer. Glue the word box and leaf first. Secondly, glue the rectangle then overlap petals. A green button with raffia threaded through its holes was added to the center of the petals. Add a tag and ribbon to the hanger.
Hint: To avoid scratching the door when opened and closed, add felt to the back of the plaque.
Monday, April 27, 2009
Butterflies at Seventy-Five
 I made this little mini-album to give to my Aunt Dickle (yes that is her name!) to commerate her surprise 75th birthday party. This cute little butterfly accordian book by Maya Road is actually two books - one chipboard, the other acrylic - merged into one. I took them apart with needle-nosed pliers in order to alternate chip board and acrylic pages (much like SueB did in her Wassail album class this past January). I can use the remaining pages for another project.
I used three different colored Staz-on inks to distress the edges of the chip board pages and to tint the edges of the acrylic. I created a template for each page style and traced the MME papers to cover the center. Each photo was punched with a Marvey scalloped oval punch and matted on a scrap of MME paper cut with a slightly larger punch. I bought the full set of oval scalloped punches at Scrapbooks-Plus and use them ALL THE TIME!!!
 I painted the "cover" with green scrapbook paint from Making Memories then sprayed it with a little Glimmer Mist to get the sheen that I wanted. After it dried, I put the album back together with my needle-nosed pliers - which was much more difficult than taking it apart as I have some serious coordination issues!
 I painted the "cover" with green scrapbook paint from Making Memories then sprayed it with a little Glimmer Mist to get the sheen that I wanted. After it dried, I put the album back together with my needle-nosed pliers - which was much more difficult than taking it apart as I have some serious coordination issues!
 For the finishing touches, I inked the edges of those totally cool Heidi Swapp super-sized foam letters and placed them a little off the cover's center so I could wrap a ribbon around the middle to hold the whole thing together.
This was one of the fastest Mini books I have ever made--not too many pages and a page size small enough that there wasn't room to get all wrapped up in embellishing every page to death.
Sunday, April 26, 2009
NEVER TOO OLD...

I made this cute little card for my friend Laura's Birthday...The problem is I never gave it to her, but she did see it...
The outside is just several scraps that I had left over from the kit. I am not much of a card maker, so they are always the last thing that I do...sort of a after thought. I give props to all the ladies out there that make cards...they are beautiful, I am just not a card giver, I think I say that every month. :)
The Outside message says "you are never to old to me my fair friend..." and on the inside has a little turtle flipped over on his back :)...This card just came to me...I had these old stamps that I had never used but purchased because of the turtle, so I decided to use them, and then it was Laura's Birthday, So I had inspiration...
Suzie And Misty Team Teach
I am really excited to announce that Susie and I are going to do a team teach. This is all her brilliant idea...I am just hanging with the cool girl...
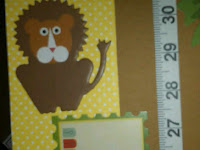 Suzie designed an amazing growth chart...we are calling it a "boy" one but perhaps it could be for a girl too...And I have designed a layout that would make a great compainion to go with it...We haven't set a date yet. But both projects are done...
We are planning on teaching them back to back. You could take both or take one. AND YOU ARE HEARING THIS HERE FIRST THERE IS TALK OF A PRINCESS VERSION.
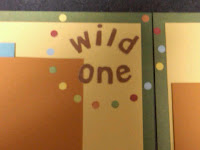
Sorry for the awful pictures it was a last minute thought to take pictues of it and give our readers the first sneak peak...Contact Scrapbooks-Plus for more information. The layout will be 20 dollars, and I am not sure about the growth chart...more information will follow...Susie and I can't wait to work with everyone...remember this would make a great gift.
Friday, April 24, 2009
STAMPS!!!

Thursday, April 23, 2009
Grad Box Classes!
 I just wanted to take a minute to thank all the lovely ladies who have taken my Graduation Exploding box classes. I really appreciate the feedback I have gotten from everyone! It has been a lot of fun working with you all. I took a couple of pictures from class this past week and I wanted to share them.
.
Laurie finished a box featuring Miami University (Ohio - not Florida) and she did a great job! She even took the time to customize the laser cut frame on the top of the box by making the underlying base piece out of 2 colors (red & white) and mitering the corners just perfectly!
 Jenny made a box for a relative graduating from school in Ogden, Utah! I have been told it is just the beginning - she has a few more boxes in mind, after she finds out the various school colors.
Kathy avoided my camera lens as she worked on a box for Paul VI - she claims to have been photographed over the weekend at one of the Debbie Shuh classes, but I have seen no proof!

Esther is working on a box to celebrate her High School Reunion: Womack Senior High Year - Class of 19 __ (the year is our little secret!) - fortunately, the tassels that go on the boxes allow you to customize any date. We needed to special order some Bazzill to get exactly the right blue to go with that gold cardstock. We are currently fine-tuning the logo piece created for the inside of her exploding box. The finished product is going to be a lovely momento for her to share with her classmates.
 MaryAnn and Natalie were back for round 2 to work on boxes from Chantilly and Broad Run.
 Here's a pic of Sandy and Sara taking turns using my Scor-pal to make EXTRA exploding boxes for Westfield and Park View. .I love all the different ways you all have chosen to personalize your exploding boxes - College graduations, high school reunions, and more - definitely a creative bunch of ladies! . .In addition to the area schools I mentioned above, Debbie has ordered a ton of new custom items for other local high schools - Centreville, Freedom, Thomas Jefferson, Fairfax, and Oakton to name a few. If you haven't been in recently, the extensive selection of custom papers, laser cut logos, picture frames, and graduation caps will blow you away! If you have a grad this year make sure you stop by the store to check it all out!
Fact: 5 Year Olds Ask the Most Interesting Questions...
This layout was started months ago when Method Playground had a challenge up for making a page with a resist technique. I used a white crayon and water colors to create the centerpiece of page 1, then it kind of laid around my scrap room until I got the MME Bloom & Grow papers for this month. This layout is not my usual style, but I like the way it turned out.  I (gasp) tore paper - although I must admit I did not do it free hand - I used a tearing ruler, which gave me enough control that I didn't freak out. Then I made up for all that tearing by using plenty of crisp straight edges, too. I also used a label maker for the first time - I see more of that in my future - it kind of reminds me of the strip journaling that I have been admiring in Loretta's layouts. The Bazzill Edge die cuts were lots of fun to work with - a quick way to add a funky element. I really like the PINK Heidi Swapp letters and the way they contrast with the orange paper - HIGH VOLTAGE!
I think the contrasts on this layout are what makes me happy - or maybe it is just looking at my daughter's little red boots and thinking about her curious nature that turns up the corners of my smile...
I (gasp) tore paper - although I must admit I did not do it free hand - I used a tearing ruler, which gave me enough control that I didn't freak out. Then I made up for all that tearing by using plenty of crisp straight edges, too. I also used a label maker for the first time - I see more of that in my future - it kind of reminds me of the strip journaling that I have been admiring in Loretta's layouts. The Bazzill Edge die cuts were lots of fun to work with - a quick way to add a funky element. I really like the PINK Heidi Swapp letters and the way they contrast with the orange paper - HIGH VOLTAGE!I think the contrasts on this layout are what makes me happy - or maybe it is just looking at my daughter's little red boots and thinking about her curious nature that turns up the corners of my smile...
Tuesday, April 21, 2009
Springtime Canvas
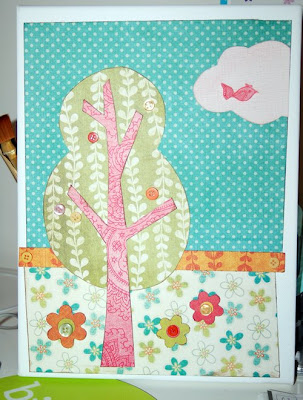
For my off-the-page project this month I decided to decorate a canvas. You can get these pretty cheap at craft stores, and it's a nice way to personalize a child's room. To adhere the paper to the canvas I used Mod Podge - be sure to cover the entire piece of paper. To make sure it's really adhering I flip the canvas over on my desk and press down all over on the back side.
I left the edges of the canvas natural, but you could easily use a bit of acrylic paint or Glimmer Mist on the canvas before adhering your paper. The cloud was made from Co-ordinations cardstock. I lightly sanded inside the cloud in a circular motion to let a bit of the pink show through.
Thanks to Kelli Crowe for inspiration from her BPS class on paper piecing! I used her method for creating the tree and the cloud.

Patterned Paper - Making The Most Of It
Most scrapbookers use patterned paper in their layouts. Sometimes it's the base of a page, sometimes it's a photo mat, and sometimes it's something in between. I like to look at the patterned paper and see if there is another way to use it that will use the most of it's particular pattern.
When I saw the Bloom and Grow line's colorful vine paper, I knew that I wanted to use the curving shape on a layout. I started by cutting out a few curving pieces and placing them along the bottom of my 2 page layout. They help guide the eye from left to right as well as give a nice neat edge to my line of photos (which aren't perfectly straight underneath).
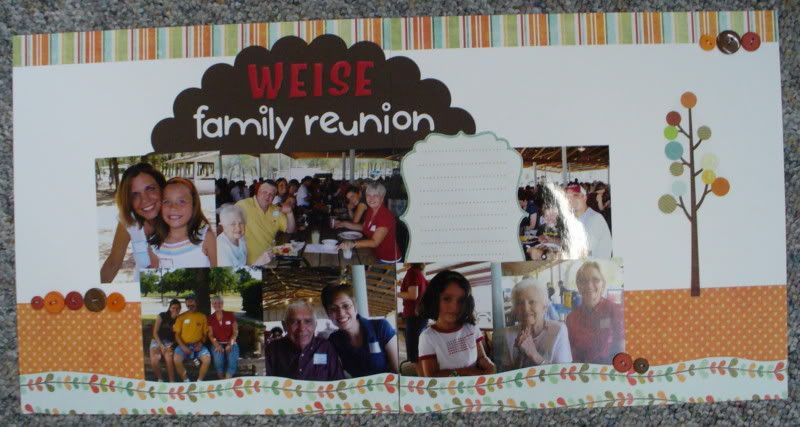
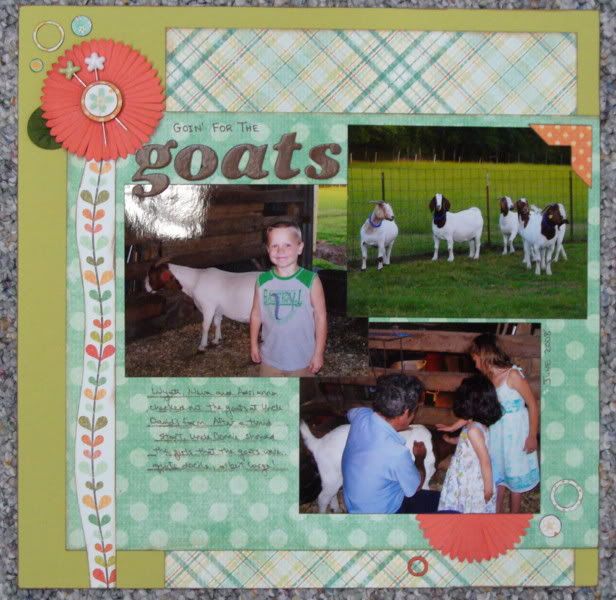
The extra that I trimmed off of one of the curves became a stem for this beautiful flower (I picked it up in Scrapbooks Plus from SEI's Ambrosia line) that frames the side of my Going for the Goats layout.
.
Take a look at your patterned paper and see if you have a new way to use it too!
thanks for stopping by!
erin
Monday, April 20, 2009
Yo-Yo Flowers
 I found some fun fabric at a local store that just happened to match this month's paper by My Mind's Eye. So I decided to try something new this month - yo-yos. You can find a template to help you with these, but they're not that hard to make. Here I made them in two sizes and with a bit of ribbon, a button, and Bazzill Basics paper leaves - voila! flowers.
 Got some scrap fabric laying around? You can find instructions and templates for making your own yo-yos here and here. They'd be awfully cute on cards as well.
Sunday, April 19, 2009
Sanding and Sewing (and a little consulting!)

Although our DT kits contained this awesome cardstock by Coordinations Cardstock this month - the navy and teal combination in my kit just didn't fit with the pinks and oranges of the MME Bloom and Grow Patterned paper I planned to use for my two-page layout. But I just love this two-color cardstock Coordination's product, so I went by Scrapbooks-Plus and purchased this same cool cardstock in the White Wash color line - the one I chose was pink on one side and with a white finish on the other. Perfect! (I'll save the navy/teal combo for something else later!!)
For this layout of our recent trip to the Virgin Islands, I used the Pink/White Wash cardstock and set to work in sanding, tearing and otherwise distressing the heck out of the white side of the paper to get the pink to bleed through. I also wanted the edges to sit up a bit, and they just wouldn't do that with Glue, so I broke out the sewing machine to really nail them down. This way, when I went to "rough them up", they weren't tearing off the page. More perfection!
I had this great sunset shot from Anegada that fit the color scheme and made the decision to have that as the focal photo. I made all the other photos black and white because the colors were all over the map (would definitely not work together). I used a second color photo of my husband and I in a supporting role. But the layout seemed bland. So I took it by Scrapbooks-Plus and consulted Misty and Debbie - they had just the answer - flowers by Flora Doodles and ric-rac. I also added pink staples to some of the photos, a few candy dots, some scraps cut with decorative scissors and a little bling. Just what the layout needed. (And you'll be seeing more of these Flora Doodle flowers in next months' projects!).
If you have a layout that isn't just working for you, bring it by the store. One of the consultants there will be more than happy to help you with those final touches that will make your work shine.
Saturday, April 18, 2009
Star Book
Star Book Instructions
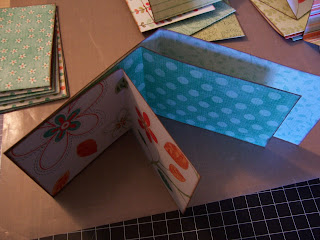


I saw someone making a star book at a crop once, and thought the idea was genious! She was kind enough to show me how they were done, and I’ve made several since. This one is going to be a gift so it’s not quite finished yet. They are actually very simple to make, one of the key things is using double-sided paper and a good adhesive. I use both Tacky Tape and my trusty ATG gun.
To make this you will need:
-Double-sided paper, 7 sheets for the inside and extra for the cover
-Strong Adhesive (I would use Tacky Tape or ATG)
-Ribbon for the closure
-Embellishments (you will need two jumbo eyelets for the closure)
-Paper Trimmer
-Bone Folder
-Ink
To make this you will need:
-Double-sided paper, 7 sheets for the inside and extra for the cover
-Strong Adhesive (I would use Tacky Tape or ATG)
-Ribbon for the closure
-Embellishments (you will need two jumbo eyelets for the closure)
-Paper Trimmer
-Bone Folder
-Ink
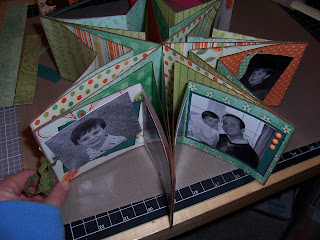
1. Cut paper into 7 4x8, 7 4x10, and 7 4x12 strips.
2. Ink the edges of both sides of each piece (optional)
3. Fold every strip in half and crease with bone folder.
4. Then take one of each size strip and adhere one the short sides on top of each other as pictured.
2. Ink the edges of both sides of each piece (optional)
3. Fold every strip in half and crease with bone folder.
4. Then take one of each size strip and adhere one the short sides on top of each other as pictured.

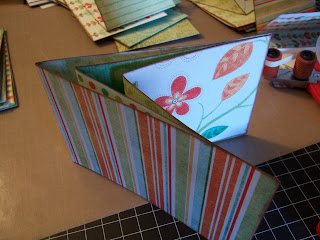
5. Then fold over and adhere the 2nd short end as pictured.
6. Continue that with all 7 sets of strips.
7. Arrange each set on top of each other so that the patterns are intermingled. Keep in mind which pieces you want as your front and back cover.
8. Adhere the back of one set to the front of the next as pictured.
6. Continue that with all 7 sets of strips.
7. Arrange each set on top of each other so that the patterns are intermingled. Keep in mind which pieces you want as your front and back cover.
8. Adhere the back of one set to the front of the next as pictured.

9. Punch a hole in the center of the open side of both your front cover and back cover and attach a jumbo eyelet to each hole.
10. You are ready to embellish and add pictures! Once that is done, you can run your ribbon through and tie it closed. To display it, just untie the ribbon and bring the front and back cover together and tie them together to get the star shape.
These can also be made with points if you want it smaller. There are multiple sites on the web with instructions as well. Just google Star Book instructions and you’ll find many ways to make these.
Enjoy!!!!
Friday, April 17, 2009
Changing my Embellishments!

Here's the final project , but here's how it was done

It's easy as Pie! I took these birds (that I didn't want) and I covered them up with the journaling block to create the swirl effect that I really wanted.
I love to hide the things I don't like!

The letters I got, I wasn't thrilled with. It was not me, so to changed them with my handy dandy sand paper! You can see the "ABC" at the top is the normal, but after some flat sanding I have a great letter with some awesome pink edges!

Make sure that you lay them flat on the table and work little pieces at a time to get the desired effect that you want!

Here's the final project! I hope that you can use these techniques in your layouts too!
Thursday, April 16, 2009
Cordinating Core Papers by Loretta Cooper

One of my favorite new things from CHA this year is this coordinating paper. Here's the secret the "core" ... it's a different color than the exterior. Why would you want paper with a different color core?, you may well ask. The answer is, all the better to emboss with. I ran this paper through my Quick Kuts Revolution with one of their 4X4 inche embossing dies.... You can of course do that with any kind of paper... but here's where the really cool part comes in. Lightly sand the raised ridges with fine grade paper or one of the Making Memories Sanding Blocks (anybody can show you where they are in the store!) and voilia! I just LOVE the way this looks. After trying it out once, I rushed back to the store, and purchased about 20 pounds of this paper... This promises to be my new card making trick... plus it's just so much fun to see the color reveal itself!
Have Fun!
Loretta
Have Fun!
Loretta
Tuesday, April 14, 2009
Newest Addition
 I really enjoyed working with the MME Bloom and Grow paper from the Scrapbooks-Plus DT kit this month. Since I don't have any girls in my house and I basically have no pictures of myself, I thought that I'd do a LO of our newest addition to our house- and the only other girl- Marley the Pig.
I really loved the Little Blossom paper that was in the kit- it was probably the paper that I used the most of this month! The Coredinations paper that was in the kit went well with it so I used a piece to compliment the patterned paper. Added the orange dot scalloped piece from the Grow accessory sheet and sewed it on. I also loved the journaling spot from the sheet but I had used it in another project- so I made another out of some Coredinations paper by tracing it and cutting it out and I sewed this on too. The rest of the LO just fell into place. One other trick I used on this LO was that I stamped directly onto the Bazzill flowers that I used. I used the same Mocha Mama ink on both the flowers and the edges of the paper.
Enjoy!
Lisa
Monday, April 13, 2009
Cute little remote holder ;)

I had this little box just sitting under the TV, begging to be decorated…So while watching TV, I got inspiration to decorate it. I used glimmer mist on the inside of it…just so it was not naked…then I decorated the outside with a few different papers. The lip and the bottom edge were done with the the core’dinations.
The Core’dination actually worked out better than I imagined it would, at first I painted but no color I painted worked the way I had hoped that it would. You can see on the bottom the last color I painted which was yuck yellow. OH WELL NO ONE IS GOING TO SEE THAT. Well not once it goes back under my TV to hold my remotes…in the mean time they have been misplaced and are just laying around the TV. YUCKY!
Sunday, April 12, 2009
Wanting Spring by Esther

This was a follow up to my anxious desire to welcome spring many weeks ago. Since spring is slow coming in this year, the planning of this page was good for me. The flower seed packets were collected for the colorful flowers. When I began to plan the page, the packets were too large. They were scanned and reduced to fit with the Bloom & Grow papers by My Mind's Eye that are so bright & cheerful.
The journaling was done on the computer on vellum & photo paper. The potted tulips were rubber stamped on photo paper and colored with color pens. The large flower pot was a die cut I had purchased at ScrapBooks Plus some time ago. I often see things that would work for a page and add them to my stash, then do the page a year later. The orange flowers were made with a circle punch by Fiskars & buttons added to the centers.
As I post this, it is Easter and I am still waiting for spring to come & stay. Maybe, I will plant the seeds.
Tip: When adding color to photo paper, use Staz-on for the stamping and markers that are acid free & will not smear. I used Fiskars & Adirondack markers.
Saturday, April 11, 2009
Precious Boy

This is my adorable nephew who is older now, but these pics will always be some of my faves. They were actually christmas pics, but they worked really well with this month's kit. The Bazzill scalloped circle actually was in last month's DT kit, but I couldn't get it to work with any of the projects so I saved it and couldn't wait to find a use for it. I loved using it on this page and adding more scallops to go with it. I added some orange eyelets to the circle, and voila! One of my favorite tools is my Cricut Expression. I used the Graphically Speaking cartridge for the 'boy' circle and just added patterned paper underneath the green to fill in the negative space. I really liked this layout and the Bloom & Grow line we got to play with. The Bloom & Grow comes in several color schemes so there's something in it for everyone, so much fun! Happy Scrappin' and have a wonderful Easter!
Friday, April 10, 2009

Thursday, April 9, 2009
Bloom & Grow...

and grow, and grow! Several of my relatives and friends are having babies in the near future, so I have been thinking about baby gifts. I created a growth chart this month using paper from My Mind's Eye Bloom & Grow Collection. It went together really quickly, using the birds from the die cut sheet. I did trim a couple of smaller birds out of the patterned paper to add a little variety. The heads of the birds are popped up to add dimension (because I never make anything just flat!). I placed the die cut journaling block at the bottom - the perfect place to add a little personalization.
A great companion to this gift would be to create a matching scrapbook to chronicle the baby's growth for the first year - one page per month so that all the new mom has to do is to print a picture and put it in place - and beyond...to cover the first 10 years. Imagine pictures taken next to the growth chart every year to include in the scrapbook (not that I was ever that organized, but some people are!).
I am actually getting very excited about this idea and am going to have to plan a class - anybody interested?
Wednesday, April 8, 2009
Spring Fling by Loretta Cooper

I loved this paper as soon as I saw it! Great choice Deborah. It's the Bloom and Grow line from My Mind's Eye. The inspiration for the layout was really the great colors in the line. As you can see I layered several prints and created chip board embellishments out of some of the coordiating stickers.
The oranged scallop piece was part of the kit, but I balanced it with a scalloped white stripe placed horizontally across the bottom. You can purchase all kinds of pre-cut scallops, but if you love the look you might consider investing in a cutter that includes various decorative blades. Debbie or any of the girls at Scrapbooks Plus can help you choose one you are sure to love.
Thanks for dropping by the DT Blog,
Loretta
Tuesday, April 7, 2009
Leverick Bay - from "left-overs"

Because of the beauty of the flowered arch in this photo, I decided the photo should be the center of all the attention, but I still wanted to use lots of the My Mind's Eye product in this month's DT kit. I managed to use a total of five photos (one that measured 8.5 "x 11.75"!), three patterned papers, three different cardstock colors, as well as die cuts, HUGE foam letters, and candy dots - all in a one-page layout. And most of all of this "product"could be considered "left-overs".
You can get similar results by just using your left over scraps - you know those long pieces that are never wide enough to mat a photo. You can make good use of those scraps to highlight a super huge photo that you love. Even though I cut most of the pieces for this layout from full sheets (since this was my first project this month, I had no choice, but I could have just as easily put this layout together last from left overs in my "scrap box". ) The green polka dot paper measures 3.5" x 11.5", the pink patterned paper measures 3"x 11". I used some left over white card stock to mat the pink paper to really make it pop. The only full sheet of paper used was a single piece of teal cardstock to mount everything on.
That big photo can take center stage and still be incorporated into a fun (and embellishment filled) design. It's a great excuse to let your photography shine and still incorporate lots of paper and "stuff".
That big photo can take center stage and still be incorporated into a fun (and embellishment filled) design. It's a great excuse to let your photography shine and still incorporate lots of paper and "stuff".
Monday, April 6, 2009
Boyd's Bear Country...

...we took our little boy to Boyd's Bear Country, because I am a collector...ssshh don't tell anyone...I have a secret passion for there super cute little kitties, and I have a piggy along with a black and white kitty that I inherited from my Grammy, when she passed away.
So I wanted to go check it out. It has been on my places to visit since I have moved to VA 4 years ago.
My Son gave me great inspiration when I went, so glad I brought my camera with me. There was so many things to take pictures of. The little paw prints in the parking lot were so cute, when we took William out of the car and he seen them he looked down and screamed "Mommy Blue is here, and look she left me a clue!" It was so cute, and one of the rare times I actually had my camera ready to catch some shots of him. He wanted to look and feel everything. Thank goodness this is one of those stores that you can allow them to do just that.
The layout is a simple little grid that I worked out to be nearly the same size on each side. The flowers I added a little diamond glaze to and I just cut them out of one of the papers that came in the kit, along with some candy dots that came in the kit. You can get them in many colors at Scrapbooks-Plus. (if you don't see a color you want ask a staff member they can get a order from you and when it comes in call you) I journal in my own handwriting as I do much of the time. Something for my son to remember be buy. The label and the tag came on the punch out sheet...
I wonder how many have this problem...when I really like paper...I struggle I don't want to mess it up and I want to do the paper justice...When I don't like the paper I can whip something out with no issue. I was not a fan of this months paper...but it sure came together nicely and I really like it now. Funny how that works out isn't it. You don't like it when you first see it, but then put it together and wonder "wow, why didn't I like that?"
Sunday, April 5, 2009
More Co-ordinations
 One of the fun things with the April kit was the chance to play with the Co-ordinations cardstock, which Scrapbooks Plus recently started carrying. The cardstock has a different color on each side and is great for tearing, sanding or embossing to reveal the 2nd color.
For this layout I used the whitewash cardstock. I cut several circles with a punch and then used an embossing stylus with this plastic needlework frame to make designs on my cardstock. Once I dry embossed the design I flipped it over to the whitewash side and lightly sanded to bring out the pink color.

Saturday, April 4, 2009
Fast Album

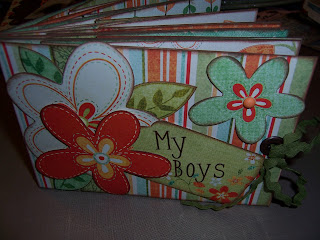
I love to make mini albums. To me there is nothing better than the feeling of finishing a project- sometimes when I think about the enormous amount of pictures I have to scrap for my 12x12 scrapbook it completely freaks me out! This is a quick and easy way to scrap pictures- and it works perfectly for a last minute gift project.
I took this idea from Simple Scrapbooks and have used it MANY times over and over. The main idea of it is that you use the same basic LO for each page but change the papers and embellishments. It's a really quick way to get a mini album done in one sitting!
I used most of the papers My Minds Eye papers that came in the DT kit this month in this mini book. I used the blackboard Scarlett album from Cosmo Cricket for the base. I covered one side of each page with paper, made a pocket, cut a 3" circle for my page title, and cut a journaling tag. The tabs for the journaling tag are actually flowers that I punched from the patterned paper- I just folded them in half and stapled them to the top of the tag. I sanded and inked the edges and I was done. I'd say from start to finish this album took less than 3 hours.
Next time you want to finish a project quickly, just try a "fast album" formula- you'll be glad you did!
Enjoy!
Lisa
Friday, April 3, 2009
Quick Coredinations' Accent
This month's kit included a couple of sheets of the new chocolate brown Coredinations paper. How great... my two favorite colors all in one piece of cardstock! I've picked up quite a few sheets of it on my own, as well as some of the White Wash colors. This paper is a lot of fun to use. Once you get some, you'll be hooked as well!
The easiest way to use the paper is just to tear it. Some people aren't the tearing kind, but this paper may convert you. When tearing there are a couple of options... careful and controlled or wild and crazy. Here is the breakdown:
I tend to be wild and crazy... especially since I don't like to measure. In fact, if I tear paper and it's too "straight" I will usually start over so I can have more "visual interest" to my piece. I usually tear it approximately where I want the paper edge to be and then adjust the rest of the layout around it. There's no real technique, just grab and pull slowly.
Now, if you are more careful and controlled there are tearing options for you. One option is to get a tearing ruler. Fiskars makes some with different shaped edges. I have a double-sided tearing and centering ruler with a large deckled edge and a small deckled edge... the best of both worlds: you'll get the torn look, but it'll be right where you want it. Another option to get a controlled tear is to wet the paper along your tear line using a dropper. This is useful if you are tearing patterned paper and want a particular portion of the pattern to show.
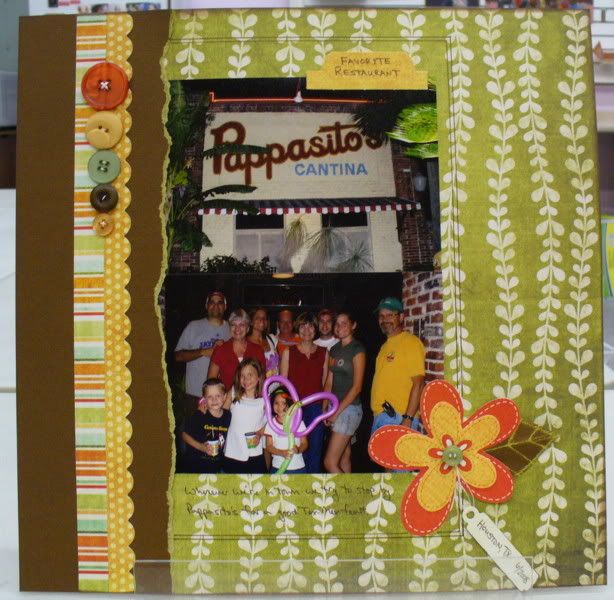
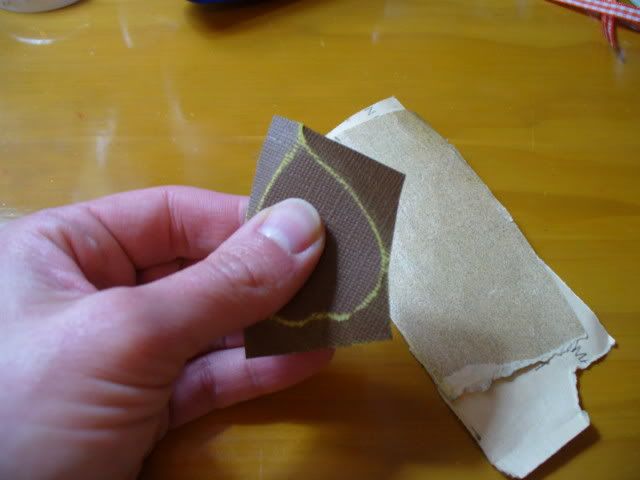
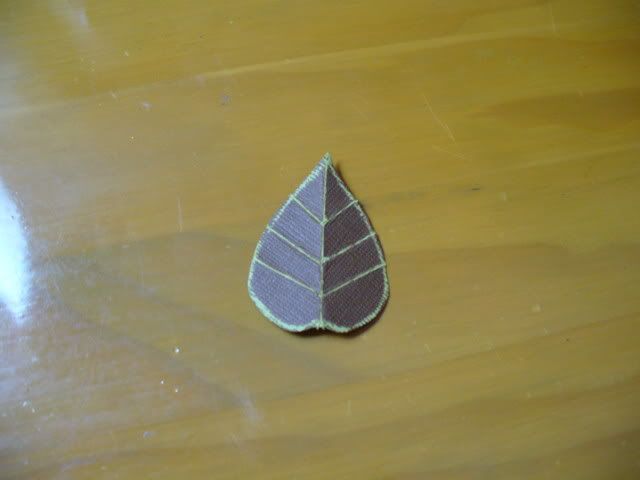
Past tearing and want to do more? You can do lots of different things with this paper. I used it to create a matching leaf shape for this layout. Here is the step by step:
First I took one of the Maya Road chipboard petals (which are kind of leaf-shaped) and a scrap of my Coredinations paper.
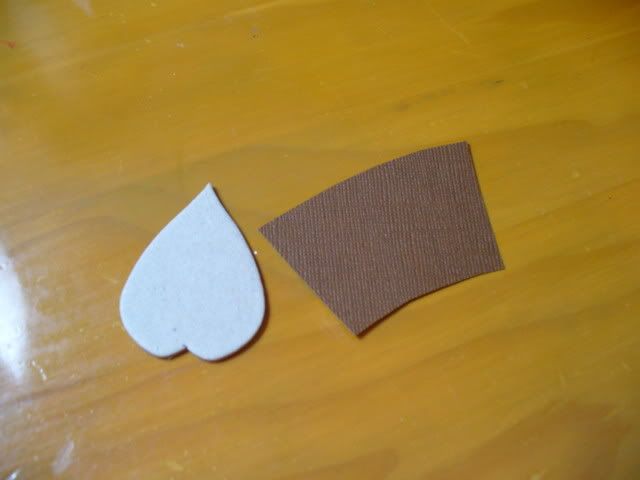
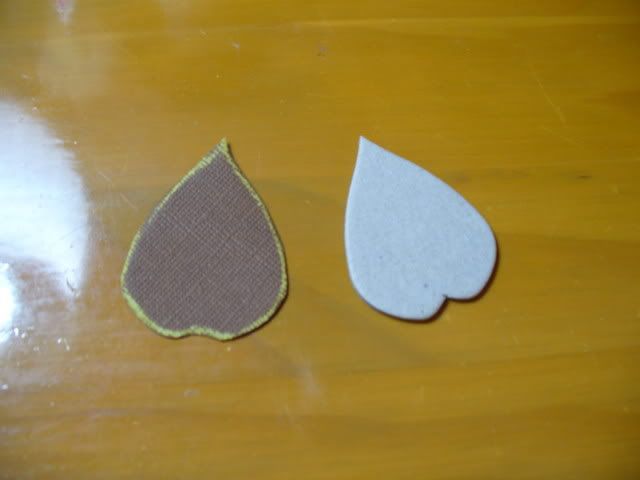
I laid the paper over the chipboard shape and sanded around the edges with 150 grit sandpaper.
Then I cut it out.
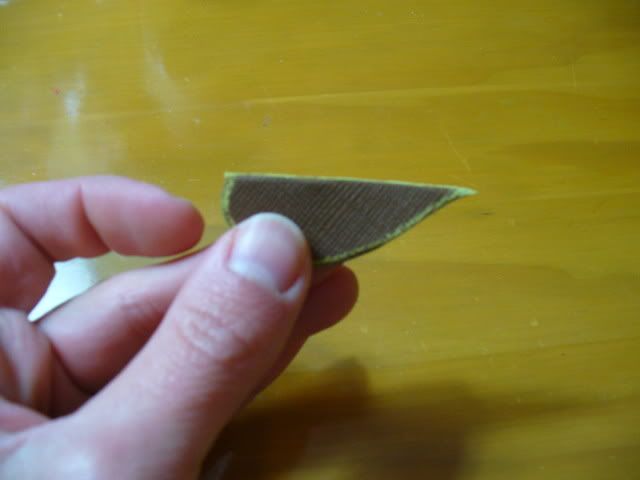
Next I folded it in half and sanded down the center fold.
I added veins to the leaf by folding the entire piece at an angle and sanding it. Then I flipped the fold to the other side to add the matching vein. I did three veins on each side.
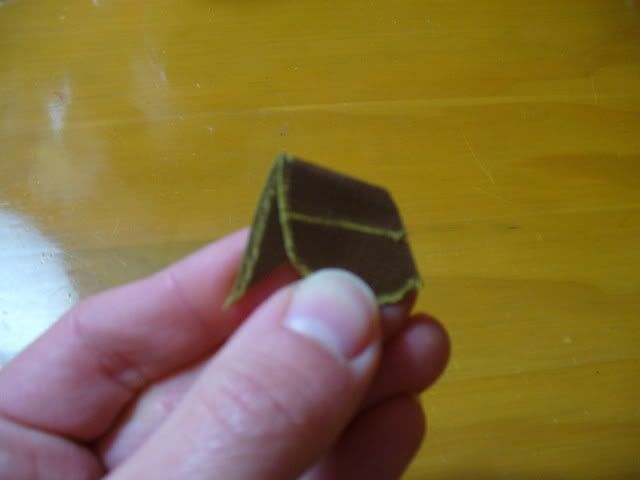
Here is the finished leaf!
Thanks for stopping by!
erin
PS. For this layout of my favorite restaurant in Houston, I took a picture of the sign painted on the building to use as my title. This is works great for vacation shots too, when you don't want to forget where you were... just take a picture of the sign and you'll have it right with all of your other shots to remind you!
Thursday, April 2, 2009
This Little Piggy
The weather has been so nice lately that I took my guinea pig outside to enjoy some fresh greens...and there were so many beautiful spring flowers, I turned it into a photo shoot!  Not many tips to share from this layout. It went together so quickly because I used several elements from the My Mind's Eye Die Cut sheet - a scalloped border, the journaling block, the parentheses, and two cute little floral paisley embellishments!
.
 Not many tips to share from this layout. It went together so quickly because I used several elements from the My Mind's Eye Die Cut sheet - a scalloped border, the journaling block, the parentheses, and two cute little floral paisley embellishments!
.
Because I chose to put the scalloped border on top of paper with similar colors, inking the edges definitely helped the die cut stand out - and the vellum did the same thing for the smaller letters in the title. This is actually one of my favorite uses for vellum because it lets the background show through, but provides just enough contrast to separate the title. The die cut parentheses provided the perfect little frame.
.
And don't you just LOVE the Heidi Swapp Foam Letters?!?! They are so thick and the adhesive on them is great. I always try to add a little dimension to my projects - there are pop dots under the paisley embellishments - but the Heidi Swapp letters just JUMP off the page - perfect for a title!
.
I actually took waaaay too many pictures of my cute little piglet! I was going to make an exploding box for the rest (what a surprise, right?) but I think I will turn this 1 page layout into a 2 page layout when it comes home. I hope Debbie has ordered more of those die cut sheets...
Subscribe to:
Posts (Atom)