Every month the Design Team gets to play with fabulous new papers and products to create a 1 page layout, a 2 page layout, a card and an altered item. Sometimes this is really easy, sometimes it is more of a challenge – people have different tastes and different styles – but we always come up with a wide variety of ideas to share on “The Wall”.
Starting in July, the Design Team invites the customers of Scrapbooks Plus to play along in our new Monthly Challenge!!
The rules for this month's challenge are pretty simple:
1. Come by the store and pick up some supplies (the papers and products we used for this month will be available on the 1st at a special display in the Crop Room).
2. Create a layout (1 or 2 page) in which the majority of the materials used are from this month’s kit.
3. Complete and post your project by the 21st. (On the 1st of every month, the Designer of the Month has a post where she reveals the new kit. Leave a comment on that post, providing a link to where your project may be viewed online...OR...email your project to debbie@scrapbooks-plus.com)
4. The winning layout will be featured on our blog so check back on the last day of the month to see if you won! Won? Yes! A prize will be awarded – a gift certificate to Scrapbooks Plus!

Tuesday, June 30, 2009
Monday, June 29, 2009
Quick Tip: Picking Your Ink
When you're working with a colored cardstock background, sometimes it can be a bit of a challenge to pick the right ink to use. I often test out ink colors on scraps of white cardstock, but that won't tell you which will look best on the colored background. I tend to start with a cardstock base, so I don't have a lot of extra scraps of colored cardstock to use as testers.
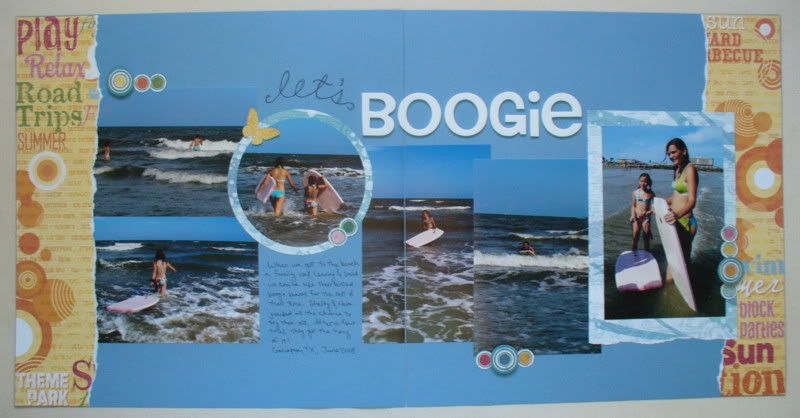
My solution is simple... use the back! I use the back of my layout to test different colored pens and even to practice my stamping before putting it on the front of the layout. For this layout I auditioned almost every blue pen I had on the back....
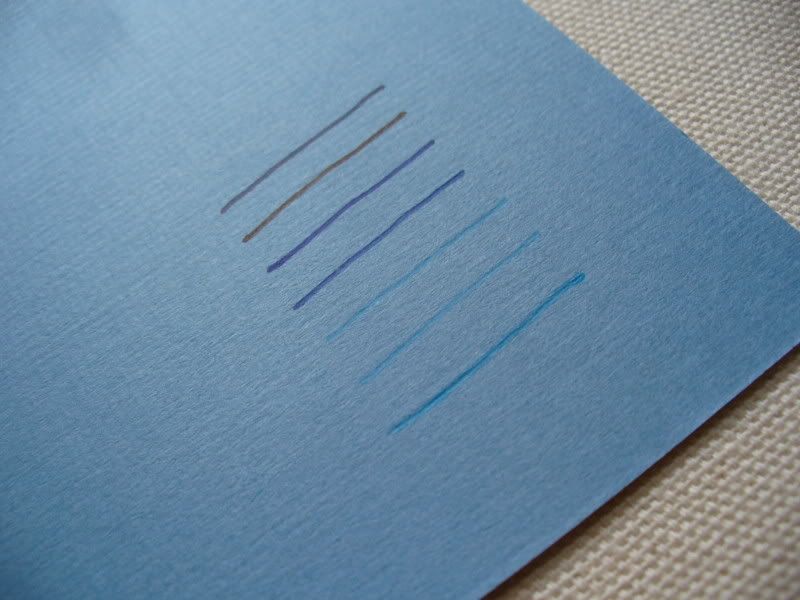
...before choosing my blue-black for the title and journaling on the front.
Thanks for stopping by!
erin
**This layout is loosely based on a Becky Fleck sketch from her PageMaps book. Her sketches are a great go-to item when I have a lot of photos I want to include in my layout!
Are you ready for the Design Team's interactive surprise for the July kit? Tune in and find out tomorrow! Just 1 more day! .....
:)
My solution is simple... use the back! I use the back of my layout to test different colored pens and even to practice my stamping before putting it on the front of the layout. For this layout I auditioned almost every blue pen I had on the back....
...before choosing my blue-black for the title and journaling on the front.
Thanks for stopping by!
erin
**This layout is loosely based on a Becky Fleck sketch from her PageMaps book. Her sketches are a great go-to item when I have a lot of photos I want to include in my layout!
Are you ready for the Design Team's interactive surprise for the July kit? Tune in and find out tomorrow! Just 1 more day! .....
:)
Sunday, June 28, 2009
School's Out For The Summer! by Esther

This page showed children having fun in the summer sun. A fun thing is a pinwheel. Here is a cardstock one made for the summer theme. I used the Flair Summer Daze for the yellow swirls & adhered it to solid red Bazzill. Any contrasting combination or a two-sided cardstock will work. Some of the DT used two-sided cardstock from Best Creation. The cardstock is displayed at the Scrapbooks Plus.
The pinwheel is easy to make. Cut a square of the two-sided paper. Cut a hole in the middle with either the Big-bite or a Crop-A-Dile. Cut slits from each of the four corners to within one inch of the center. Punch a hole in each left-handed side of the slit shapes. Now overlap the holes moving around the shape so that they can be secured with the brad in the center that goes through the middle hole. I used a lollipop stick for the handle.

The page was laid out based on the three photos. It began with a solid blue cardstock. I cut the theme "School's Out For Summer!" & the sun shapes from the Flair paper & adhered them to chipboard to bring them forward. My sub theme is "The Sun." Glitter was added to the sun.
The journaling was done on the computer & printed on photo paper to easily read. This paper was a challenge for me because it is so busy. But the colors were good for the summer hot sun theme.
I hope you will enjoy the summer & the sun with family & friends.
Saturday, June 27, 2009
Bling, Sparkle, SPLASH!
 I put together this really quick mini book using the Best Creation glitter paper and Bazzill card stock. There were two shades of blue in my kit, but to create the effect I wanted for this book, two sheets and just one color wouldn't be enough - so I bought more at Scrapbooks-Plus!
 The bracket album is Anna Griffin's latest in the Peyton line. (Debbie will be ordering them in bracket, scallop or flower shapes for sale at the store.) I think all this glitter works better with on acrylic verses chipboard.
I made a template that was cut about 3/4" in from the edge of the album I used this template to cut each background page. All the photo mats were cut from a coordinating color and measure 3 1/2" x 3 1/2".
 I attempted to coordinate the mats and the pages on each spread, using glitter paper for the mat with a cardstock page of a coordinating color on one page and the opposite combo (glitter paper page and cardstock photo mat on the other).

Photos were cropped 3"x 3" and embellishments kept simple. Glittered letters mark the first initial of each child's first name. I hand wrote the child's first name on a small tag cut with a Martha Stewart punch.
 I'm giving this book to our neighbor (after all, it was his pool party!) for his birthday next week. He's color blind! Maybe the bling and all the hot colors won't hurt his eyes too much!
 I attempted to coordinate the mats and the pages on each spread, using glitter paper for the mat with a cardstock page of a coordinating color on one page and the opposite combo (glitter paper page and cardstock photo mat on the other).
Photos were cropped 3"x 3" and embellishments kept simple. Glittered letters mark the first initial of each child's first name. I hand wrote the child's first name on a small tag cut with a Martha Stewart punch.
 I'm giving this book to our neighbor (after all, it was his pool party!) for his birthday next week. He's color blind! Maybe the bling and all the hot colors won't hurt his eyes too much!
And keep posted - there's so much going on at the store. Check out my blog for the layout instructions for incorporating the store Make-and-Takes into layouts. And the Design Team has something in store for our blog followers - more to come at the first of the month!
Sharon
Friday, June 26, 2009
Large Pictures, and strips of Paper...

For me the pictures are always more important then the papers or the embellies...sometimes I like to go overboard with papers and embellies (well most the time I do) but this time I just wanted it
 to be about the pictures...
The strips on this paper really worked for me ... I was able to pick two strips and make this large picture the center of the layout.

I love paper that is layout this way cause then I just save the rest of the strips and use them for another project...sometimes I can even make a layout out of the little scraps...or a card :)
thanks for looking and happy scrappin'...
Don't forget to check out what the Design Team has in store for you at the first of the month...will you be joining in on the fun and games that we have planned for you?...
Thursday, June 25, 2009
Summer Smiles
 My double-page layout is of one of my favorite subjects, my nephew, Tyson. Our family all loves taking pictures of the nephews so I always have lots to scrap. These are various summer pics from last year. When I saw this month's kit, I knew these would be perfect for it.
 This layout made up for the lack of ink last month. :-) I stamped, inked all the edges, and inked even the stickers! Another fun thing we got this month was little bling sequins made by The Paper Studio. I loved the colors, and they matched so well with this kit.
If you need some inspiration for your summer layouts, stop on by!
Wednesday, June 24, 2009
 Who doesn't love shadows? I had so much fun taking Pea Pod for a walk and getting some pictures, but I didn't think that the pictures would come out better of us then of him! There were like action shots! I almost didn't print them, because I thought that they would look horrible! They actually came out so good that I got the bigger one of us!
 While scrapping this layout I played with cutting things up. First I only cut thin strips of paper for outlining the large picture. The biggest piece I cut was only 1"!!! This let me really stretch my paper and keep my album flatter (though if you know me, none of my albums lay flat....LOL)! I also cut up the word strip Sunshine. I think the next time I cut up words, I'm going to make sure that I don't ink where the words meet. I didn't really like the final lay out of the words, but I really liked the rest. **note to self, try it with things you don't like first!**
Tuesday, June 23, 2009
Something Exciting...
...is in the works for our blog followers - we appreciate you guys and want to get to know you better - so we have come up with a really fun idea! Check back for details!
"Fun in the Sun" Card
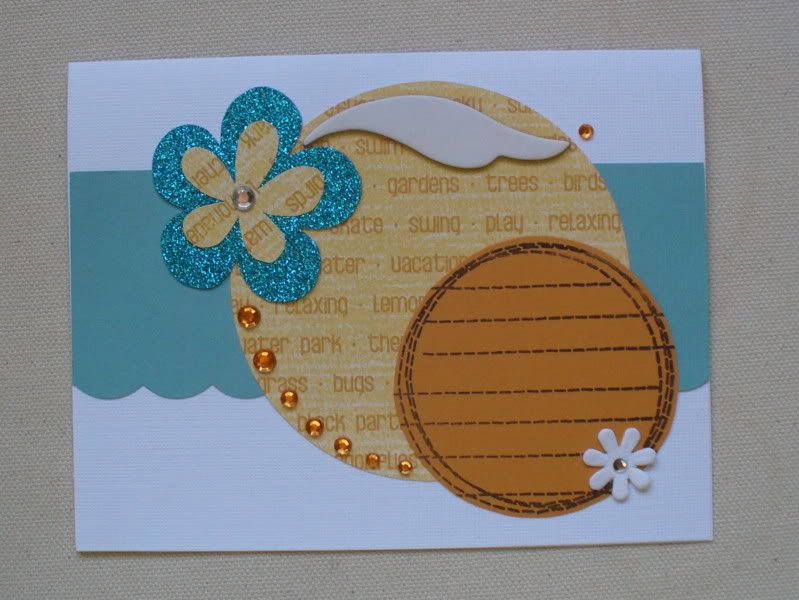
 I loved the phrases printed on the Summer Daze Words paper...pretty much a comprehensive list of all the activities associated with summer time.
.
.
.
.
To create this "Fun in the Sun" card, I simply trimmed out several strips, matted them on orange card stock, and arranged them to resemble the rays of the sun. I stamped the flip flops on cardstock, added a little bling for fun, and adhered them with red line tape, so that the one on the far right is actually holding the card closed.
The sentiment inside reads "Enjoy your summer - however you choose to spend it!"
Monday, June 22, 2009
Repeating a Theme
 I like to repeat things in my layouts. In this case -- circles. And this layout has lots of 'em! I started with a piece of the Flair paper. Since the paper is made up of circles, I decided to play off that theme. Add the orange color and it says summer and sunshine to me. So I used that to my advantage so all the orange circles repeat the idea of sun & sunshine.
The next thing I grabbed were the Jenni Bowlin chipboard suns. Luckily I spotted these at Scrapbooks Plus when I stopped by for the kit. You get two suns in each package and the centers are removable which makes it easy to alter. The center is covered with more Flair paper but I decided to leave the rays white.
Next I placed a bit of the Best Creations paper underneath the sun -- polka dotted to keep with the circles. Below the sun I added a round journaling sticker from Basic Grey.
The Flair paper has this lovely swirl just off center of the paper. When putting the pieces together I took my exacto knife and cut around the swirl so I could slide my photo and paper underneath. I centered the chipboard sun in the middle of the swirl so that the whole swoosh leads you right to the sun and my title.
Working with a lots of circles = lots of sunshine!
Sunday, June 21, 2009
Pinwheels

When I saw this paper I knew just how I was going to use it -- pinwheels. This double-sided paper is perfect because it has two distinctive patterns and has a nice weight so it's not too flimsy. It would be a nice centerpiece for a summer picnic or child's party.
I found a pattern here and printed it out the size I wanted. After cutting out my pieces I used a crop-a-dile to make the holes in each arm, as well as a hole in a straw. The pinwheel is held together by a brad. Although it won't easily turn, it sure is pretty!
I found this pail in the Target dollar aisle. The pinwheels are held in place by a bit of floral foam. I used some of the glitter paper to cover up the floral foam.
Saturday, June 20, 2009
Paper Piecing with Stamps
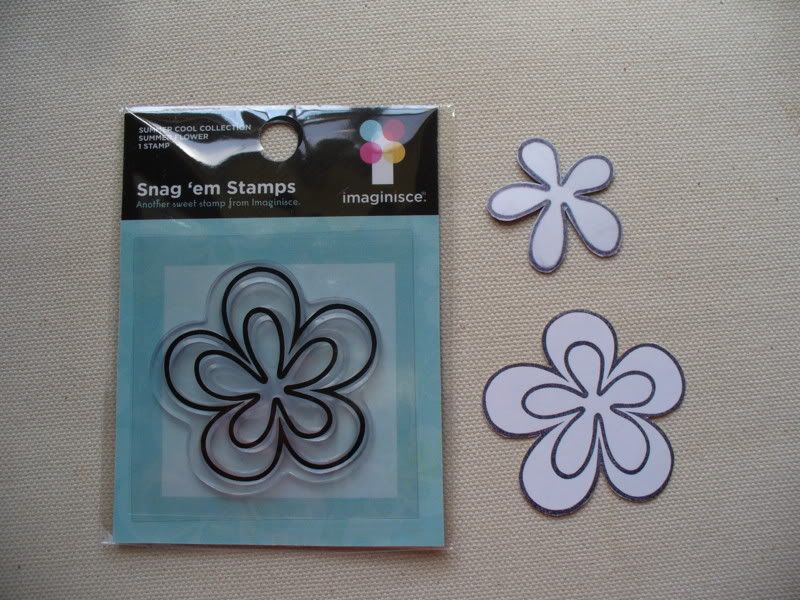
When I picked up my DT kit this month, I was excited to see an cute, little clear stamp of a flower. The simple lines of the stamp make it perfect to use as a paper piecing pattern.... and it's really easy. Here's how:
First, you stamp your design onto as many pieces as there are parts to the stamp. This flower had 2 distinct parts... so I stamped it onto 2 pieces of paper. I stamped on the back for a couple of reasons. First, to elimate having to cut the parts out perfectly... since the lines are hidden, no one will know if I'm a little bit off. Second, one of my papers was glitter paper and it really wouldn't work well to stamp on. (And you'd go blind trying to cut it out!) Just be sure to be consistent with your stamping, and stamp all on the front or all on the back so that your pieces fit together properly.

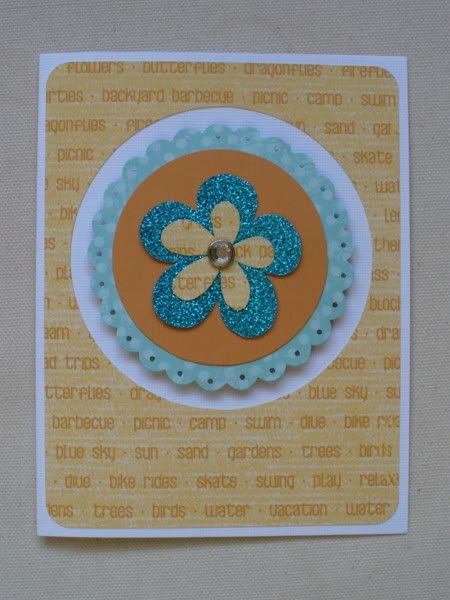
My paper pieced flowers made their way onto a pair of summery cards. It would be nice to make a set of four, add stamped envelopes, and tie them up as a little thank you gift.
thanks for stopping by!
erin
First, you stamp your design onto as many pieces as there are parts to the stamp. This flower had 2 distinct parts... so I stamped it onto 2 pieces of paper. I stamped on the back for a couple of reasons. First, to elimate having to cut the parts out perfectly... since the lines are hidden, no one will know if I'm a little bit off. Second, one of my papers was glitter paper and it really wouldn't work well to stamp on. (And you'd go blind trying to cut it out!) Just be sure to be consistent with your stamping, and stamp all on the front or all on the back so that your pieces fit together properly.
My paper pieced flowers made their way onto a pair of summery cards. It would be nice to make a set of four, add stamped envelopes, and tie them up as a little thank you gift.
thanks for stopping by!
erin
Friday, June 19, 2009
Best Creations Paper
 I'm a big fan of Best Creations paper...I love the way their lines use glitter without the glitter getting all over everything else in your scrapbook. AND the papers are double sided and heavy...great for layouts, projects and cards. On this layout, I cut out the kites to make my own embellishments and strategically placed them to fly with Nicky's kite.

Even the small kite worked out well when cut out to embellish the title. (notice I added a strand of black thread to make a little tail for it!).
When I finished the layout, I had some paper left over so I made the way cute card using the reverse side and one stripe I hand cut. The flowers were stamped and colored with watercolor pencils.The sentiment is a stamp from Hero Arts.

Thursday, June 18, 2009
June Fun
 Ok, so after my adventure with glitter on my 12x12 layout, I decided to go crazy. I made a box out of glitter paper! I got the directions for a mini pizza box from Splitcoast Stampers. I recommend Tacky Tape or Red Line Tape to adhere the glitter paper together. I cut out the top and added acetate and then embellished with some rub-ons, ribbons, and a few buttons.
The card is a 5 1/2 inch square card using scraps and embellishments. Cards are a great way to use up those little scraps instead of throwing them away. So pick up those scraps and try out a few cards!
Wednesday, June 17, 2009
 This kit was difficult for me! I didn't have a lot of pictures that I really could use and I was clueless what I was going to do! Then one day I got to play with my Pea Pod!! We had SO MUCH FUN! And even though we weren't at the beach and we didn't fly a kite, we played hard, and of course we ate marshmallows!!! I think that he loves them almost as much as I do! I wanted to try something new with my layouts and use a very large picture. I started out with a 10" x 12". That didn't work for me so I trimmed it down to about 8" x 12". This seemed to start flowing for me! When I started working it just seem to fall together! I really enjoyed using pieces of papers that I didn't expect to use, but I really was glad that I did it! If you haven't tried using huge pictures, get a couple the next time you're at Costco and play around with them!!! You may find a new fun way to scrap!
Tuesday, June 16, 2009
Chantilly's Got Talent!
Probably the best thing about being on Design Team is the opportunity to learn from some really talented scrappers. Like all team activities, it also brings you face to face with challenges. I have to admit, this month's kit was a challenge for me. Here's why: I have no idea what to do with printed paper with words on it.
That's why I was blown away by all the amazing work on this month's wall. In dulge me while I gush over some of my favorites.
Check out how Deborah used the paper. She took advantage of the print to make it her title "the Sun" and also used the coordinating paper as part of her photo block. (I also love the way she used the circles to break up all the linear look of this! Notice the triangle!) LOVE! LOVE! LOVE! This layout!
 Sharon's page made me stop and stare. I still can't figure out how she made these pieces flow so well into each other... and the photos move seamlessly with the print. It all creates a feeling of waves and movement. Notice how she carried through the circle with the candy dots.
So many great ideas to steal, I hardly know where to begin! Awesome Sharon!
And of course our "DOM" (Designer of the Month!)
Esther captured that same spirit of movement with her PinWheel layout... What a great idea for two sided paper.
If you haven't been by the store this week, make sure you stop in and check out these amazing designs...
If you're like me, you'll head home with a bag full of paper and your brain bulging with new ideas to try!
Thanks for the inspiration, Ladies!
Loretta


That's why I was blown away by all the amazing work on this month's wall. In
 dulge me while I gush over some of my favorites.
Check out how Deborah used the paper. She took advantage of the print to make it her title "the Sun" and also used the coordinating paper as part of her photo block. (I also love the way she used the circles to break up all the linear look of this! Notice the triangle!) LOVE! LOVE! LOVE! This layout!
 Sharon's page made me stop and stare. I still can't figure out how she made these pieces flow so well into each other... and the photos move seamlessly with the print. It all creates a feeling of waves and movement. Notice how she carried through the circle with the candy dots.
So many great ideas to steal, I hardly know where to begin! Awesome Sharon!
And of course our "DOM" (Designer of the Month!)

Esther captured that same spirit of movement with her PinWheel layout... What a great idea for two sided paper.
If you haven't been by the store this week, make sure you stop in and check out these amazing designs...
If you're like me, you'll head home with a bag full of paper and your brain bulging with new ideas to try!
Thanks for the inspiration, Ladies!
Loretta
Monday, June 15, 2009
Altered Fun
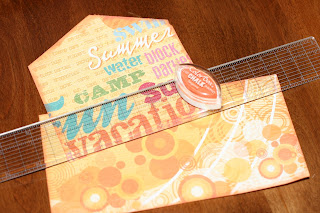
This cute little project didn't take anytime at all and it is cute and functional. With all the summer picnics coming up you can use one or several of these little holders on your tables to hold condiments, plastic ware, napkins, etc.


Sunday, June 14, 2009
Let's go fly a kite!
 This month's kit had so many fun items in it- it was hard to know where to start! Sharon and I were talking about it when she mentioned that she had an idea for a kite LO. It immediately made me think of these pictures of Logan flying a kite for the first time a few years ago. I had put these pictures aside until I found the perfect paper to scrap them with- and this kit was perfect for it! Thanks for the idea Sharon!
I wanted to use the Lets Go Fly a Kite paper by Best Creations so I cut a piece of it to use as my title. I also used some of the Walking on Sunshine paper by Flair (which I have to say was my favorite paper in the group!), cut a thin strip of the glitter paper and stuck it all down. This was a really quick LO to put together. I knew when I had everything down that my LO needed something more so I cut the kite and the word kite with my Cricut. The word kite actually was done on white cardstock that I colored with Copic markers (which are my newest scrap addiction) and sprayed with some Glimmer Mist.

I took the Copic Marker class that Laura Petruso taught in May and learned so many new and exciting things about Copic markers. Laura is teaching more Copic marker classes at ScrapbooksPlus in June and July. If you have any interest in Copics you should definitely take Laura's class- it rocks! I also used the Copics to color in the flower stamp that came in the kit. so much fun!
Check out the ScrapbooksPlus website and see all the great classes that our teachers have to offer. it's a great way to learn a new technique!
Enjoy!
Lisa
Saturday, June 13, 2009
OBX - little surfer...

When I seen this paper I knew exactly what I was going to do with it...
We had plans to go to the OBX, so I did my layouts before we left, and while we were at the beach I just waited for the perfect times to shoot some pictures of my son...He was not happy that I was taking pictures instead of helping him catch his "surfboard".
The very top circle was not a planned circle...however sometimes scrapbooking layouts have to be modified...like when you throw your stuff in the back of your truck and don't really think about what else you throw in on top...Well I spilled oil on top of mine...so in order to cover up the spot. I just modified the layout and added an extra circle.
The arrows that I used they were some bazzill chipboards pieces that Scrapbooks Plus has...I thought they were kind of fun...and added a little bling...but unlike the card I made you do not need sunglasses to look at this layout...
Thanks for Looking and have a happy Saturday...
P.S. Start looking for mine and Susie's class next month. :)
Friday, June 12, 2009
Chomp, Chomp! by Esther

 The summer theme and bling appealed to me for this month. But also, I was excited to get my hands on the Crop-A-Dile Corner Chomper. It was shown in magazines several months ago. I had to have one. When Scrapbooks got them in, I was there. What a great tool to add to your collection.
I "chomped" corners to my heart's content over into the night. It has a quarter inch & a half inch corners. The bits of paper from the corners are caught in the device. These are easily emptied when you are ready. This tool makes it easy to see that your corner is in place before cutting both lightweight and heavier weight corners. I tried it on cardstock , then chipboard. Next was the acrylic pieces. It is great!
The mini album shown is a product of my excessive use of the Chomper. This mini album is a way to show some of the summer photos, I look forward to taking soon.
You can cut the chipboard pieces to sizes desired at the store. Look under the DT Wall for the cutter. The summer & play themed papers are Flair & Best Creation. Glitter cardstock was easily cornered with the chomper. The paper & cardstock can be adhered to the chipboard and after it is dry, both are cornered for a smooth cut.
Get your hands on this tool & chomp, chomp!
Thursday, June 11, 2009
Glitter!
 Ok, I have to admit, I was very nervous when I saw this kit. Anyone who knows me well knows that I am not a bling, glitter kind of girl. I've used Stickles before, but only in tiny amounts as flower centers, etc. So I did my best to try something new and put glitter paper on my layout. For this layout I picked some pictures of my class last year releasing our butterflies. The kids love this and always hope the butterflies land on them. In five years of raising butterflies with my kiddos this is the only time it has happened. This butterfly landed and really wanted to hang out. Luckily I had my camera ready!
For the bling portion of this layout, I used the Graphically Speaking Cricut Cartridge to cut out the butterfly. To cut the glitter paper, I used the Deep Cut Blade since this paper is thick. I also decided trying not to use ink was for the birds! So I went crazy and ink to match each color paper and inked everything in sight! Come on over to the store and check out all the projects in person, pictures won't give you the full effect with the glitter this month. Happy Scrappin'!
Wednesday, June 10, 2009
Shaker Card!
 Did you shake this at the store yet???
When I started, I really didn't know what I wanted to do, until I found my clear beads at the bottom of my tote! This card started off pretty basic. I used the wave paper to mat the front of the card and I knew that I wanted to cut out the flip flops and pop them on top!
So you ask, how did I make the shaker part, this part is easy AND I learned it from a Rusty Pickle class that I took at GASC last year. (BTW, Rusty Pickle will be teaching a class on thursday before GASC at Scrapbooks plus! How did we get so lucky?!) Anyways, to make the cover, I took a package of letters and took the plastic wrapper off and started cutting the plastic to the size that I needed! Yes, I recycled the trash from letters I used in another project to make my card! I'm being green, are you? After I got the size correct I laid the clear film over my my wave paper. I then took a blue copic marker and traced some of the waves. To give it the contrast, I then turned the film over and glued it down with the drawings on the bottom side, only pushing down on three sides. The last side I waited to close until I got a bunch of beads in there. I used micro beads so that they would roll around easily and not just stick there. Finally after all sides are put down I glued down a blue sparkle frame to finish off the look!
On a side note, I also cut apart the stamp so that I had a right and a left foot that I could stamp each by themselves. It made it so much easier when I was cutting them out!
Happy Scrapping
Tuesday, June 9, 2009
A Moment in Time...
It doesn't look like a .25 cent garage sale find, does it?  I found the clock about a month ago and knew I would use it to create an altered project, but I was willing to wait for the right paper. And then Esther included the perfect stuff in this month's kit - the BEE-YU-TEE-FUL embossed, double-sided "A Kite Day Words" paper from Best Creations.
I found the clock about a month ago and knew I would use it to create an altered project, but I was willing to wait for the right paper. And then Esther included the perfect stuff in this month's kit - the BEE-YU-TEE-FUL embossed, double-sided "A Kite Day Words" paper from Best Creations. 
It is a pretty simple project. I removed the original picture insert from the clock face and used it as a pattern. I traced the circle onto a piece of vellum, so I could hold it over the patterned paper (and the picture) and pick out exactly which sections would work best. The shiny peacock blue ribbon was great to delineate the different sections.
.As soon as I saw the embossed kites, I wanted to cut one out to travel around the clock on the minute hand. I attached it with a little red line tape - so you know it is going to be "flying high" for a long time! Tip: I bent the end of the minute hand up very slightly to make sure it would clear the embellishments. I checked it every few minutes for the first hour and made the adjustment when I noticed it had gotten stuck.
 Tip: I bent the end of the minute hand up very slightly to make sure it would clear the embellishments. I checked it every few minutes for the first hour and made the adjustment when I noticed it had gotten stuck.
 The circular green frame on the upper left of the clock face came off of the Flair Designs Summer Daze die cut sticker sheet and made it easy to add a simple title. I set it with eyelets using The Big Bite from Cropodile. I tell you, that tool has completely changed my relationship with eyelets. It is so easy to use. Debbie has one in the crop room at Scrapbooks Plus. You should try it out - you will definitely be using more eyelets on your projects, too!
.
Several good things about this project: it was really inexpensive - it was quick and easy - I can see myself changing the picture and the paper at a later date (maybe even seasonally)- and I think this would make an awesome gift for someone - because everyone needs to know what time it is!
Sunday, June 7, 2009
Wave Runner

I must admit that I do love Deborah's and Erin's clean graphic designs and how the "less is more" theory works for them...because it really does...for them. I look at their work and go "Wow! Why can't my pages look like that?" I have figured out the answer...because I just can't do "less is more". I've tried - really I have - but I just have to have "stuff" all over the page. My problem is deciding when "more" isn't "too much"!
On this layout of my nephew and my youngest son Nicky at the beach, I started with just cutting the yellow circle out of the Flair patterned paper to put in the center of the two blue background pages. Then I added different sized circles punched from cardstock...then the candy dots... then the waves from flourishes cut on the Accu-cut at Scrapbooks-Plus (you can use those punches any time you want BTW!). Then, that wasn't enough, so I added Glossy Accents to the circles, then to the waves, then to the white "bubbles" in the design of the blue Flair paper. Then I thought about stickles or some glitter and thought "maybe too much" so I stopped.
I'm sure there are other "stuff" addicts out there like me. I suppose the key is to find the style that suits you and the good sense to know when "enough is enough"!
Happy Summer Scrappin'
Sharon
Saturday, June 6, 2009
Cricut

Happy Saturday Everyone,
Did you know that you can rent Scrapbook Plus' Cricut Machine. You pay $3.00 for a session and you can use any of the many cartridges that they have, all you have to do is bring a 12x12 cricut mat. (this is a good oportunity if you are thinking you might want to upgrade to the expressions from the little one to try it out) If you don't have one you can purchase one threw the store and it is so nice...if you are a card maker and want to make some fun shapped cards they have the wild card cartridge avaliable.
Now you might need sunglasses to read this card but it says "oh happy day" ... and I did the whole thing on the cricut...come by the store and try it out...and then share with us what you made...add a comment with a link and we will check it out...we love to see your work!
Enjoy the rest of your Saturday, I am off to do Prom Pictures :)
PS, just as a side note, you do not have to use the deep cut to cut the glitter paper, I just use multi-cut and it cut it without an issue...smooth like butter :)
PS, just as a side note, you do not have to use the deep cut to cut the glitter paper, I just use multi-cut and it cut it without an issue...smooth like butter :)
Friday, June 5, 2009
Working With the Theme
Just like Erin, I was also drawn to this paper from June's kit. I liked the repeating circles and thought it would make a nice accent in my layout. So I added three circles along the edge - a journaling block from My Mind's Eye I picked up at Scrapbooks Plus and several stickers combined with a little bit of sparkly paper.
For this layout, I went with the "less is more" approach. I used smaller sections of the papers and balanced my photo/paper block with a wide neutral border. When you've got a bunch of photos and/or busy patterned paper, sometimes it really helps your layout to leave a lot of white space for the viewer's eye to rest.

For this layout, I went with the "less is more" approach. I used smaller sections of the papers and balanced my photo/paper block with a wide neutral border. When you've got a bunch of photos and/or busy patterned paper, sometimes it really helps your layout to leave a lot of white space for the viewer's eye to rest.

Go Against the Theme
There is some paper that you can only use for certain layouts. You know what I mean... the paper that is only for Christmas or birthday or baby shower. However, there is a lot of themed paper that can be used outside it's orginal purpose. Perhaps the themed part isn't recognizable in small pieces and cropping it down is the answer. Perhaps the themed part is easily avoided by covering it up. Or perhaps the paper was part of a themed line, but the actual piece really isn't theme specific and could coordinate with other lines.
For example, our kit this month was full of spring and summer themed pieces... kites, beaches, sand, water... the works! One of the sheets of patterned paper was a sheet of 12-inch strip designs. I liked this curvy, orange strip the best and cut it out right away. I loved the color and the circles on it, and I knew I wanted to use it. The phrase on it was "Soak up the Sun".... but I wanted to use my early spring moss photo... so I just covered up the phrase with the matted photo. Since my photo isn't about summer or sunshine, but the colors and circles are just right for what I wanted, this was an easy fix. Yes, if you look really, really closely you can see a little bit of an "S" peeking out from the left and a little bit on an "N" peeking out on the right... but if you aren't looking for them, you'll never see them. The round design on the paper, the curve and the additional circles and buttons work perfectly with the water droplets in the photo.

The next time you see a piece of themed paper in the store or in your stash... look past the obvious and see if you can use it in a new and different way!
thanks for stopping by!
erin
For example, our kit this month was full of spring and summer themed pieces... kites, beaches, sand, water... the works! One of the sheets of patterned paper was a sheet of 12-inch strip designs. I liked this curvy, orange strip the best and cut it out right away. I loved the color and the circles on it, and I knew I wanted to use it. The phrase on it was "Soak up the Sun".... but I wanted to use my early spring moss photo... so I just covered up the phrase with the matted photo. Since my photo isn't about summer or sunshine, but the colors and circles are just right for what I wanted, this was an easy fix. Yes, if you look really, really closely you can see a little bit of an "S" peeking out from the left and a little bit on an "N" peeking out on the right... but if you aren't looking for them, you'll never see them. The round design on the paper, the curve and the additional circles and buttons work perfectly with the water droplets in the photo.
The next time you see a piece of themed paper in the store or in your stash... look past the obvious and see if you can use it in a new and different way!
thanks for stopping by!
erin
Thursday, June 4, 2009
Soak up the sun!

This month's DT kit was so much fun to work with. It was full of summer colors and lots of glitter! When I saw the Summer Daze Pieces of Flair paper it made me think back to our vacation at Topsail,NC. I knew I wanted to use the Sky Blue glitter paper but when I cut my shape out from the Cricut machine at ScrapbooksPlus and put it on the background paper it got lost. So, I decided to put some orange cardstock behind it. It worked really well in creating the contrast I was looking for. I felt like I had the same problem with the picture I had used- so I picked out a lighter orange cardstock to mat the picture.
One of my "new" favorite products to use is actually something I have had in my scrapbook room for a while- it is Glossy Accents by Tim Holtz. I wanted "the Sun" to stand out more on the paper so I used the Glossy Accents to make it pop. It is hard to tell in this picture but when you go look at the DT wall you can tell.
Stop by ScrapbooksPlus and check out the DT Wall. The DT members out did themselves this month- the projects are fabulous!
Enjoy!
Lisa
PS- Make sure to check back to the blog later this month~ we have something in the works for our blog readers!
Monday, June 1, 2009
"Sunshine" Single Page with Circles
I was completely inspired by all the cool circle designs printed on the Flair Summer Daze Words paper. It made for a really easy layout.  I trimmed the top and left side of the paper to make it 11.5" x 11.5" and mounted it on some orange card stock. The pictures were cropped into circle shapes and mounted on more of that vibrant orange. I used some pop dots to vary the height of a couple of them and added a circular journaling block. If you look closely you will see 3 small eyelets on the bottom left and upper right of the page, just repeating the theme of orange circles! With all of the great words already printed on the page, any of which would make a perfect title for this page, I didn't feel the need to create an actual title. This is probably the fastest layout I have made in a long time - and I love it!
I trimmed the top and left side of the paper to make it 11.5" x 11.5" and mounted it on some orange card stock. The pictures were cropped into circle shapes and mounted on more of that vibrant orange. I used some pop dots to vary the height of a couple of them and added a circular journaling block. If you look closely you will see 3 small eyelets on the bottom left and upper right of the page, just repeating the theme of orange circles! With all of the great words already printed on the page, any of which would make a perfect title for this page, I didn't feel the need to create an actual title. This is probably the fastest layout I have made in a long time - and I love it!
Subscribe to:
Posts (Atom)