Friday, October 31, 2008

Happy Halloween ...


... card that is! Use your square punches with patterned paper to punch out individual pictures. For this card I backed my punched-out squares with a copper paper from Die Cuts With a View and then black cardstock before mounting them on my card. Along the bottom I added a metal accent from 7gypsies.

Thursday, October 30, 2008

Jumping the gutter


Did you know that the space between two pages is called the "gutter"? Well, up until a couple of weeks ago I didn't (thanks Cathy Z)! Until recently, I had never gotten into putting pictures across the gutter. I was scared to cut my pictures like that! In this LO using the papers from the October DT kit, I decided that I didn't really want to crop my photos of pumpkins. So to be able to fit all the pictures I wanted, I "jumped the gutter" with my photos. Here is how I do this. First I set up my LO the way I want it, place the two background pages together so that they are touching. Then I glue everything down (to include gluing the pictures I am going to cut that are jumping the "gutter"), turn it over and use my Fiskars Fingertip craft knife and cut the pages apart. Now you are going to want to be careful what you are cutting- you probably don't want to cut an important part of the photo- like cutting some one's face in two may not be the best option! This way works best for me. So on your next LO try to "jump the gutter"! It's fun!

Tuesday, October 28, 2008

Hello Jack - Time for your Lobotomy!

When those words popped out of my son's mouth as he started to carve his Halloween pumpkin, I cracked up. When he explained it came from a Calvin & Hobbes cartoon, I knew I had a layout in my future. Lucky for me that Lisa picked such great papers from the Creative Imaginations Trickery Line and My Mind's Eye for the Design Team kit this month!

This layout is a little different from my normal style. I was going for a collage effect. It allowed me to include lots of different elements - stamps, chipboard, ribbon, dimensional stickers, machine stitching, a charm, more stamps, more stickers - and a comic strip of course!

The comic strip was actually my starting point. I pulled out my I-kan-dee Chalks by Pebbles, Inc and used some orange to accent just the pumpkins. I also added a little ink around the edges to soften the stark white of the paper.

Next up was the chipboard pumpkin, which I colored with Stazon ink and then heat embossed with Holographic Embossing powder. I enjoyed that so much, I decided to stamp and emboss some leaves to use as a sparkly accent.
Lisa included Tim Holtz Fragments in the kit this month - something I had never played with before. I had 3 very small pieces to work with but they were the perfect match for the Creative Imaginations jack-o-lantern paper, which is covered with little Halloween themed icons. I snipped out a few, inked the edges with a touch of orange, and used Memory Mount to glue them to the fragments. What a cool and easy way to add dimension!
The die-cut mini page from Teresa Collins and the journaling block from Creative Imaginations added another eclectic touch to the collage. Bright green thread for the stitching pulled out the bits of green in the pictures and added a subtle punch of color.

I used several stamps as accents around the page...words, pumpkins, spiders...as well as the dimensional stickers from the kit.

The last item I added was the circular sticker of the trick-or-treaters. Believe it or not, it came inside a big bag of Doritos! It was a perfect find - the striped background echoed the striped paper, and the image illustrated the word stickers just above it. Serendipity!

Like I said, this was a different kind of layout for me, but it was a lot of fun and a little bit of a challenge. I think I will step outside my comfort zone more often!

Monday, October 27, 2008

Fun with Scalloped Paper!

These scalloped papers from Creative Imaginations were part of our October kit. They can really make a great frame for your photographs, but don't let them scare you!

The scalloped edges can really have a dramatic effect on your page, especially layered over another strong color like this orange Basic Grey paper.

I used one piece of the black scalloped paper for both these layouts. For "pick," I first decided where I wanted my photo to be, then cut the scalloped paper so that the edge peeked around the side of the photo. I then took the leftover strip and used a section of it on the bottom layout on top of my photos.


Working With Crazy Colors

Halloween, like many other holidays, can result in some brightly colored photos. With all of the costumes, you could have quite a few crazy colors to work with, which could become a problem for you when you go to scrapbook the holiday. There are a number of options to fix this.... you could print your photos in black and white, but sometimes all the colors of the season are a part of what you want to capture. You could coordinate your children’s costumes... but sometimes they just won’t cooperate. Another option is to just go with it and use a simple color scheme to reflect the holiday without being overwhelming.


The last option is the one that I chose to use for this page. I had five pictures. Some were from my digital camera, some were from my old APS camera, and some were given to me by friends. When I got around to this layout it was late and night and I didn’t really want to scan them and order prints, or take them to one of the printing kiosks to see how they’d look in b&w or sepia. Instead I decided to keep the color scheme really simple: dark gray, black, white and orange. The die-cut mini-pages from Teresa Collins were the inspiration. I searched through my stash and found this old paper from Scenic Route to coordinate. The orange dot works with the die-cuts really well as they both have the same color and the simple, clean feel. The orange is almost a little burnt and brown looking, making it seem to be even more of a neutral.

Thanks for stopping by!
erin

Sunday, October 26, 2008

7 Days in October


Digital version using different paper. (Mainly because I used up all the retro-looking paper on a another project. Oops.) Since you can't see the journaling, I added tabbed days to keep track of the week.


Ali Edwards recently asked her readers to play along as she created an album focusing on a week in her life. As I photographed my days and wrote about them, I began to wonder if I could turn this project into two projects. The first would be to create a two-page spread that included three photos from each day along with a small bit of journaling to explain what I did on those days. The second project would be the much more inclusive mini book.

With a mini book, you can create as many pages as you want and journal to your heart's desire. But with a two-page spread, you're a bit limited in what you can do. So the challenge was to see how I could get those 21 photos and journaling onto a spread without turning the whole thing into one big visual mess.

I started by opening up Photoshop and creating a document 24 inches wide and 12 inches deep. All my papers were scanned in, so all I had to do was layer them where I wanted them. My kraft paper would be acting as the frame for the photo grid. I took the width of that and divided by seven, having decided to represent the days of the week horizontally. Doing that allowed me to place three photos in each day's column. To get the height of each photo, I took the height of the kraft paper and divided by three. I rounded that down a little to accommodate my gutter (the space between the photos and the edges of the paper frame). What you see below is my sketch with all my widths.


Now it was just a matter of sizing all my photos and placing them on the page. Right now you might be wondering why I didn't just print the photos and start trimming like a mad woman. I thought about that. But then I thought that it would be much easier printing out one grid of photos rather than cutting out 21 photos, each with four sides, which is 84 cuts. Yikes!! Ouch!! My poor fingers! By printing out one large photo, I was saving myself, my trimmer and a piece of kraft card stock.

Once I had my measurements, I was able to open my photos and begin to size the them. With the crop tool in Photoshop, you can enter your dimensions and resolution to get the perfect size with each crop.


Now that all the photos were the right size, it was time to line 'em up on my screen. Using Photoshop's grid made the whole thing insanely simple.


Once everything was in place, I was ready to print. Or was I? My photo collage is 17 inches wide, which means it jumps the 12x12 gutter. Why not print out each side on 8.5x11 photo paper and then line 'em up on both 12x12 sheets? Perfect! (I also don't happen to own 11x17 photo paper. I do, though, have 8.5x11.) It worked beautifully.

I trimmed all my card stock according to my digital version and then started adhering everything, making sure to leave the bottoms of the photo collage tape-free. My journaling would hide here. Rather than write it out by hand, I created a chart for each day of the week in InDesign. The weekday sort of lines up under the corresponding photos, so when you pull it out, you see the word Monday first followed by the journaling. Here's one half:


Photoshop also came in handy with creating the title. I couldn't find a 7 big enough to make me happy, so I printed one out and made my own chipboard 7, which I then covered with glitter and hairspray. (Thanks, Lisa!) The chipboard pumpkin was first inked with StazOn (pumpkin -- seriously!) and then covered with Doodlebug glitter and hairspray. The leaves were the finishing touch.

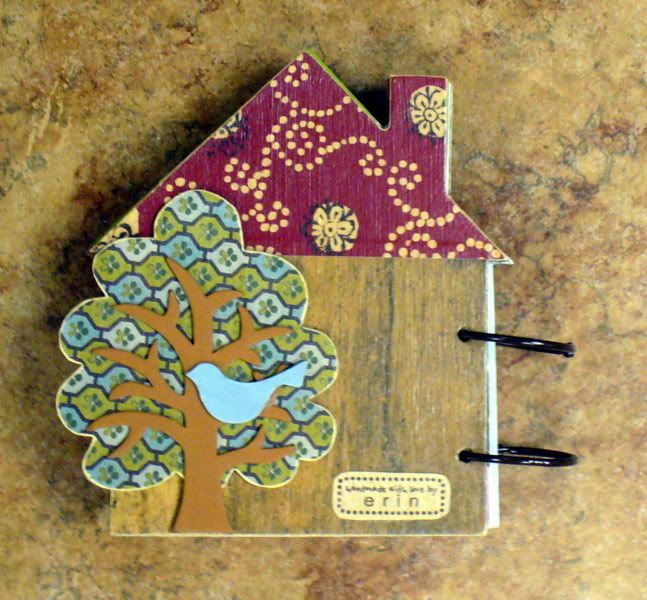
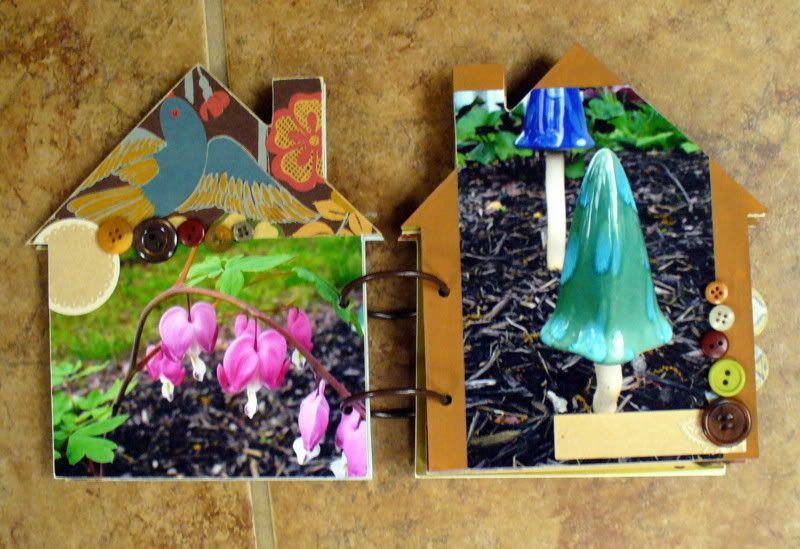
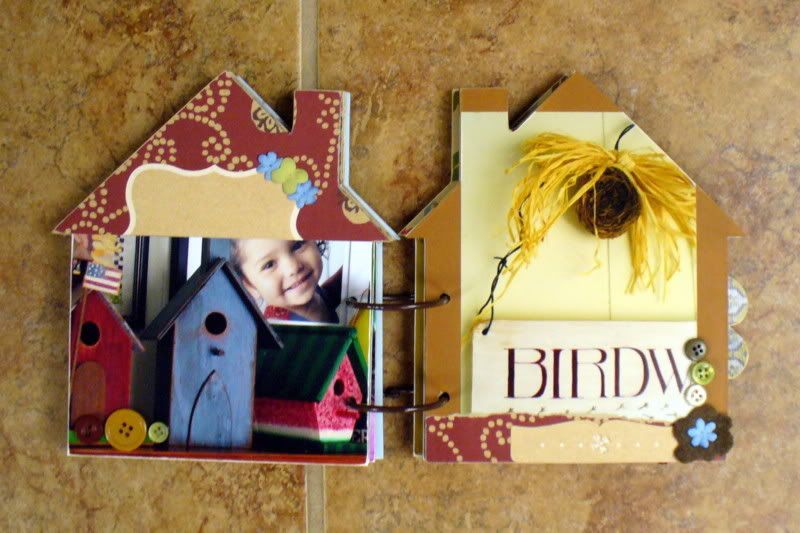
Ali's project was a ton of fun and I highly recommend documenting seven days in your life. It's really cool to be able to see everything you do in a regular week. Years down the road, we'll probably forget how we spent this time, and this helps remind us of all that we did. Now it's time to break out the mini book project!

Saturday, October 25, 2008

The Fall Guy

I mentioned in an earlier post that I "collected" techniques. This layout has a new one I had not tried before - one that shows both sides of a double sided cardstock.

I started with the placement of the print in the upper right corner. Using my paper piercer, I carefully marked where I wanted the picture to go...making the holes about 1/4" smaller than the 5x7 print. Using my exacto knife, I sliced an "X" connecting those holes. Instead of just folding the flaps back, I decided to roll them (over a pencil) to add dimension to the layout and reveal the pattern on the back of the cardstock at the same time. I used my ATG gun to lay down stripes of adhesive to hold the rolls in place. The picture was taped to the back.

Next I pulled out my Scrapboss from Fiskars and the sampler embossing template that came with it. The metallic-looking cardstock in our kit this month was very easy to emboss and I decided to make a pattern of falling leaves. I will confess that I originally had some ideas to enhance the leaves - but the Ranger Inks and the Stazon just disappeared into the cardstock! If you look at the bottom edge of the embossed strip you might notice a colored leaf peeking out from under the picture. I started to play with my Pearl-Ex powders - but I wasn't happy with the results I was getting, so I let it go. I decided the embossing alone was strong enough for this design.

I also cut letters out of the metallic cardstock - although if you look closely, you can see that the "A" is actually cut from metal (using Sizzix "Nouveau"dies). The letters were mounted on pieces of dark cardstock and accented with the cool leaf brads that came in our kit - I really liked the variety of finishes they came in -copper, pewter, brass. The rest of the title was cut with the Cricut "Jasmine" cart.

Notice the scalloped edges Kathryn mentioned in her post - they are fun, easy and add a subtle detail.

I snipped one of the journaling blocks into 2 pieces just for visual interest, and added the double layer of ribbons, pumpkin charm, and the cool scarecrow sticker. I'll add the actual journaling when the layout comes home - my 15 year old son deserves a little privacy!

Friday, October 24, 2008

Tutorial: Quick & Easy Scalloped Edges

I love the scalloped edge trend that is so popular these days. I even got my scalloped edge scissors out of their case on the "retirement" shelf of my scrap closet so I could add the edge to more projects. Here's an example of how I used this trend recently on one of my projects:


There are several ways to add scalloped edges to your pages. Here are just a couple that I use on my own projects:

1. Use a Scalloped Border Punch or Scalloped Edge Scissors: both these methods work well. I don't have a scalloped border punch (I want one, though!), but I do use these scalloped edge scissors pretty frequently:


To make sure my scalloped edge is straight, I turn the paper I'm going to use over to the reverse side and draw a straight line with a ruler and a pen or pencil. Then I cut along the line so my scalloped edge comes out perfectly straight every time!

I have two sizes of scalloped edge scissors: small and really small. This limits the size of my scallops. Which is why I had to use a different method for the larger scallops on my card.

2. Use a Circle Punch to Create a Scalloped Edge: I first saw this technique used by Kristina Werner on her "Simple Mother's Day Card" video. She makes beautiful cards and posts tutorials of the process on her fabulous blog. Ever since I saw her use this technique I have been in love with it and using it everywhere. I wanted to share it with all of you because it is so versatile!

Very simply, you just use a circle punch (any size!) to punch out several circles from a sheet of cardstock or patterned paper.


Then run a line of glue on the reverse of the paper you'd like to have a scalloped edge. Starting in the center, glue the circles onto the paper so that they are half on and half off the paper. Sometimes you might need to make some adjustments to get them all aligned perfectly, so don't press them down hard into the adhesive until you're sure they're exactly where you want them.


When you turn it over, you will have a beautiful scalloped edge showing! And, if you'd like to save paper, or if you decide you want a scalloped edge after you've already glued down your paper (which happens to me all the time), you can cut the circles in half and glue them in a row along the edge of a sheet of paper that has already been adhered to your project.

This is a quick and easy way to add scallops of any size to your projects. I hope you have fun playing with this technique as I do!

Wednesday, October 22, 2008

October RAK


I absolutely fell in love with the Creative Imaginations papers from this month's DT kit. I enjoy the fall- the cool, crisp air, the fall colors and the change of season. I designed this month's RAK with Fall in mind. This book is filled with great fall colors and will work perfectly with any fall pictures you take! I left the title up to you so I included Thickers in brown and a package of Creative Imaginations epoxy stickers in the fall theme for you to decorate. Best of all, this book is free! All you need to do is leave a comment and let us know what holiday/activity you like to scrapbook? For me, I love to scrapbook Halloween. We'll pick a winner out of all the comments on Nov 15th. And remember you can't win if you are a Scrapbooks-Plus employee or DT member! Good luck!

Monday, October 20, 2008

RAK winner!

Through the very scientific method of folding paper and drawing a name out of a colander, we have come up with this month's RAK winner!

Congrats, Leslie!! You can either pick up your book at the store or we can send it out to you. E-mail me at nlynn42@verizon.net with your address or give the store a call.

Need More Cowbell

Do you remember that Saturday Night Live sketch with Christopher Walken & Blue Oyster Cult? I love the line "Need More Cowbell" and my husband and I use it all the time when we feel something just doesn't have enough oomph/pizzaz/special touch/cowbell.

I felt like this layout needed more cowbell:


When I got to the point above, I liked it, and so I decided it was finished and went to bed. The next afternoon I looked at it again and I felt like it needed a little bit more to make it really special. So I added these photo corners:


Which I had to cut from the cardstock on the back of the layout since I had already glued everything down:


This is something I do pretty frequently to save paper, or because I make a change to my layout design. It's easy to do with a ruler and a craft knife. Just make sure that 1) you don't cut all the way through to the front of your layout and 2) you cover any exposed adhesive when you're through:


After I'd adhered the photo corners to the page, I looked at the layout again and I thought "Need More Cowbell!" so I took some of these Fragments by Tim Holtz:


And I added them to the page to highlight some of the spooky little images on the background paper:


Here is the finished project:


I liked the original, but I took some time to really sparkle it up & I am much happier with the result! So, the next time you finish a layout, take 24 hours to sleep on it and then look at it with fresh eyes and ask yourself, "Does it need more cowbell?"

Sunday, October 19, 2008

Quick Tips for Tiles

This month’s DT kit included some of the Tim Holtz clear acrylic tiles. There are so many things that you can do with these... but sometimes we all need a little push. So here are a few ideas that I used.

First I colored my tiles with Alcohol Inks. This is easy peasy! Just take your tiles, alcohol ink, and a non-stick craft sheet (or, if you don’t have that try putting down a couple of layers of cling wrap on your work surface). You can color the tiles a couple of ways:

1. You can drip the inks directly out of the bottle and onto the tile, tipping it to make sure the surface is covered, and, if you have extra puddles, you can carefully pour off the excess onto your sheet.

2. You can drip the inks onto the craft sheet to make a small puddle. Place the tile in the puddle and push it around to cover it in the ink. Pick it up carefully and set it aside to dry.


Generally I find that the first option gives me a more saturated color and the second option is a lighter color. Both look very cool with very little effort. If you don’t want colored fingers, use gloves. If you don’t mind being messy... the ink will come off in a couple of days! :)

First up – Colored tile with epoxy sticker... a simple and elegant feature for a card.


Second – Colored tile backed with patterned paper. Stick the patterned paper on with Glossy Accents or Zip Dry to cover the entire piece and avoid glue lines.


Third – Colored tile with stamping and heat embossing. Be really careful when you heat the embossing powder as you could melt the tile... I did a little bit on one edge, but it just adds to the look! You could also just stamp on the tile with an ink suitable for glossy surfaces like Staz-On... just be sure to stamp on the opposite side from the alcohol ink as the solvent ink will take off the alcohol ink. This card is a scraplift of Susie’s picture frame from last month. I swapped out the slide mount for a tag rim and tile.


Thanks for looking!
erin

Saturday, October 18, 2008

Showcasing a Great Photograph


Every now and then, I get lucky enough to capture a spectacular landscape scene on film. You know, those photos where the light is just right, the colors are brilliant and the detail is perfect. And it feels like such a shame to display all that beauty in the confines of 4"x6" or 5"x7" formats. So I say, blow it up and make it BIG!

Autumn is a great time of year to take those kinds of photographs. And making it big doesn't have to be difficult. The photo here of the tree line at Skyline is 10" x 14.5", but you don't have to have a large format printer to print it. Using Adobe Photoshop (and I have an OLD version) set your crop parameter for height to 10" and width to 8" and crop the first "half" of the photo, making a mental note where the "half" stops by picking out a landmark in the picture to overlap your second "half" with. If you have a printer, you can print the first half using the "portrait" setting on 8.5 x 11 photopaper or save it to a file for the printing vendor of your choice. Then undo your crop (or return to the original) and crop the second "half" with a height of 10" and width of 6.5". Start your crop of the second half at your landmark, leaving just a bit of overlap from the first half. Use the same steps as before to print or save to a file. When you save, make sure your file name reflects the dimensions you want the prints to have so the vendor you use won't be confused.

For a layout like mine, simply arrange both "halves" on the center line of your two background sheets - I used Basic Grey's "rust" from Archaic for the background in my layout. You will need to trim the overlap to eliminate any repetition in the photo. My layout was quite simple actually - a couple of strips of patterned paper on the left and a matted journaling block on the right. What I truly like about this layout is the supporting photos in the upper left field of the layout. Here I highlighted a few wildlife shots we took that day - including a Mamma Bear! This space can be used for any of the smaller detailed photos you might take - a close up of a few brightly colored leaves, milkweed pods opening, thistle heads, birds... whatever you see in your view finder.

I've used this design a few times - most recently to capture the breathtaking Napali Coast in Kauai. You can view that example at my blog (link on the right) on the September 1 post. All the product used in that layout also are all available at Scrapbooks Plus.
Layouts like these are great ways to scrapbook those landscapes that truly are larger than life!!
So get out there and capture autumn in all of its glory!

Friday, October 17, 2008

October DT work

I love the fall- especially Halloween and Thanksgiving. To me it's the kick off of the holiday season. For this month's DT kit I decided to use the Creative Imaginations Trickery line- it's the right mix of Halloween and Fall.


For this LO I went with some Halloween pictures of my boys from last year. I loved the Black circle paper from Creative Imaginations- so I backed it with the Rusty paper from Basic Grey. The "boo" title element is actually a scroll frame from Clear Scraps that I stamped with a cobweb using Staz On Black ink to give it a creepy feel. I backed with a scrap piece of paper and and used Thickers for my title. The orange flowers are from Bazzill and I inked the edges with black ink.


I made some bats from Grungeboard, covered them with Black Soot Distress Ink and put a layer of black Stickles for some sparkle. I bent the wings up to give them some pop and add dimension. Grungeboard is great for adding dimension to your pages- when you bend it it will hold the bend. I just picked up the new Grungeboard Holiday Shapes at ScrapbooksPlus- the set has a great variety of shapes for each of the upcoming holidays!

Monday, October 13, 2008

it's almost drawing time for the DT giveaway

.
Each month one member of the Scrapbooks Plus Design Team makes a wonderful finished project from the month's kit to give away as a RAK. That means that any one of you, our blog readers, can win this stylish project!

To win, you simply leave a comment on the DT RAK post. Remember, not every comment throughout the DT blog counts. Only by leaving a comment on the RAK post can you enter your name in the monthly drawing. Yes, that means you have to scroll back through all the fun posts about techniques and scrapping styles till you find the RAK offering :). This month's RAK post appeared on Sunday, September 21st (you can also click here on the highlighted date), and you have through October 19th to leave your comment there. And, of course, you are welcome to comment or ask questions on any of our blog posts whenever you visit.


What does RAK mean? It means "Random Act of Kindness," and the DT RAK project is made especially as a gift for a lucky Design Team blog reader. This month, using the Anna Griffin "Sierra" papers, DT member Nancy Palm made a gorgeous star book, fully assembled and waiting for your photos and journaling. It is among the many creative layouts, cards, and projects on the DT display board in the classroom, if you would like to see how it's made.

But first, hurry over to the DT RAK post and leave your comment to enter the drawing. Nancy would love to give her special mini album to you!
.

Quick Tip!

Hi all! Hope you are enjoying the Columbus Day holiday... or at least enjoying the lighter traffic since the government is closed! :)

I wanted to show you a quick and easy way to distress photo edges. I love this technique because is it SO quick and simple to do, but it’s adds a nice touch to a layout.

First, your supplies: a photo, craft mat, and a scrap of sandpaper. For the photo a matte finish is better. You can certainly use a glossy print, but the finished result will look more “scratchy” for lack of a better word. Your sandpaper should be 150 grit or more. Remember that the lower the number, the scratchier the sandpaper. 150 is the lowest I would recommend and I use 240 the most often.


Next, take your craft mat and butt the edge of the photo and the edge of the mat together. Fold the sandpaper over on itself with the scratchy side out and carefully rub along the edge of the photo. You’ll see the color start to come off and reveal the white photo paper. Sand until your satisfied with the look... remember you can always sand more, but you can’t go backwards! Repeat for the remaining sides of your picture.


Here is my finished layout... I love how the simple distressed edges highlight the photos without being busy or bulky.


Thanks for looking!
erin

Sunday, October 12, 2008

Make Mine A Mini-Book!

The Anna Griffin papers this month were so warm and cozy I thought that they would be perfect for a home-themed minibook. I knew that Scrapbooks Plus had a house-shaped die in the crop room, so I grabbed some of the free chipboard and cut myself out some chipboard pages. I have to say that once you do this, you will be addicted to the free chipboard options! I didn’t even know how to use the machine until a few months ago, but luckily Misty at the store was happy to show me how... and there are instructions posted right on the wall in case you are a bit rusty! (Thank you, Misty!)

I covered the front and back covers with patterned paper and several coats of Mod-Podge to seal it. For the back cover, my signature stamp on the back uses scraps of the back of the patterned paper... which for these Anna Griffin papers is plain kraft. I was really excited that the backs were kraft... because kraft paper goes with so many things, because it’s beautiful, and also because some kraft papers that you can buy out there are not acid free. With Anna Griffin you can completely trust that it’s safe for your photos. I added some chipboard accents and the Kaiser wood letter title painted with Tim Holtz crackle paint to the front and set it aside.


Now, I am not usually a mini-book maker. Don’t get me wrong, I love the look of mini-books that other people make, but tend to be overwhelmed with options to make it work for me. This month I really wanted to make a mini-book, so for the inside pages, I limited myself to only a few supplies: photos, patterned paper scraps, kraft stickers, buttons, and flowers in paper and felt. I pulled out all the buttons and flowers that were the right color scheme and no more. I did the same with the buttons... only the colors I was going for and nothing else! Each page featured a photo, a kraft journaling sticker, buttons, and flowers. Some of the felt flowers I had in the right color were just too big or the shape wasn’t what I wanted, so I took out my scissors and cut them down. All of the embellishments are glued on with Zip Dry so that they can take some handling without any trouble!

Here are of few of the inside pages... if you want to see all of them, check out my blog or stop by the store and take a look-see!


Thanks for looking!
erin

Saturday, October 11, 2008

Slide Mounts & Ribbon


Some people collect page sketches - I collect techniques. This month I used a simple one I had never used before - tying a slide mount on with a ribbon. It is a great way to add depth to a layout without adding a lot of bulk. One of my first stops when I visit Scrapbooks Plus is always the ribbon rack at the front of the store. Ribbons these days come in such a wide variety of patterns that it is an easy and inexpensive way to add a bit of fun to a project. Using a slide mount is a great technique by itself. It allows you to focus attention on a small picture - or a small detail of a larger picture.

My altered item this month was a picture frame that I picked up at a craft store - one of those wooden frames with a nice flat wide edge and a small opening for a picture. My goal was to make it look like a scrapbook page, which to me meant I had to have more than one picture because I rarely do a layout with just one! I combed thru my stash and found that I had a slide mount in exactly the same rich golden tones as the Anna Griffin papers and I was ready to get started.

I traced the frame onto the back of the patterned paper and cut it out. I just used regular old Elmers glue to attach it and a brayer to get the bubbles out. I positioned the slide mount so it was overlaping the picture opening a little bit and used thumbtacks on the back of the frame to hold the ribbon in place and tied the knot. The bird in the upper left was hand cut and added so that it also overlapped the opening, and then I popped on the dimensional flower sticker. Last up was the lettering. Of course I did not have the letters I needed, but I found that it was really easy to alter the wooden letters with a pair of wire cutters. (The "l" used to be a capital "T" and the "y" started out its life as the letter "X".) I used a wood stain to get the right color, and then added them with some Memory Mount glue.

What technique have you been waiting to try?