Tuesday, April 29, 2008

So Very Much Fun!


One of my projects for April was a minibook. And I decided to play around with some new supplies - Glimmer Mist and a Heidi Swapp mask. I used a Basic Grey chipboard book as my base. The pages are all hole-punched and on a binder ring, which makes it easy to work on them.

After I adhered the paper to the front cover, I decided it needed a little something extra. I used a small Heidi Swapp butterfly mask and sprayed the left half of the cover with Sandy Beach Glimmer Mist. I was a little impatient, so I used my heat gun to dry the paper. I really liked the effect it gave - a shimmery distressed look. A couple of suggestions for using this: 1) cover your work surface before spraying. I used a large piece of scrap cardboard; 2) move your hand quickly over the surface as you're spraying and use several fine coats of spray; 3) have a paper towel on hand (or two) - just in case. Luckily, Glimmer Mist is water-based, so clean-up is easy!

After that was dry, I used a Tim Holtz stamp and Distress Ink in Black Soot to stamp the swirl pattern. I stamped my title with Versamark ink and used Distess Embossing powder over the title. You may not know that you can use Distress Ink to emboss with -- but you can! The inked flourish also picked up embossing powder. You can really see the Glimmer Mist on the cover in this picture --

Friday, April 25, 2008

Altering Your Beloved ATG, Part II

Now that you've prepped your ATG for paint, the third step in this alteration process is to prime and paint your ATG. I recommend applying the primer and then waiting twenty-four hours before painting. Most spray paint cans say they dry more quickly than that, but I want to make sure that I have a nice, strong hold. The ATG will be handled quite a bit, and I don't want to have to worry about the paint wearing off.

1. Prime your ATG. Spray your ATG with the primer. You don't want to get too close to the gun because you risk drips. You want to use a side to side motion to spray the gun. The coverage should be more like a fine mist that will take several passes. Spray one side of the ATG completely, then let the primer dry thoroughly (consult the spray can for the specific drying time). Flip it over and repeat the process on the other side. You can omit this step if you will be using Krylon Fusion or another spray paint formulated for plastic to paint your ATG. (remember that I am using extra Krylon fusion as a primer ~ that is why mine looks black at this point)


2. Paint your ATG. Once you have allowed your ATG to dry thoroughly, you need to repeat the above steps to cover the primer with the paint color you've chosen. Use the same side-to-side misting action to cover the primer on one side of the ATG. Allow to dry thoroughly, and then flip the ATG to spray the other side. Depending on the color you chose & your own personal preference, you may want to add another coat of paint. Once the ATG is completely covered, I'd recommend waiting another 24 hours before continuing on to the next steps.


3. Glitter the ATG. If you LOVE BLING as much as my mom, then you probably added the Krylon glitter spray to your shopping cart. Repeat the steps above to cover the paint color on one side of the ATG with the glitter spray. Allow to dry thoroughly (consult the back of the can for optimal drying time) and then flip over the ATG and repeat the glittering on the other side.


4. Peel the painter's tape off the ATG. Once you're finished painting and all the layers of the paint are completely dry, carefully remove the painter's tape from the ATG. Slow and steady is the way to go here -- you don't want to risk chipping any of the layers of your paint.

4. Reattach the dispenser wheels. Using your phillips head screwdriver, reattach the pieces of the dispenser mechanism that you removed earlier.

Now comes the fun part: step four is to embellish your ATG!
This part is totally personal. It's your ATG, so make it look the way you want it to look!

1. Bling it up! I started embellishing by placing the bling first. I learned my lesson about this the hard way from my own ATG. If you glue the embellishments down first, you might end up with a situation where there are embellishments in the way of where you wanted the lines of bling to go. It's much easier to work around the bling, than it is to work around the embellishments.


2. Add your rub-ons. Rub-ons are nice and sturdy and they'll stick to pretty much anything -- even glass! That makes them perfect for your ATG, since it will be in and out of crop bags, buried under stash on your desk, and basically handled to death. That's what it was designed for, so don't worry!


3. Add any other embellishments. I used some individuals rhinestones to draw more attention to the flower rubons. If you're going to be using some embellishments like that, you can't rely on their adhesive to keep them stuck to your ATG. You need to attach them with some heavy duty adhesive like E6000. Be careful with this step! The E6000 will take up the paint on your ATG, so plan out exactly where you want the embellishments to go & apply the E6000 sparingly to the embellishment -- you absolutely don't want too much adhesive or it will leak out the sides and take up the paint. If some does leak out, be sure to wipe it up immediately.


4. Take a picture! Take a picture of your finished ATG and post it here so we all can see how well it turned out!


5. Enjoy your shiny new ATG!

Thursday, April 24, 2008

Adhesives - a Different Perspective

Am I the last person on Earth using wet adhesive? Like most I have tried nearly every adhesive known to man (or woman), too. I have a difficult time with entire the gun/tape dispenser approach. I break the gun, get the tape off the rollers inside the dispenser with no ability to ever get it back on track. Then I can't easily reposition anything unless I have another gun full of repositionable tape, so I quit the entire tape approach, preferring what I consider to be the best wet glue on the market - Zip Dry Paper Glue by Beacon Adhesives. It doesn't wrinkle or warp paper, doesn't soak through or anything, is repositionable for about 5 to 10 minutes until it completely dries, then its permanent and doesn't peel up later (that night, then next week, or even next year). If you get excess glue on a page (oops!) it comes up in a flash with an old fashioned eraser. I love it! And it seems to last forever. I find with this glue that I'm never really in a situation without adhesive because, when in a bind, I can eek that last bit from the bottom of the bottle. And it glues down ANYTHING. And, yes, you can buy it at Scrapbooks-Plus!

So maybe I am the last scrapper who uses wet glue for everything (okay - everything except vellum and an odd button or two) but it's gonna take more than an altered ATG project for me to abandon my Zip Dry. Sorry gals!!


Wednesday, April 23, 2008

Altering Your Beloved ATG, Part I

The first step in altering your ATG is to gather your supplies.
Believe me, this is not a project you want to stop halfway through to go find something you need. Spray paint dries fast & it doesn't give you much time to run around like the proverbial chicken. I know this because when I altered my ATG, I sprayed Krylon Fusion on my engagement ring and had to rush around like a madwoman trying to find something to clean it off before it bonded to the diamond permanently. This is all because I forgot to bring baby wipes. Good preparation is the key to a smooth ATG alteration.

You will definitely need the following supplies:
1. Scotch ATG 700 or 714 by 3M. The ATG comes in two sizes, and the size refers to the adhesive width, not the size of the gun. The 700 fits 1/2" and 3/4" width adhesive out of the box, and 1/4" width adhesive with an adapter (sold separately). The 714 fits 1/4" width adhesive only.

2. Spray Paint. The ATG is made of plastic and plastic doesn't do so well with spray paint, unfortunately. You will either need to use a can of Krylon Fusion, which is specially formulated for plastic but, sadly, does not come in very many colors OR you will need to spray your ATG with a plastic primer first and then use any can of spray paint you like. For my mom's ATG, I will be using Krylon Fusion as a primer (because I have plenty leftover from when I altered my ATG) and then I'll be painting it a lovely shade of watermelon pink.
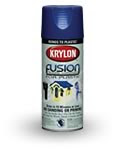


3. Painter's Tape. The ATG has a few surfaces that you may not want covered in paint. We will use good old blue painter's tape to ensure that the spray paint goes only where we want it.

4. Phillips head screwdriver. We will need to remove a few pieces of the ATG to get the best paint coverage possible, so make sure you have a screwdriver handy.

5. Newspaper/Posterboard/cardboard box. Many spray paints are toxic, so it's important to complete the painting portion of this project in a well-ventilated area. I will be working outside. To keep my asphalt paint-free, I will be working on a piece of posterboard.

6. Baby Wipes. It's good to have these or some other form of personal cleansing cloths on hand if you need to correct a mistake or clean something. Spray paint usually dries pretty fast, so you don't have much time before it becomes permanent. Also, don't wear jewelry while altering you ATG. You have been warned.

The following supplies are optional:
7. Krylon Glitter paint. My mom LOVES BLING, so after I've finished applying the paint and letting it dry, I'll be spraying the whole thing with some silver glitter paint. The paint also contains a fixative, so it should hold up to plenty of handling without the glitter falling off & making a mess.


8. Rub ons. I will also be using American Crafts rub ons to dress up the ATG a little bit.


9. Bling. Remember that my mom LOVES BLING, so just glitter is not enough! I'll also be using some Heidi Swapp bling to decorate the ATG & really make it shine!


10. Other embellishments. I used epoxy stickers on my ATG. If you're going to be using some embellishments like that, you can't rely on their adhesive to keep them stuck to your ATG. You will need to attach them with a heavy duty adhesive like E-6000.


The second step is to prepare your ATG for paint.
For this step you'll need your ATG, screwdriver and painter's tape handy. We'll be removing some small pieces from inside the ATG to get good paint coverage, as well as covering parts of the exterior with painter's tape to protect it from the spray.

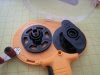
1. Remove black wheels from inside ATG. Using your screwdriver, loosen the screws holding the black plastic wheels which hold the tape and remove them. We'll be painting the interior of the ATG, too, and we don't want to get paint gummed up in the actual dispenser mechanism.


2. Cover applicator tip with painter's tape. It is easier to cover the applicator tip than it is to remove it altogether. I know this because I've tried to take it apart & discovered that the applicator tip is also attached to one of the gears inside the ATG & is, therefore, impossible to remove without a great deal of pain and agony. So, while you're taping off areas you want untouched, make sure to include this part as well. 
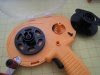
I forgot to take a picture before I started painting, but you can see how I used tape to cover the applicator tip.


3. Cover trigger with painter's tape. I've seen the triggers painted on other ATGs, but I am concerned about doing anything to the ATG that might impair functionality down the road, so I will be leaving my trigger unpainted.

3. Cover clear lid with painter's tape. This step is optional and all about personal preference. I don't want the lid to be painted because I like to be able to see how much tape I have left without actually needing to open the lid. So I will only be painting a small portion of the lid -- everything but the black strip that reads "Scotch ATG 700" will be covered on mine. If you want the lid of your ATG to be painted as well, then omit this step.

4. Take your ATG to a well-ventilated area. Take your ATG and your posterboard or newspaper to a well-ventilated area. It is best to work outside on a day that is not too breezy. If the day is breezy, make sure you have somehow anchored your posterboard or newspaper so that it doesn't blow away.

You are now ready to get painting.

Monday, April 21, 2008

Confessions of an Adhesive Junkie

I have had a love/hate relationship with adhesive for most of my time in the scrapbooking hobby. It's such an important element of the hobby (really, where would we be without it?) but finding the right one can be tricky.

Probably over the course of my scrapbooking hobby I have tried at least twenty different types of adhesive and adhesive dispensers, and I have never found one that worked all the time without problems, or didn't cost an arm and a leg, or wasn't a pain to refill, or worked until another company bought them out and changed the formula, etc., etc.

All this adhesive drama ended the day the Scotch ATG 700 by 3M came into my life:


If you already own an ATG, then you know what I'm talking about. Because it is not possible to own one of these babies and not enshrine it in your heart and in your scrapbook room.

If you don't already own an ATG, then you need to get one. Now.

For those of you that are still here reading this blog and not speeding off to ScrapbooksPlus to pick one up, I know what you're thinking. You're thinking that the gun is huge, that it must be heavy and bulky, that it's expensive, and, quite frankly, ugly.

Not so, my friends, not so.

The gun is wonderful to use. It is bigger than the adhesive dispenser you are probably using right now, but it is light as a feather and fits comfortably in your hand. I find that I have less aches and pains in my shoulder and wrist after using this guy for hours than I did when I was using Hermas or Tombows or other forms of adhesive.

It's super simple to reload, and if you're the sort of person who forgets how to load your adhesive (like me) then you're in luck, because the directions are actually etched into the gun itself! And the adhesive is the most economical on the market, hands down. So even though the gun costs more than other adhesive dispensers on the market, it more than pays for itself with what you save on adhesive.

There is one area where I'm not going to argue with you, however, and that is aesthetics. The ATG is pretty darn ugly. It's a framer's tool. It's bright yellow so that it doesn't get lost on a counter with a bunch of other supplies. I'll bet it's industrial yellow color is just great for framing professionals. However, we scrapbookers want everything to be beautiful, not just functional.

That is why, once you get your ATG and fall in love with it, you must alter it.

Here are a couple pictures of my altered ATG:


I just bought my mom an ATG for Mother's Day and I'm going to be altering it for her before I wrap it up and give it to her. While I'm doing that I'm going to take you through the altering process step-by-step. If you haven't purchased an ATG yet, you still have time. I will post the first part of the instructions on Wednesday and the second part of the instructions on Friday.

Possible class


Hi all,

What would ya'll think of a class on how to make a coptic-bound journal, such as the one above? The great thing about this stitch is that your book lies flat, making it perfect for sketching out layouts, jotting down notes and whatever else your heart desires. You'd learn how to make the stitch and how to cover your book. Once you have the technique, you can go crazy making all sorts of books and journals. If enough folks are interested, we'll offer the class at the store. Thanks!

Friday, April 18, 2008

Design Team framed wall


We recently turned in our projects and I thought I'd share where they're displayed inside the store. The framed wall is in the back, which is where folks crop and where classes take place, and is a great place to find inspiration of all sorts. 


Thursday, April 17, 2008

Flowers

While working with the paper from My Mind's Eye this month and the weather outside finally warming up I was inspired to make these flowers. I used some Plain Jane chipboard flowers, a container from the $1 section at Target (I painted it white with Adirondack Paint Dabber in Snow White), a flower punch, buttons, and bling. It was a fast and fun project that I am going to use for Teacher Appreciation Week gift at school. I am putting step by step instructions on my blog on how I covered the chipboard. Enjoy! Lisa

Sunday, April 13, 2008

hi, spring!

After planting the last rhododendrons this cold afternoon, I had just enough time to make a card from April's Design Team kit before assembling dinner. Using three coordinating My Mind's Eye 29th Street Market "Mellow" papers and a card idea I saw on Melissa Phillips's blog Lily Bean Paperie, I arranged the card so I could add my sparkly embellishments. It takes only a few warm days of spring to get me in the mood for scallops (as in petals) and shiny (as in sunshine).


First I cut the 5x7" card from the "Happy Stripes" paper. Then I drew an arc from the upper left corner to the lower right of the card and cut a scalloped edge arc to match from the "Beautiful Blossoms" paper. Within the scalloped paper, I cut another arc so I could reverse part of the paper, leaving the tan scalloped edge as contrast. Making Memories Shimmer Jigsaw letters spell a glittery "hi" and center the Bazzill paper flower. KaiserScrapbook Rhinestones accent the scallops.

Next I drew and cut a butterfly from a piece of clear packaging so I could see its placement on the "Icing on the Cake" paper. After I cut the butterfly from the patterned cardstock, I dotted it with blue Ice Stickles and mounted it on foam adhesive. Since I had a blue plastic-covered paper clip handy, I cut it into antenna for a little more pop. Finally, the blue seam binding tied across the top of the card came just days ago on a package from Rebecca Sower.


.

Saturday, April 12, 2008

what is hot and what is not?

Have you been looking at the vast array of recent scrapbook papers and embellishments and wondering how you were going to fit all that cool stuff in your already overstuffed workspace? Have you noticed how many new companies appeared at CHA this February? And how many others have either disappeared or have been bought out by larger companies? Some of this has to do with creating and following trends. Those who stay in front of the trends are more able to compete. But what about us who are expected to follow? Will our kids really understand our fixation with putting owls around all their photos during that trend?

There are some trends that are pretty obvious and easy to like, such as die cut paper edges and anything "office" -- from ledger paper to page tabs. Then there are others that call to us but are harder to use successfully, such as transparencies. As you approach your next layouts and projects, think about whether you notice the market trends and which ones you enjoy using the most. Although I am only a follower of "what is hot and what is not" in the market, I have rounded up a list of a dozen trends that are fun for me to use:

1. Die cut paper edges used inside a layout
2. Lots of bird and butterfly embellishments
3. Embellishments clustered and layered to add focus and weight
4. Embellishments with texture and dimension (chipboard, felt,
distressed edges, layered flowers)
5. Bold paper patterns used in smaller blocks
6. Energetic mixing of pattern papers
7. Office look (ledger paper, graph paper, die cut journaling blocks,
tabs, clips, torn notebook edges)
8. Rounded corners and scalloped edges
9. Shapes cut from patterned paper (die cut or hand cut)
10. Rub-ons and other embellishments like bling used on top of photos
11. Acrylic alphabet stamping mixed with other alphabets
12. Sewing notions (fabric blocks, stitching, pompom trims, buttons, ric rac)

There are so many more . . . Tell us which are your favorites (and which aren't!).
.

Thursday, April 10, 2008

"Smile"

Okay - I think I am basically done with my single page layout for this month. I still need to journal in the upper right. I may have overdone it on the "bling" or on the little flowers. Honest opinions please? Do I need to move or remove anything? My 10 year old daughter had been anxiously awaiting the moment she could help me put the "bling" on the layout. She likes the shiny stuff so much I feel sorry for her future husband...he's gonna spend a fortune keeping her in diamonds! Were we a little too heavy handed?

Details: Yummy 29th Street Market papers from My Mind's Eye. Marvy Uchida punch for the little posies - I am glad I save my scraps because all of those little flowers were punched from leftover bits from my "Honeymoon" box. Fiskars edge punch for the paper lace. (Although there was a Fiskars "Flower" edge punch at Scrapbooks Plus that I had to stop myself from buying that also would have been great on this layout - it matches the little posies on the paper!) Heidi Swapp "Bling" and the teeny, skinny cinammon dot ribbon - so cute!

Wednesday, April 9, 2008

"HoneyMoon" Exploding Box

I have been wanting to try an Exploding Box for ages, and when I got this month's kit with the 29th Street Market papers from My Mind's Eye I knew I had the perfect foundation. I would have to say it is a misnomer to call it paper, it really is card stock...beautifully decorated on both sides! The patterns and colors seemed kind of timeless so I decided to use my parent's honeymoon from 1947 for my subject.

My Scor-Pal made it easy to set up the box. I used 12", 11.5" and 11" square papers/cardstock, which I scored 4" in from each side. Then I cut out the corners and put them aside to use later. The lid was made with 8.25" cardstock which was scored 2" in from each side. The corners were NOT cut from the lid...they were scored diagonally, folded in, and glued.

I loved this project because there are 21 different panels to decorate so you could use as many different techniques as you wanted. I will just show you a few of my favorites.

I used my Fiskars edge punch to create the lacey top of this panel and backed it with a strip of paper to show off the detail and protect the delicate cuts. I used ribbon to create a frame for this picture of my mother and detailed it with a tiny heart shaped brad. Don't you just love her bathing suit?


I created another set of panels to tell a story...My mom & dad were walking along the boardwalk in Virginia Beach when one of the arcade "barkers" tried to guess her weight. He was wrong and she won a prize...a little plaster figurine we call "Peep" that has been sitting on her windowsill for years. I used an Autumn Leaves stamp for the journaling block, another stamp for the arrow and a rub on for the little chick...I am going to have my mom write in the story so I have her handwriting. This is a perfect example of how you don't have to have a picture to tell a story.

I also wanted to keep my mom's handwriting from the edges of this picture of my father, so I trimmed it down to fit on the panel. (This is actually a color xerox, which is why I was comfortable cutting it.) I used a chipboard wave which I covered with paper and edged with Snow-Tex from DecoArt to create the foamy look - by the way, you can cut this wave yourself at Scrapbooks Plus using the dies in the classroom.

It was soooo much fun to make! And it only took 4 pieces of paper/card stock...the corners you cut out at the beginning are more than enough to decorate all the panels with bits & pieces, pockets & tags. I will include a few more detail shots so you can see variety of panels you can make. These make such nice gifts - weddings, anniversaries, graduations.

Monday, April 7, 2008

Progress on this Month's Kit


So I've had my kit for a week now and I must admit that all these girly pinks and greens are quite the challenge for my grungy boy style, but here's a sneak peek of my work-in-progress. I'm still missing the title and journaling, but finding the right photo that worked well with this 29th Street Market collection from My Mind's Eye was my greatest challenge. There are few girls in our family but I remembered that at Thanksgiving I had taken a bunch of photo's of my husband's god daughter. So here she is in glorious pink and blue!


I also started to work on my project - an 8x8 album documenting our recent journey on the "Road to Hana". Using the turquoise, powder blue, red and verde papers of this line, I created unique photo mats that I plan to adhere to cardstock album pages that I'm tinting with Glimmer Mist from My Tattered Angels. I certainly have a long way to go to complete all of this by next week!


Sunday, April 6, 2008

another tinkering ink project

Blue is a difficult color for me to use in my design work. But the fun of the Design Team is being presented with choices outside your preferred comfortable range. So for this month's navy-based Tinkering Ink kit, I tried to find a way to set up enough contrast to the cool blues and lavenders to warm them up, using sunny yellow and even warm black and lots of bling. This 9-section wall hanging plays off both sides of the Tinkering Ink Provincial Fare pattern paper and uses the whole pack of Tinkering Ink felt embellishments, plus a few papers from the Little Yellow Bicycle Zach's Life line to literally add to the yellow.


Each section has its own arrangement, with lots of fun embellishments to add to the 3-dimensional effect, including the Martha Stewart butterfly punches which fold up their wings. I've added only three small black-and-white photos of my grandchildren, but you could add more photos on other sections of the hanging, allowing some of your embellishments to extend into the photos.


This lower section of the hanging shows two of the Tinkering Ink felt embellishments. To the left is a large round felt flower medallion with a Sizzix bird die cut, a Marvy scalloped oval punch, and Heidi Swapp bling. To the right is a felt tag, from which I cut the small blue flower medallion to center the My Mind's Eye transparent flower and the large yellow paper flower. Then I used the rest of the white felt tag to cut leaves for the flower stem, adding a butterfly and more Heidi Swapp bling to finish the arrangement.  The Marvy punches and My Mind's Eye transparencies are available at the store, as are the Tinkering Ink papers and embellishments.

This month's Scrapbooks Plus Design Team layouts, cards, and projects will be on display in the crop room frame until the 15th of April, when the new month's designs will take their place. If you are visiting this Design Team blog, we would all love to hear from you. Please feel free to comment or ask questions about what you see.
.

Friday, April 4, 2008

My creative process

I started working on my new kit yesterday and I think I finally have realized what my "scrapbook process" is. I hadn't really thought about it until I read the last few posts. My process usually begins with photos that inspire me and I go from there. I pick out paper that I like, a few embellishments and then I crop my pictures and work them into a LO. At this point I usually walk around and look at the LO from different angles and see what I like/don't like and re-arrange. I do this at least a couple of times, sometimes even walking away from it over night. When I finally happy with the LO I will add embellishments and journal last. It's probably not the easiest way to scrap but it works for me.

I have to say I LOVE the new kits that ScrapbooksPlus put together for us! I am working with the My Minds Eye 29th Market Street Fancy Line. It is so pretty and I really enjoy working with it. I used some Prima flowers and some bling and felt(Fancy Pants) for the flower centers. The white letters are from Making Memories.

How do I start a project?

In response to the question posed, believe it or not, with my stenopad of graph paper, ruler and a pencil...Maybe it's the engineering training, but I take a look at the materials in a kit, get a sense of the colors, patterns and the size of the embellishments, prints, designs, etc., and I sketch out various one or two page layouts that might work with that paper line. While doing so, I mentally review the photos I've recently taken (or have earmarked to scrap) and start to "place" them in the design (at least the one that is forming in my head by this point.) Then off to my scraproom I go!
Sometimes the paper itself just "speaks" to me. Then I lay it all out on the kitchen table (or on the crop tables at Scrapbooks-Plus), and walk around it a couple of times to get a feel for the colors, patterns and elements that will fit well with my photos, before I take on the graph paper. (Of course while I'm walking I have that ruler in my hand!) For example, I took one look at the "Zachary" Little Yellow Bicycle paper in my kit from last month and KNEW, with its orange and blue-grunge look that it was perfect for my boys fall season of little league baseball. (the grungier the better!) And knowing I had tons of photographs I wanted to use, I ran to my graph paper and sketched a multi-photo design altered from a layout I had done last year. So it's both sitting and standing (walking) for me.....but I "think" on graph paper before I cut the first sheet of scrap paper.
Sharon

Thursday, April 3, 2008

The process (while standing and sitting)


Last week, Kathryn asked about our process, what do we do when we start a new project. For me,  it always starts by matching the photos to the paper. Then I'll grab some stamps and letters that I think might work along with rub-ons and embellishments. 

For last month's kit, I worked with Daisy Bucket's Playlist series. The greens and blues mixed with the circles brought to mind a bubbling sense of fun. That feeling you get right before you head off to a great destination. So while it was still cold and wet outside, I was indoors scrappin' our vacations to St. Thomas and Chincoteague, remembering the warm waters of the Caribbean and the sound of the surf as it hits the shore. 

(That project BTW, is totally responsible for this year's quick beach trip.)

Once I've decided what to scrap, I'll start playing with the layout, arranging the photos and type. I'll mentally add my stamping and start moving around various embellishments. If I have a limited amount of paper and I'm working on a two-page spread, I'll scan all my paper and photos and play around in Photoshop until I get a design that works. Then I'll go back to my paper layout and start cutting and pasting. I'll leaving spots for journaling and add that once I'm all done. What comes out is usually a bit different from what happens in Photoshop, but that's just fine. When all is said and done, I have two layouts completed on the same topic. Cool!

As for standing or sitting, I'm a combo of both. I'll stand while arranging and to get a good look at everything, but when I'm cutting or adhering, I'm sitting. Oftentimes, I end up with way too much stuff on my work table and will have to move things to the floor. Hence a big mess! When I'm finished, tho, I'll put everything back.

Overall, I'm a pretty slow scrapper and will often let projects sit on my work table overnight. If I'm feeling the same groove the next morning, then I'll start sticking stuff down.


My Mind's Eye Notebook

Last night I was out at ScrapbooksPlus cropping with Kim and another friend of ours. I knew I wanted to use the Bind-It-All this month to make a little mini something, and when I saw all the pretty goodies in this month's kit, I decided to make a cute little notebook for myself. I usually carry one around with me at all times, because if I don't write things down as they come to me, there's a better than even chance that I will completely forget what I wanted to do in the first place. Then I will stay up until 3:00 in the morning trying to remember the brilliant idea I had at 2:45 that afternoon. To avoid all that, I write things down immediately.

I liked the shape of this Basic Grey album:


But I also wanted the album to be a little more portable and spiral bound. So I traced one of the inside sheets from the Basic Greay album onto a piece of chipboard I brought with me. (I always have a good supply of chipboard on hand because I love making minis. I keep it when it's in packaging, cereal boxes, mailers, you name it) I situated the Basic Greay sheet so that one side went off the edge of the chipboard, giving me the straight edge that I wanted. Then I cut that piece out of the chipboard and used it as a template for the back cover and the inside pages.

I covered the chipboard pieces with paper from the kit and used the Bind-It-All to punch the holes and create the spiral binding. If you love mini books and you do not have a Bind-It-All, you must get one immediately! I have one at home and I love it, love it, love it. Last night I used the Bind-It-All in the crop room at ScrapbooksPlus.

This is how the notebook looked when I was finished:


This flower and button and journaling card were from the kit, and they have them at ScrapbooksPlus.


I wanted the letters to have some nice texture, so I used Grungeboard. I love mixing up the fonts on my projects ~ I think it gives a really fun look. The swirls were perfect for this project. All those ribbons that I tied around the spiral binding came in the kit and are available at ScrapbooksPlus.


I inked the grungboard in Robin's Egg Blue from Clearsnap, and the edges of the book were inked in Chestnut Rhoan (also from Clearsnap & the most perfect scrapbook ink color of all time, IMHO).

Thanks for looking at my notebook! If you haven't taken the time to play with the Bind-It-All yet, I encourage you to do so as soon as possible. It really is so very versatile and is tons of fun!