Saturday, December 31, 2011

Two Page Layout


I typically have a tough time with 2 page layouts since I prefer the ease of 1 page designs. This collection by Simple Stories makes that job a bit easy using the journaling words embedded within the papers. There is just so much in this collection including the small calendar that you will be able to use the embellies from this collection for many layouts to come.

Friday, December 30, 2011

Share Your Sentiments with an Exploding Box

An exploding box is a small box that when opened has pages and pockets for pictures or messages, giving you a special way to share your sentiments.  They are great for special relatives or friends.  My  box is filled with inspirational messages for a friend, who is going through a tough time.  You have a total of 20 sides inside the box on which you can put messages, pictures or embellishments.  In addition, you have pockets for 8 tags or special memorabilia.  This is one of the projects that looks tough but the basic framework is easy if you follow the pattern.  The Simple Stories Life Documented collection works especially well.  The double-sided coordinating papers are of just the right weight – they are easy to work but thick enough for a box.  The embellishments can be as simple or complicated as you want. 

For this project you need four pieces of paper/cardstock – three for the boxes and one for the top.  For the outside of the box, I used Live Life 24/7.  A 12" x 12" piece forms  the outside of the box and one set of inside flaps. For the middle box, you need a 10.5” square.  I used Newsprint.  And for the inner box, which requires a 9” square,  I used Orange/Grid. 

Begin with the 12" x 12" paper.  Imagine your paper is a grid with 4" squares as in the image below.  (My drawing is not to scale; all should be 4" squares.)   Score on dotted lines and cut on solid ones.  To assure that all my lines were straigiht and corners square, I used my trimmer, changing from a cutting blade to scoring blade as needed.   Score a diagonal line from the outside corner of A to the inside corner of A.  Repeat with C, G & I.


A

B

C

D

E

F

G

H

I

Inside of Outer Box
Fold along score marks.  The four corner squares will become triangles once you complete folding.  Use glue to hold the corners in the triangle shape.  The flatter they are the better it will be when you fold the box.  I inked all the edges with Fired Brick Distress Ink.  The four squares that you have on the inside can be decorated.  I would recommend that you decorate these with flat objects as the two other sets of “pages” will be on top of these.  I stamped messages on coordinating paper and affixed to the squares.  If you use, a lighter paper on the inside you could stamp your design directly on the flap.  Cut out objects, border trim, etc. would be really great for this. 
 
Middle Box Pocket & Tag

For the middle (10.5" square) and inner (9" square) boxes, score and cut as shown in diagram above.  Squares should be 3 1/2" and 3" respectively.  (Note: Do not score diagonal lines as you did for the outer box.)  For these two boxes, you fold along the scored lines to make four pockets for each.  Seal the side edge of the square.  I used 1/8” redline tape to hold the pockets in place. You only need to adhere on side since once box is glued in place a bottom will be formed.  Remember in selecting colors and folding to consider what color you want the pockets to be.  The pockets will be the color of the paper that is facing down.  

Inner Box Pocket & Tag


I inked the inner box with Spiced Marmalade Distress Ink and the middle box with Weathered Wood Distress Ink.  I stamped a variety of  positive messages, butterflies and birds using Tim Holtz stamps. (Stampers Anonymous Odds & Ends, Stuff to Say,)   I used some hearts cut from the papers, circles and scalloped circles.   Life Documented provides lots of circles and messages that could be used.  On the inner pockets, you can use items with a little more depth.  For example, I used some Bazzill flowers.   (Since you are going to decorate the bottom, it is best to put the thicker embellishments at the top.)

 
I used the Simple Stories journaling cards to create tags to put in the pockets. I trimmed them to fit the size of the pockets.   I affixed an eyelet and tied a ribbon to the top.  (I used white ribbon and sprayed it with Spiced Marmalade Glimmer Mist.  The tags can include a message, a picture or one on each side.

Inner Box
Once you have all boxes decorated, glue the boxes together.  You can use your favorite adhesive.  I used Glossy Accents because I wanted to make sure it stuck.  Once the boxes are together, you can decorate the bottom of the inside of the box.   I made one flower with a Gluber and a strip of linen ribbon that is available at ScrapbooksPlus.   (If you  haven’t used Glubers, you need to try them.  They are really easy to use to make a variety of flowers.)  You simply roll the ribbon and push down into the massive (and strong) glue dot.  Of course, you could use any kind of flower or other embellishment you like.  The remainder of my flowers are  Bazzill paper flowers. This is where you can make the box fit your theme and use lots of the fun embellishments available at Scrapbooks-Plus.  The only limit is the space you have.


Inside of Box When Closed


Fold the box closed and secure with a ribbon.  I used the elasticized ribbon from the Tim Holtz Ideo-ology Lavish Trimmings set.  After it was sprayed with Spiced Marmalade Glimmer Mist it looked great with the paper.  I fastened the ribbon with a Tim Holtz Idea-ology Memo Pin.  An Idea-ology Trinket Pin would work the same way – perhaps even better because it wouldn’t have a sharp edge.  You can tie it shut with any ribbon, but using this elastic ribbon means you don’t have to re-tie every time you open the box.

Voila!
A Beautiful Box wtih a Special Inside

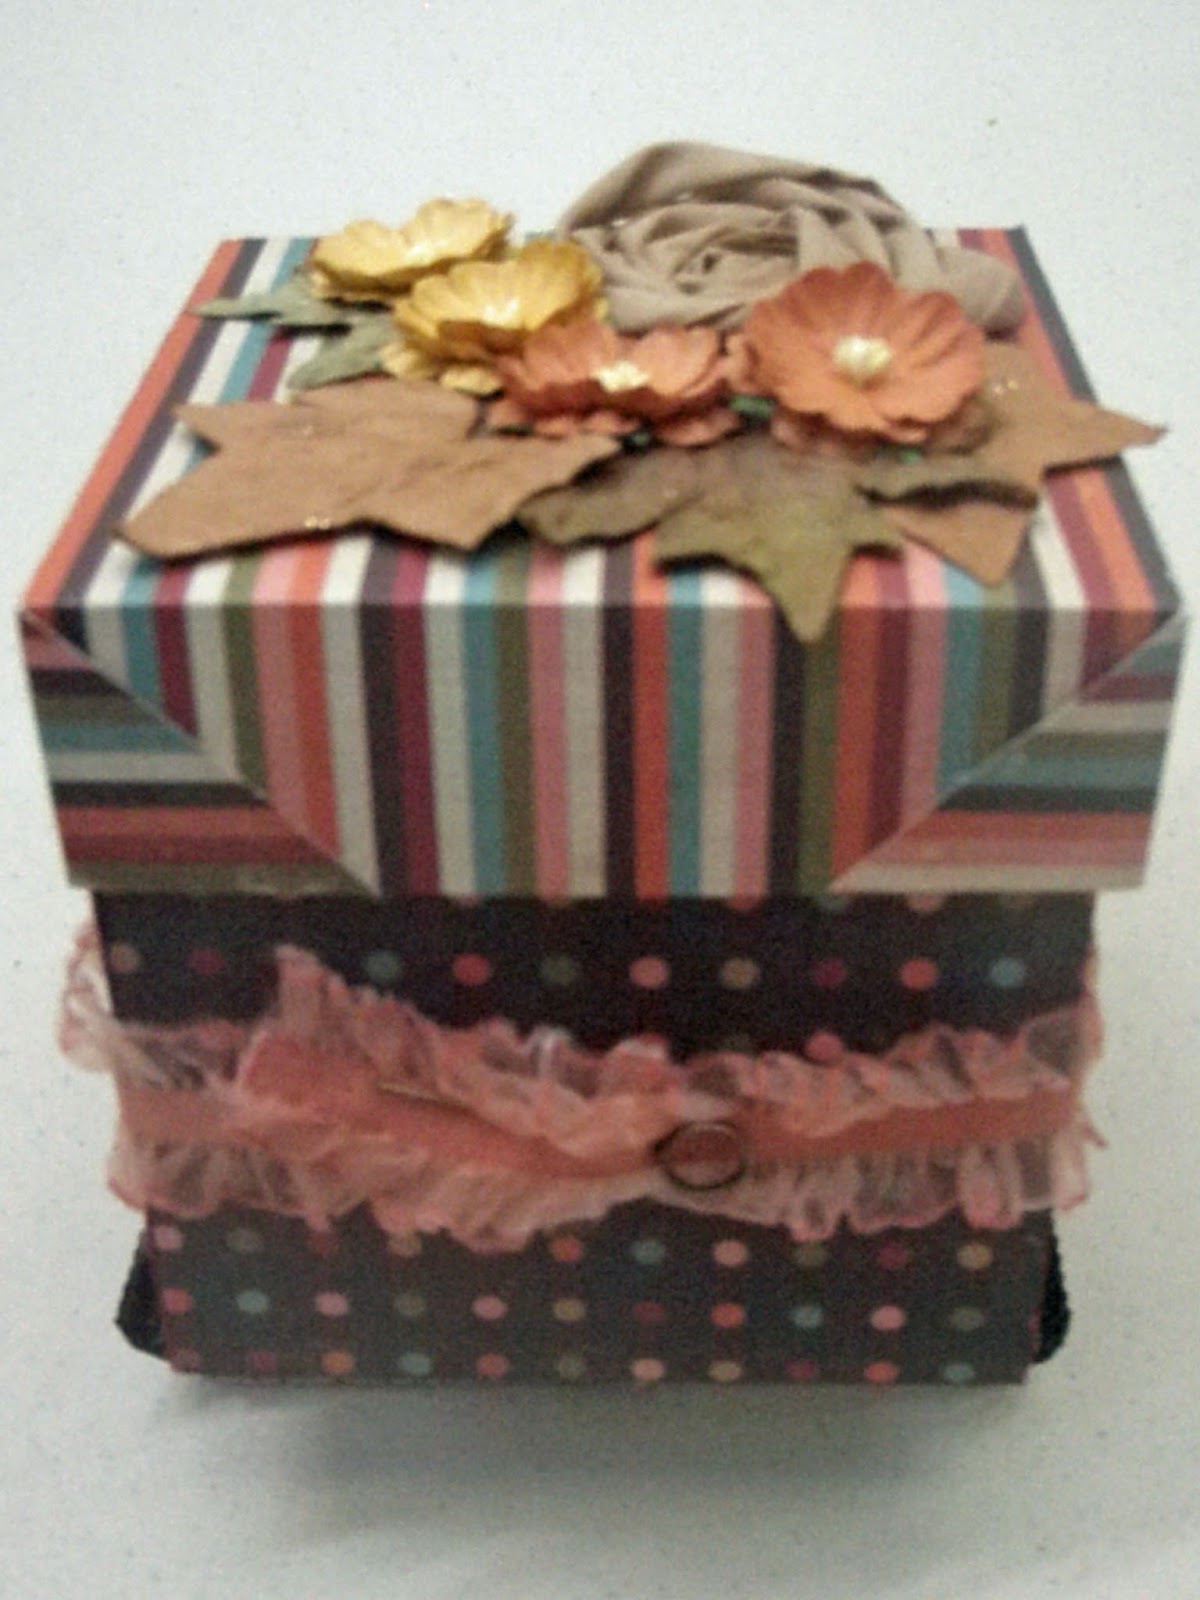
For the box top, you need a 5 ¾”  piece of paper/cardstock.  Score 1½” around all four outside edges of the box.  In the corner squares, cut a straight line from the out edge to the inside edge of the square.  Fold along the scoring lines, gluing the corner edges. 

All that is left to do is decorate the top of the box.  I made mine match the decorations that I put in the bottom of the inner box so I used another flower made with a Gluber and linen ribbon and the same Bazzill flowers.  I added a few Prima leaves.

These are perfect when you want to give a little more than a card, but not a big gift.  What grandmother wouldn’t love one of these with pictures of the grandkids?  Or it would be a great way to share your  feelings or memories with your Valentine?  I’m thinking it would also be a great thank you gift for a hostess.  And you get the fun of making it.  Try it!


Thursday, December 29, 2011

Quick and easy album

I really love how easy it is to use the papers from Simple Stories.  I do have to admit that the year-o-graphy papers have been my favorite by far!  W?hen I saw the Journaling card element pages I knew I wanted to make a mini book out of them.  It was a really quick and easy album to make. 


I just cut the journaling cards out and glued them together with some PVA glue and let them dry over night.  I added a piece of jute string as a tie and held that down with some fabric tape that I had in my stash.  


I plan on using this mini album as a quick snapshot of the year.  I'm thinking that I may take a picture of my boys in front of the same place every month so you can see the progression of how they grow over a year.

Enjoy!
Lisa


Wednesday, December 28, 2011

Building Blocks


The nice thing about Simple Stories' collections is that they give you building blocks for your layouts. They have several papers in each line that are blocks of 4x6 patterns, perfect for mixing in with photos.

Here I used one of those blocks in a grouping with three vertical 4x6 photos. To the left is a group of horizontal 4x6 photos. I used pieces of two other papers to bookend my large photo block. The piece of calendar paper is great for journaling.

Happy New Year! Wednesday Make & Take

I had the pleasure of putting together this week's Wednesday Make & Take.  It is blingy and sparkly and is perfect for displaying your New Year's evening photos!

The layout features fun Teresa Collins embossed colored core papers as the background, glitter cardstock as the photo mats and fun suede paper!  The free element is the glitter clock featured above the vellum journaling tag.  It is available black on blue as shown in the photo or blue on black- your choice, while supplies last!  The double scallop edge (from Martha Stewart) on the bottom of the blue suede border can be punched at the store this week if you have a few minutes or cut with any other border punch you choose- or left straight.  The suede behind the vellum journaling tag is embossed which you can also borrow while at the store if you don't have it (Cuttlebug swirls embossing folder)- or leave it un-embossed for a classic look.  This layout has some great papers that give great texture, depth and fun to your layout!  It is finished by adding random mulit-sized rhinestones along the border scallops and swirls.

Have more than 3 photos?  No problem- you can easily add one in the space above the journaling tag as well as placing two smaller photos in the large black photo mat.  Hurry in today to purchase the supplies for this layout!  Remember, supplies are limited!!

Tuesday, December 27, 2011

Farewell!

Well folks this is my last post for the ScrapbooksPlus design team. It has been a pleasure working with such talented ladies the last 2 years but it is time to move on. I need to focus on teaching & other new ventures! I came away with some fabulous friends that I will cherish & I learned a lot! I will miss all the last minute texts back & forth as we race to get our layouts done on time. Now I will just have to pester & tease you all!

For my final blog post I went through & picked out some of my favs from this years team, it was hard to choose just one they are so talented!

Lisa Hausman: Our fearless leader of the team who put in a lot of extra hours sending emails, designing extra kits & staying on top of those of us who may on occasion forget to post on time! You did a great job.
I had to go with this layout (Aug. 29th) because I love the guinea fowl!!! Lisa's pages always have some extra inky goodness to them & a clean organized look. I love the technique she used here on the bird cages. She also takes great expressive pictures & has a story to her layouts. I laugh every time I think of the guineas pecking on the window while she scrapbooks.

Deborah Mahnken: A member of the team, like forever & every month she consistently turns out great quality layouts. If you only knew how long she works on them! I had a hard time picking one, Deborah is one of my favorite members to scraplift!

Deb is great at layering but her pages always look nice & balanced. She also adds a splash of inky technique without it taking over the layout (unlike me!). She also an eye for incorporating multiple papers in a unique way-love her stuff!!! This layout is a prime example (June3rd).

Nicky Price: This was Nicky's 1st year on the design team & she did a great job. Nicky has a wonderful way with paper, putting multiple patterns together and creating a beautiful result every time. She also takes great photos, with lots of expression. I was torn between a number of layouts because she also makes great mini-books.
I chose this layout because I could never put so many patterned papers together & have it turn out so beautifully! (Sept 10th).

Kathy Bryant: Her first year on the design team yet she did a fantastic job. Every month her layouts & projects were detailed & well thought out. She put a lot of time in her blog with photos & technique explanations.
I chose this layout because another thing Kathy is great at is putting a lot of photos on her layouts. As someone who takes a lot of photos I appreciate this! The details are great in this with using the key die cut in multiple ways-love it!

Megan Carey: This was Megan's 2nd year on the design team & it was a crazy year for her health wise. Despite almost dying & other things (like that wasn't enough) she got her projects in on time & had her blog posted even if she had to do it from a hospital bed. You have to admire that! Her layouts almost always tell a story which I love & Megan brings something special to them. Oftentimes that would be a different technique or special way to add in your journaling.

On this layout it was the cute pinwheels, paired with the crackle paint flag die. The photo is simple but makes a strong statement. Love it!

Esther McCullough: Is a veteran design team member & if I had to choose 1 word to describe her style it would have to be heritage. Esther scraps a lot of her family history & her travels. On one of her layouts the title was the latitude/longitude of the place -genius!

Esther also makes a lot of mini books so I had to go with this one as my favorite. Great use of multiple papers to create this fun mini-book.

Erica Houghton: One word to describe Erica's layouts would be flawless. Her pages are usually stunning, almost always incorporate flowers & bling, with a wonderful way of combining multiple paper patterns.
I was torn between 3 layouts as my favorite, one travel layout because the photo was amazing but in the end went with this layout (Aug.16th) as it showed all of Erica's strengths. Love the layering of both paper & embellishments, so many patterns yet they fit together seamlessly. The bonus was the Tim Holtz stamp!

Laura Petruso: This was Laura's 1st year on the design team but she is also the Copic teacher at the store. Laura just doesn't do a bad layout, they are all good & varied in style. Her blog posts often contain great technique tutorials. One of my favorite things about her is the projects she does, altered frames, boxes also she makes beautiful cards.
Again there were a number of projects I liked but this was my favorite. I tend to suck at cards so I appreciate someone who is great at them. The box is a total bonus especially the index cards. Very elegant and the cards are fun & eclectic but put together beautifully.

Good luck to the incoming design team, have fun. To our wonderful customers keep in mind how hard these ladies work to bring you inspiration. It is not easy to work within the parameters of one kit & bring multiple projects out of it. Encouraging comments are always appreciated!!! Happy scrapping!

Monday, December 26, 2011

12/26/2011 9:08 PM Hope you had a wonderful Christmas with friends and family. Remember to pick up your Scrap Bucks this week for every $25 that you spend get $5 in Scrap Bucks to use in January. We got in a few new products last week for you to check out.
Advantus- Tim Holtz Vial Labels, Tissue Wrap, Fractured Dolls, Light Bulbs and Pen Nibs.
Elizabeth Crafts- Bronze and Silver Shimmer Sheetz.
Ek Success- Little Mermaid stickers.
Fancy Pants- Winterland papers and 6x6 paper pad.
Petticoat Parlor- Red Cardinals diecut. Happy New Year, Police, Firefighter and 911 Cares diecuts.
Ranger- Glue n Seal matte finish. Picket Fence Distress Stickles. Cut-N-Dry Stamp Pad Felt.
Stampington & Company- Art Journaling magazine.
Don’t forget to join us on Thursday from 11:30-2:30 to work on tags #5 and #6 in the Tim Holtz 12 tags of Christmas series. Remember that we will close at 3:00 on New Year’s Eve and will be closed on January 1st and 2. Have a great week. Debbie

12 Tags this Thursday!

This Thursday we're back with two more of Tim Holtz's 12 Tags of Christmas. We'll be focusing on days 5 & 6. The techniques featured in these tags are alcohol ink and acrylic and using Ranger metal foil tape to create a faux enameled look.

If you'd like to join us, just stop by!  You can pick up a kit with a tag and all the die cut pieces for $3.50 each.  You can check out all twelve of this year's tags with directions at Tim Holtz's blog.

Here's what you'll need to bring:


Day 5 tag:  alcohol inks (Tim used cranberry, red pepper, and watermelon), ink applicator tool, archival ink/jet black, green paint (lettuce paint daubber), pumice stone distress ink, ink blending tool, glossy accents, tiny attacher, sanding grip,  pearls.

I'll bring my seasonal stamps, but if you have a favorite set you'd like to use, by all means bring it! I created a second tag with different shades of green alcohol ink and a snowflake stamp that I just love - you can see the background below.


Two different backgrounds using the same technique -  different colors, different stamps:


Day 6 tag:  paint dabbers or acrylic paint (assorted colors), glossy accents, distress ink (walnut stain),  ink blending tool, heat gun, clear embossing powder, burnishing block, charm and ribbon.

I decided to use a wooden embellishment from Kaisercraft on my tag, but we got more of Tim's Christmas charms in last week!


Saturday, December 24, 2011

2012 journal


I have to say it.  I LOVE the Simple Stories paper line- well actually all their paper lines but who's counting!  They are all so versatile and easy to use.  That especially goes for the Year-O-Graphy paper line~ it works for all different layouts/themes/holidays, etc.
When I first got the paper I knew I wanted to do some sort of year in review type album- just wasn't sure how I was going to do it.  I had taken a class ages ago on repurposing old books- so it got me to thinking about recycling a book and making it into a year in review!  I decided that I wanted to go with doing a year in review for 2012- couldn't get my self organized enough to do a 2011!  /so this book is all ready for me to start working on in 2012.  This book actually was an old Martha Stewart holiday book- just took out the insides and started to create. 

 I used a variety of different types of paper.  I love to art journal so I used mixed media paper, water color paper and some cardstock.  I also added in some of the pieces of the year-o-graphy line- just used the scraps that I had laying around.  I made three different signatures to the book (you call each of the sections you sew in signatures- not sure why....) Since I used a variety of sizes and papers I decided to actually sew each signature on my sewing machine to make it easier to put together.
 I used some buttons on the binding and also used some Tim Holtz Tissue tape to help with the edges.  I did used some book tape to cover the binding and to give it some strength.  I LOVE the way the book came out and can't wait to get started it in!
Enjoy and have a wonderful holiday season!
Lisa

Friday, December 23, 2011

Using Simple Stories Line to Scrapbook Your Life (Easily)

My last two pages for December show how easy it is to match the Simple Stories to the pictures you have.

My first page uses the page map to make a Christmas page.  I was delighted to use these paper as my family wears a lot of orange and rarely does Christmas paper go with orange.  Using a page map makes it easy to make a page.  It shows where to put the picture and the title and you fill it in with the paper you like and the embellishments.  I used the striped side of Everyday Life for my background.  To give it a little shine (I always like shine for the holidays), I sprayed the edges with Spiced Marmalade Glimmer Mist.  I used an 11” x 11” square of Green/Notebook for the inner background.  I distress the edges of this square before gluing down.  Finally, I made photo mat of Orange/Grid from a 10 ½” x 10 ½” square.  (I cut it along grid lines so it may not be exactly a 10 ½” square.  I distressed the edges and inked the edges with Spiced Marmalade Distress Ink.  I scalloped a  strip of Green/Notebook on both sides and placed it below the bottom pictures to complete the frame.  I used the pieces left over after scalloping to separate the pictures. The title was made from two different size and colors of stickers from the set.  I added a Christmas tree sticker and a scalloped circle on which I placed another Christmas tree sticker.  The final embellishment was a scalloped circle cut from the Grid paper. I inked it with Spiced Marmalade Distress ink and added a circle from the set and a “24” sticker to show that picture was from Christmas Eve.

The other one-page layout  truly scraps an everyday event.  A relative and I had driven to Georgetown (45 minutes from my house) just to get a cupcake.  We had such a great time that I wanted to be reminded of the day.  When I saw the pink paper from this line, I thought it was perfect.  Georgetown Cupcake colors are pink but the line lent itself to a less girly pink picture that totally fit the bill. I used pictures of a variety of sizes; most I cut to fit the space/look I wanted, but I did use Photoshop to make a 2” x 6” picture of the three types of cookies we tried.   I used several items from the line to add to the page.  For example, I cut circles in half and then put below the picture to label each type of cupcake. Similarly, I cut out a scalloped circle that said “Celebrate, today” to put beneath a picture of my relative eating a cupcake.  I cut out a heart and a strip of paper that said “Life is Sweet,” clearly appropriate for a page about cupcakes. I again stitched to match stitch design on the paper.  (I just made holes where you needed them with my needled and then went back and stitched.)  I used a sticker to add “May” and “28.”  The small title, “Georgetown Cupcake” also came from the line.  I put a journaling tag on a piece of red paper.  I stitched across the top (as the journaling card showed) and added the year with stickers on the bottom.  

This line really offers stickers, journaling tags, etc that allow you to personalize a page just for your event.  Even if you don't see exactly how they work for your pictures, just buy paper, stickers and journaling cards.  Take them home and look at them.  I guarantee by the next morning you will be thinking, "Oh yeah, that message really fits this day." 

Thursday, December 22, 2011

Dallas Everyday 2010 by Esther


This layout uses the Simple Stories, Year-o-graphy cardstocks and embellishments. Strips of the stripped ___ were used to accent and tie the two pages together. Banners were on one side and I added cut outs to the other.

Since there was a lot of color in the pictures, I mounted them on a solid tan Bazzill cardstock to help them blend with the background. Journaling was printed in brown on ivory paper and mounted on a brown pattern.

Wednesday, December 21, 2011

Owl Be There.

I have been wanting to do this project for months & was waiting for the right paper line to come along & Simple Stories Year.o.graphy could not be more perfect! Using the Tim Holtz Valise die & the cinch to make a mini-book. The obvious thing for this would be a travel book but isn't life travel also? I made a page a month plus book. I made the cover & back using heavy bazzill chipboard that I purchased at ScrapbooksPlus. I cut out the paper -"green" & heat embossed a map design with copper. The straps were cut out using the kits "red". The buckles are glassine that were sanded around the edges to look aged. The nails were made with pearls. Everything was distressed with vintage photo my favorite go to. I added fun metal elements. The base of the book is the monthly journal card elements and an alternated fun element in the middle. Tags, envelopes, or the kits flash cards.
Here I made a bingo card with craft paper, cutting the edges with Alterations. Stamped a script image & ran it through the bingo emboss texture fade. The page was swiped with fired brick to pick up the bingo card image & distressed.
This page I used a glassine envelope & ran it through a texture fade than added perfect pearls & heat set it. To pick up the embossed image I swiped black soot over the top.

This was an insert where I just added a tag. Once all the pages were assembled I put them together using The Cinch. It was super easy & makes my book look very professional. Now all I need is photos, embellishments, journaling...... Have a very Merry Christmas & peace be with you!

Wednesday 12/21 make and take


This Wednesday's make and take is done with the beautiful Winter Whites paper line from TPC Studios.  It is perfect for any winter layout!  Stop by Scrapbooks Plus and pick yours up today!

Tuesday, December 20, 2011

PageMap, PageMap, PageMap!!

Im so happy that we can employ creative license to layouts/PageMap designs. If not, I would get in trouble a lot! I always start off in the right direction but this photo and the accompanying words within in the circles begged to have the 3 circles in the lower portion of the page.

Its also a bit difficult to see in this photo but the tag "live life 24/7" is treated with glossy accents. I love this product! Its perfect for adding that extra bit of dimension and fun!

Be sure to stop by the store to try the map for yourself on your own layouts!

Monday, December 19, 2011

12/19/2011 10:31 AM Good Monday morning to all of you. It’s less than a week left until Christmas, my has this month flown by! Be sure to stop by the store this week to pick up your last minute gifts and supplies. We got in several new products last week so be sure and check them out.

Ellison/Sizzix- Tim Holtz Die Pick. Tim Holtz Gingerbread Big Z Die.
Maya Road- Satin Pleat Aqua Ribbon. 3x3 Canvas Coaster Album. Mini Kraft Jotter Tags. Mini Tag Canvas Pieces. Baker’s Dozen 2012 Calendar Kit.
Petticoat Parlor: Laser Title Cuts: Christmas Lights, Decorating the Tree, First Christmas and Merry Christmas.

Just wanted to remind you that crops have been postponed until after the New Year so that we can all spend more time with our friends and families.

Be sure to join us on Thursday from 11:30-2:30 to work on tags #3 and #4 in the Tim Holtz 12 tags of Christmas series. Have a great week! Debbie

I really liked this collection by Simple Stories. Got photos laying around that you need to scrap? No problem! It has lots of tags, pieces, calendars and designs. I had this photo of Rachel in her first Nutcracker performance that I'd been waiting to scrap.

I started with the "celebrate life tag" and the photo transparency. Next was finding paper and other items that would complement my photo. I loved the mini calendars - and I'd use them on every layout if I could! For my embellishments, I grabbed a couple of stickers - a snowflake and a "snowflaky" design as accents. Love this page!

Saturday, December 17, 2011

Folded Tree Christmas Card

This card has a few different elements that make it look complicated but it really is very simple!  The tree is made from half of a 5 1/2" circle.   Simply cut out a circle then cut it in half.  The sample below shows approximately where the folds are made on the circle but it doesn't have to be perfect to look great!  The first fold is the one on the left in the photo.  This becomes the bottom of your tree.  Note that the point is at about 2/3 of the straight side of the half circle- not the center. The next fold is folded in the opposite direction and the final is folded the same direction as the first.  The tree is completed with Stickles as ornaments and a star brad on top.


The other really fun element on this is Grunge Board by Tim Holtz.  I used a Sizzix embossing folder on raw Grunge Board and then rubbed my distressing ink over it.  Grunge Board is really fun to work with.  It is really strong- much better than chipboard because it doesn't crack and break- but could be used in the very same manner.  It is also pliable so you could use it as a hinge.  It comes in a pack of sheets where you could use all or just a piece.  Such fun stuff! 

I completed my card with the beautiful braided trim and a sneak peek at some perforated music paper from next month's Design Team kit!  Happy Holidays!!

Friday, December 16, 2011

5 Years Old


I made this layout using the page map that Lisa included in our kit. Sometimes page maps are just a starting point for me and after moving things around a bit I end up with something that looks very different from the original page map. This was not the case for this layout. I loved the page map and followed it pretty closely. I think the thing I loved so much about the page map is the circles. There are three on the page map; one at the top left, one at the bottom left, and one in the middle of the page on the right side. Together they make what is known in design as a Visual Triangle. This visual triangle is used to pull the whole layout together and to cause the viewer to see the design as a whole.


I used a few circles that I punched out of the Life Snippets paper. This particular paper went a long way in my projects. I used these circles on a few projects. Since I popped them off of the page by using pop dots I was able to create a finished look to the layout with just these circles, no other embellishments were needed.

Thursday, December 15, 2011

Year-in-Review Minibook


I had this Fancy Pants minibook sitting around. I just loved it and grabbed one as soon as Debbie got them in. And I had been saving it for just the right thing. Well.... fast forward a few years and that mini album was still sitting around.  I decided to just dive right in and use it for this month's Simple Stories kit. And I'm so glad I did!

I decided to use a photo from each month in 2011. The felt and transparent pages highlight some of my favorite photos or memories from the year.


Here's a look at several of the pages:


We all have product that we just *love* and have to have -- but love it so much it just sits there unused -- like my Fancy Pants book. Take a deep breath, grab some photos and just USE it! Trust me, you'll love it even more when it's part of a finished project. :)