

Wednesday, August 27, 2008
Are you ready for Autumn? September DT kits are almost ready!

As the end of summer nears, the days get a bit shorter, the nights a bit cooler, making getting outdoors all the more inviting. For this month's Design Team kit, I went with a true "Virgo" line - playing to my earth sign completely (yes, its my birthday month, too!) This month's kit begs for nature layouts with soft, earthy muted colors in blues, browns, greens and reds. Think about layouts highlighting your home, nature, outdoor activities, etc. as well as photos of all those men in our lives. And don't forget about all those heritage photos you've been meaning to scrap. This line is just perfect for them!
Nearly everything in this kit comes from the Anna Griffin "Sierra" line....Printed cardstock, patterned kraft paper, wooden brads, jute, leather, tape "ribbons", golden resin pieces, dimensional stickers, currugated photos corners, etc. The kit includes Chantilly Lace cardstock in tan, burgany and brown, as well as wooden monogram letters from Kaiser crafts.
So start your planning and get ready for a break from pastels and pinks. Its time to get woodsy in our creations. Kits are ready for the long Labor Day weekend and available for pick up by DT members Friday evening and due back to the store by September 15. Enjoy!
Monday, August 25, 2008
Summer Sunshine layout with stitching template
.
Recently restocked at Scrapbooks Plus are the stitching templates, needles, paper piercers, piercing mats, and colored floss from the Bazzill Stitch'z line. And I've been taking many customers back to the Design Team display board to show them how I used the large flower stitching template on my two-page layout this month. So I thought I would share this technique here, too.

For these two pages, I chose the plain green and yellow reverse sides of two American Crafts "Spring and Summer Collection" papers from our August Design Team kit and cut them into larger and narrower strips to alternate across the width of the layout. I wanted a late summer feel to the colors so I could use a few of my butterfly photos, since I enjoy their company so much in my garden. For my photo mat, I offset a 9" x 12" portion of the scalloped green-and-white swirl paper, adding a scalloped edge to the cut side. With leftover strips of the green swirl paper, I added a few more scalloped edges to soften the straight cuts. The strip of deep pink dotted fabric helps to settle the eye and connect the other pinks.

In the negative space left over on the right page of the layout, I continued the idea of the swirly "butterfly path" lines by using the Bazzill Stitch'z template to outline part of the flower design. The templates make this technique very simple. You place your paper on a piercing mat, then position your template over the section of paper you wish to pierce, and follow the already-punched holes in the template to pierce your paper holes. You can use as much or little of the template as you choose. Here I used a third of the three-flower design, but you could use only one flower outline, or any other part. And there are many other template designs to choose from.

With embroidery floss (there are 7 colors in the store, available by the yard or the whole roll), you sew a running backstitch to complete the design. That means you 1) bring your threaded floss needle up in one hole, 2) take a stitch back and down through the preceding hole, 3) run your thread under the paper forward again for two holes and 4) bring your needle up in the next clear hole from where you came up before. Then backstitch again down through the preceding hole, run forward under two holes, and come up in the next clear hole. You won't want to make your thread too long because it tends to knot up on itself or get caught on the corners of your layout. To change threads, just leave a tail of thread on the underside of your paper and anchor it under several backstitches; don't knot it. Needleworkers will tell you to let your thread dangle every once in a while to stretch out its kinks.
To finish the layout, I used the little "sunshine" stamp, a couple ribbon loops for horizontal effect, some silk flowers, photo corners, and butterflies cut with Martha Stewart punches. The big green swirls are from a Sizzix die.
.
Saturday, August 23, 2008
Another Idea to Play with Hambly

Love Erin's ideas for Hambly. I used the strip of two rows of circles to frame some of the action photos of my son boogie boarding. I printed a number of action shots in either 2" x 2" or 2" x 4" size and cut pieces of patterned paper in the same sizes. I then created a 4 inch strip of photos and papers for my page. The Hambly overlay was perfect to frame some of the action. I adhered the Hambly horiziontally down the center using a thin line of Zip Dry glue. Then I covered the glue with a strip of ric rac on top of the Hambly.
This technique is great for sporting events of kids as well - a great way to highlight a set of action photos where you just can't choose which one to use. I say, use them all, and then pick the very best one to enlarge for your focal point. I think I'll use this design again for my son's very first touchdown he made this morning. Go Nicky!!
Friday, August 22, 2008
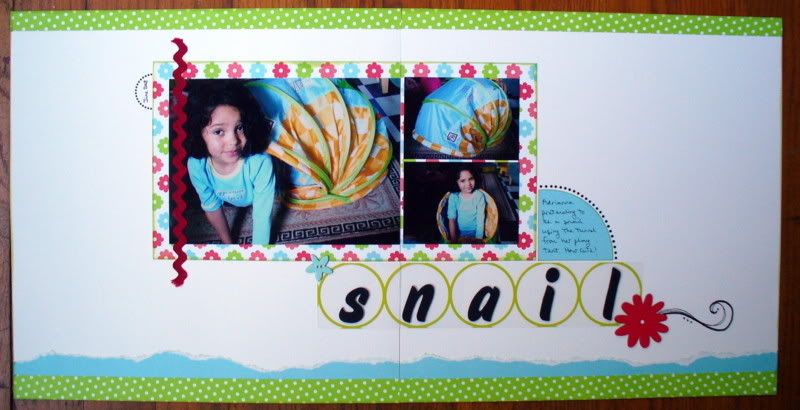
Playing with Hambly
I don't know about you... but I have a number of those cool Hambly overlays that I've purchased and carefully socked away. They are not being used in part because I like them SO much that I'm afraid to cut them (what if I mess them up, after all?!). The other reason that they are stuck in my stash is that I'm I little afraid of using them... they are a little bit intimidating. When Nancy said that she was going to be adding a little bit of Hambly into out kits I was excited... and I was determined to actually utilize them!
Now the Hambly sheets are clear... so you have to think of how you will attach them early on in the design process. You can always hide your adhesive by placing it behind overlapping pieces. Other ideas are to sew them on, staple them, use brads or eyelets to attach them, or use adhesive over the entire back - like a Xyron - to make it less noticable. Both of the projects I made using my Hambly pieces hid the glue behind overlapping parts.
The first project was a 2 page layout. I decided to use the circles in the Hambly overlay to hold each of the letters of my title. I love the American Crafts paper because all you need is just a little bit and it has a great impact... and you have lots of scraps left for other projects! A little rick rack, some American Crafts rubons, and doodling finished it off.
The second project was a card front. I cut out just one of the circles from the overlay and used it as an accent to my large punch and as a home for my little, chipboard birdie. The birdie is painted white and sprinkled with a little bit of white glitter. The card also features the "Sunshine" stamp from Imaginesce. Love these stamps and I am a little addicted to picking them up... they are so cute and inexpensive that they are irrisistible!
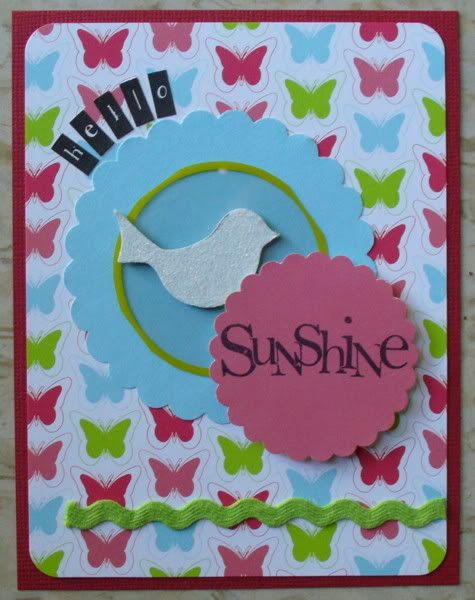
A note on cards: I usually make just the front of the card and then attach it to a purchased plain white or cream card. This way it's easy to get a nice square front ... because sometimes the cards aren't perfectly square. It also helps keep the inside neat since you can hide stitching and brad backs without the inside of your card looking messy. Plus, as a bonus, you can always easily write on the inside even if your card front is a dark color!
Happy scrapping!
erin
Now the Hambly sheets are clear... so you have to think of how you will attach them early on in the design process. You can always hide your adhesive by placing it behind overlapping pieces. Other ideas are to sew them on, staple them, use brads or eyelets to attach them, or use adhesive over the entire back - like a Xyron - to make it less noticable. Both of the projects I made using my Hambly pieces hid the glue behind overlapping parts.
The first project was a 2 page layout. I decided to use the circles in the Hambly overlay to hold each of the letters of my title. I love the American Crafts paper because all you need is just a little bit and it has a great impact... and you have lots of scraps left for other projects! A little rick rack, some American Crafts rubons, and doodling finished it off.
The second project was a card front. I cut out just one of the circles from the overlay and used it as an accent to my large punch and as a home for my little, chipboard birdie. The birdie is painted white and sprinkled with a little bit of white glitter. The card also features the "Sunshine" stamp from Imaginesce. Love these stamps and I am a little addicted to picking them up... they are so cute and inexpensive that they are irrisistible!
A note on cards: I usually make just the front of the card and then attach it to a purchased plain white or cream card. This way it's easy to get a nice square front ... because sometimes the cards aren't perfectly square. It also helps keep the inside neat since you can hide stitching and brad backs without the inside of your card looking messy. Plus, as a bonus, you can always easily write on the inside even if your card front is a dark color!
Happy scrapping!
erin
Hidden Mickeys?
I picked up my kit on the way home from Dulles after spending a week in California. Needless to say I had Disney on my mind. And as soon as I pulled this paper out of the packet, I knew it would be perfect for Disney pages. Look at all those "hidden Mickeys!" Hidden Mickeys are the Mickey Mouse head and ears concealed in the design of an attraction at Disney. And while we were too busy to look for these at the park, I sure saw quite a few in this American Crafts paper.

Not seeing it? How about now...

For this layout, to accentuate the "mickeys" I cut several out of the paper, coated them with Ranger's Glossy Accents, then adhered them to the layout with pop dots. And the stripes on the scalloped American Crafts paper is just perfect for journaling!


Not seeing it? How about now...

For this layout, to accentuate the "mickeys" I cut several out of the paper, coated them with Ranger's Glossy Accents, then adhered them to the layout with pop dots. And the stripes on the scalloped American Crafts paper is just perfect for journaling!

How to Hook a Worm
 This month's DT kit was really so inspiring to me. I love American Crafts- their bright, bold designs are so much fun to use! This LO was inspired by my niece trying to teach my son's how to bait a hook with a worm. I used a transparency journaling block from Prima, but when I put it on the LO it didn't "pop" enough for me so I painted the back edges with an Adirondack Paint Dabber and backed it with a piece of white card stock- I attached the card stock with Zip Dry Glue since it dries clear. I love the way that you can paint on a transparency to make it custom to the project that you are creating. I used Grungeboard arrows covered with Doodlebug Glitter in Limeade-the glitter is available at ScrapbooksPlus- to follow the pictures of the LO.
Wednesday, August 20, 2008
August Project Kit

Hey all,
Each month the designer who's responsible for the Design Team kit also creates a project kit. For my kit, I combined the accordion fold and the pamphlet stitch to create "Sunshine Days," a mini that does double-duty for all your summer memories. Add photos to both sides of the accordion, journal or add more photos inside the attached mini, and use the rub-ons and chipboard accents to give your pages added dimension. Use the "Sunshine" stamp to create a title or add to your journaling. Tie it all up with ribbon or leave it out as a display piece.
The project comes with color instructions and is available for purchase at the front of the store. If you have questions, ask away. I'd love to see what you create!


Tuesday, August 19, 2008
New August DT display and new August DT RAK
.
Speaking of "Happy" papers, the latest colorful Design Team layouts, cards, and projects for August are already on display in the crop/class room at Scrapbooks Plus, just waiting for you all to come in and see them. Design Team member Nancy Palm picked our DT kit this month, with lots of bright summery colors from American Crafts. As Designer of the Month, Nancy has also designed a special DT Project Kit for sale, featuring a project you can make from all the papers, embellishments and instructions she's included in the kit. We hope you enjoy the variety of styles and techniques on display -- and we would enjoy hearing from you with any questions you have for us.

Don't you just love to win something? Design Team member Susie Bentz has offered a fun and colorful explosion box as our August RAK of the Month. Come in to Scrapbooks Plus to see this box pop open and reveal all its inside fun. She's also added an extra little surprise to the RAK. To be eligible to win this sweet little creation and fill it with your favorite summer photos, scroll down and check it out on her August 17th RAK post. Susie will draw the winning name from all your comments left on that post.

By the way, if you see a layout or project on the DT display board that inspires you to create something similar, each month Debbie arranges all the monthly papers and embellishments used by the Design Team on a special stand close by the display board. You can choose your papers from this convenient stand and sit right down in the crop room and get to work with the DT sample close at hand.
.
Monday, August 18, 2008
Happy
 The August kit designed by Nancy is full of American Crafts FUN! To me the bright, summery colors are just so much fun to use. I purchased on of the BoBunny Word books at ScrapbooksPlus that spells Happy. It worked perfectly for our recent vacation photos! I covered each of the pages with the AC paper- I love to use the Fiskars Fingertip Craft Knife to cut around the edges and ZipDry glue (ScrapbooksPlus sells them both!). I sanded around the edges and inked them to cover any "mistakes" that I made! I used the Printed Tickets from Jenni Bowlin for small journaling spots- they were perfect for it. The AC chipboard shapes were the perfect accent- they coordinated perfectally with the paper. I looped ribbon thru the rings so that I could hang it up to display.
Sunday, August 17, 2008
Cricut Swarm - So Glad I dropped in!!

I dropped by the store last night to check out the 1st ever Scrapbooks Plus Cricut Swarm. Those ladies were really hopping! (sorry, corny "cricket" joke but I couldn't help myself...)
I hadn't actually planned to stay, but I received lots of encouragement from Debbie and the other ladies to try the new Cricut Expression. So I bought a few pieces of cardstock and started to play!
I need to say a special thanks to Misty for loaning me her "Stretch Your Imagination" cartridge. I cut out a couple of Palm Trees (10.5" tall) and learned how easy it is to use the "Flip" mode on the machine- I cut another set of these that are a mirror image. Misty then gave me a quick lesson on chalking - which she also let me borrow! I still need to add some more detail - more Misty tips on adding texture with a few strokes of a black pen - but I am happy with the results so far. Won't they be great as a border on a beach layout?!?!
I was also encouraged by Laura to borrow her Soccer mini cart...thanks, Laura! I am now ready to do some pages from my kids' soccer days. (These die cuts are 5.25" tall, but you know I could have made them any size from 1" to 11".) Hmmm, I think I may have to buy the Baseball mini-cart (and I promise to share!).
I am now ready to do some pages from my kids' soccer days. (These die cuts are 5.25" tall, but you know I could have made them any size from 1" to 11".) Hmmm, I think I may have to buy the Baseball mini-cart (and I promise to share!).I have a baby bug at home, but I am REALLY happy to have access to the Cricut Expression in the Classroom. You are welcome to bring in your own cutting mat and cartridges and use the machine the next time you are cropping at the store....OR Debbie has made a cutting mat and the store cartridges available for only $3 per session. (details at the front desk)
Oh! I also ran into fellow DT member Kim at the Swarm. (Loved the word book she was working on!) Kim will be putting together the kit for November. I don't think she has made any final decisions, but hinted that I shouldn't be expecting to see any turkeys...I can hardly wait!
I think I mentioned that Debbie was there, too, working on an album of her own. (Beautiful with a capital B!) I got to see her using the non-stick craft mat from Ranger Ink. She painted some Tim Holtz grungeboard swirls on top of the mat using acrylic paint. I think she may have to order some more of the craft mats for the store...we were all very impressed with how easy it is to clean up...and you can use it for stamping, embossing and even baking shrink art in the oven!
Bottom line - what a fun experience! Lots of talented ladies ready and willing to share tools, cartridges, opinions and techniques. I am definitely going to sign up for the next Swarm - as soon as they have it scheduled!
August RAK Giveaway

As the August designer of the month, Nancy picked some great papers from American Crafts. One of my favorite things to make is Exploding Boxes, and it was really easy to make August's RAK giveaway with the kit from this month. The colorful "paper" is really cardstock weight and it is double-sided. The box is full of flowers and butterflies...and plenty of pockets and tags just waiting for your journaling and pictures! Plus...there is a bonus item this month...Nancy included a clear stamp (the word "Sunshine") in our kits in this month. I just love it...in fact, I already have that stamp so I am going to include the kit stamp in this month's giveaway!
So...here are the rules to be included in the drawing for this RAK. (1) leave a comment on this post telling me about your favorite clear stamp designer and/or company OR an unusual/creative way you have used clear stamps in a project of your own, and (2) no DT Member or employee or owner (Sorry Debbie!) of Scrapbooks Plus will be included in the drawing. I will pick the lucky winner in a random drawing on September 15th, the day we change the DT display in the store. If you are local, you can just pick it up at Scrapbooks Plus. If you are not, we will mail it to you!
BTW - Debbie always has the cutest selection of clear stamps to choose from - I already picked up some of the new ones that just came in for Halloween and Christmas. Better get them before they are gone!
.
.
Saturday, August 16, 2008
July RAK Winner!
I solicited some help from my kids this morning to draw a name for the birthday cupcake album. And the winner is .... Scrappygal!! You can stop by Scrapbooks Plus to pick it up, or leave us an email address so we can coordinate getting the album to you.
And just wait til you see the August RAK - it's spectacular!
And just wait til you see the August RAK - it's spectacular!
Wednesday, August 13, 2008
.
Hurry, hurry!! Just a couple days left till the drawing on August 15th for the July RAK Giveaway on the Design Team blog. Scroll down through this past month's DT blog posts to Deborah's July 20 entry and leave your comment for us. You might be the lucky winner of her so-cute Cupcake Album!

.
Hurry, hurry!! Just a couple days left till the drawing on August 15th for the July RAK Giveaway on the Design Team blog. Scroll down through this past month's DT blog posts to Deborah's July 20 entry and leave your comment for us. You might be the lucky winner of her so-cute Cupcake Album!

.
Sunday, August 10, 2008
Design and Measurements for "Rough Water" amd "Blossom" layout
 I am so inspired when I get requests from so many of you asking for the instructions/design measurements for my layouts. In the middle of this post is a design diagram to help when you recreate these layouts with your own photos. The diagram that I have drawn is not to scale, so use the photos of the layouts as guidance on proportion. The sketch is to help you determine the measurements and concept behind the design. For the July DT "Rough Water" layout, all the circles are cut at 3.5 inches in diameter except for the middle circle that spans across both pages. It is 4 inches in diameter. I sanded the edges of the circle cuts just a bit, applied Zig two-way liquid glue to the edges and across the bottoms of the photos and sprinkled them with the new Doodlebug Sugared glitter in the green, blue, and purple to coordinate with the crafter's workshop papers. Both of the rectangular photos are 4x6. The center glitter paper is cut in half (6"x12") and adhered 2.5 inches from the top of the background paper. And the rest is just adding borders, edges, ribbons, etc.
For "Blossom" the cuts are easier - the tough part is hand cutting all of those flowers! I used a Fiskars finger craft knife and my trusty quilting mat to cut those. The photos measure 5'' x 7" and two 3.5" x 3.5". Or you could use one 7"x 8.5". I rounded all the edges of the paper - even the white Bazzill "bling" background. I used Quick Quotes Pink Martini chalk ink on all the edges. And who says boys don't do pink!!

Friday, August 8, 2008
August DT Kit - Initial Progress

I have just returned from a two week vacation and have been bombarded with a plethora of activity at work, the beginning of football season with five nights of practice for my two youngest sons and a new puppy (yes we finally gave in and got another lab!). I am way behind in working on the August DT kit put together by Nancy Palm. So this morning around 5:00 am, I got up with the puppy and set to work at the kitchen table (a shelf fell down in my scraproom while we were gone - my husband's installation several months ago was apparently flawed - so I have been forced out of there until I can find the time this weekend to clean up the mess!). Anyway, I captured a few pictures of my son's boogie boarding at the beach in this layout - It is not completed glued down yet - still need to add some brads, maybe a rub-on or two, journaling, title and the like, but you can see where I'm going with this. I wanted the focal picture to show his completed wild ride, with some of the action shots of other rides as supporting photos but not too distracting so I made them much smaller. The colorful American Craft papers highlight the colors in the board with the background (Bazzill cardstock) complimenting the water.
By the way - if you get a chance, jump over to my blog (link to the right of this screen) and check out my two new Basic Grey layouts I did while on vacation. "Hang Loose" was published Wednesday by Basic Grey - you can check it out under my name in the Designer Gallery on their website http://www.basicgrey.com/ , along with all the new papers scheduled to be released this fall, all of which you will find at Scrapbooks Plus in the coming months. (I am in LOVE with "Ambrosia" - can't wait to get it in at the end of this month!!)
Nice Girls . . .
.
I'm just back from CA and southern Oregon, and am hustling to catch up. So I thought I'd hurry to share my entries from last month's DT kit before we're full swing into this month's new kit.

In this two-page layout, featuring my beautiful granddaughters in their gymnastics leotards, I tried to develop a sense of movement across the page by cutting around the small circles of Crafter's Workshop Blueberry Pie to create a spilling, tumbling effect. Most of the area is one large section of circles, but I also used the leftover circles to overlap and tumble out of the main space, especially onto the second page. Using Berry Swirls, I cut a scalloped outline around the larger dotted circles to frame areas for the title and journaling. Before adding the words, I placed hand-cut purple and green leaf segments on the swirls to enliven the white spaces.
Because I had just the two photos to work with, I reprinted them and used a Martha Stewart square punch to cut the reprints into two reassembled mosaics that I framed for the lower left part of the page. This allowed me to repeat the deep colors of the leotards without competing with the focus on the main photos.

The capital letters in the title, the green spiky flowers and lower photo frames are all Sizzix die cuts. After I framed the lower photos, I used leftover frame pieces to suggest parts of a crown around the "Finish First" photos in the upper right.
Don't forget to scroll down through the previous posts to find the July RAK Giveaway! Leave your comment on that post to enter the drawing for Deborah's delightful cupcake album. Yum!!
.
Alphabet accordion book
.
For the July DT project, I decided the bright cheery colors with clean white backgrounds of the Crafter's Workshop papers were perfect for an alphabet mini-book. My DT kit contained the green sticker alphabet and the pink Thickers alphabet, lavender Bazzill cardstock, pink cardstock, and other lollipop-colored embellishments, so I had lots to work with. Armed with tag, circle, and corner punches and my trusty scalloped scissors, I went to work.

First I made the accordion pages using three 12"-wide sections of Strawberry Lace paper, adhered back to back, for a total of 6 pages.

Then I made several folded enclosures, like file folders and envelopes, to sew into the folds of the accordion pages. For each enclosure, I started with a 12" span of paper, either 6" high or higher, and folded the paper into an envelope or folder that matched on either side of the center fold.

For the file folders, I used Bazzill cardstock (because the color is double-sided) with a folded-up slot, trimmed it with scalloped paper, and secured it with eyelets and crochet thread.

For the envelopes, I used more Crafter's Workshop papers. With their cardstock weight and white reverse side, they held up well to the folding and sewing for the book.

Adding the sewn-in signatures to the three accordion folds increased the number of pages so I could include the entire alphabet.

Finally, I covered chipboard for the front and back covers and adhered these to the outside single pages, securing ribbon ties in between the page and cover. Each album page has its own alphabet letter plus simple embellishments, including tags, photo corners, circles, flowers, and ribbon. Wouldn't it be fun for a child to learn his alphabet by matching photos and found objects to each letter, adding them to the pages and pockets to come back and find again later?
.
Wednesday, August 6, 2008
A Few Cards
Here's a few cards I made with the July kit. I liked all the circles on the paper and thought I'd really set them off. I grabbed my circle punches and some pop dots, and off I went. For my first card, I used a circle punch on the bottom of the strip along the green edge. I adhered the circle cut-out to the card with pop-dots.

On this birthday card, I used the sparkly blue paper from DCWV as my background. How festive! Then, I again used several circle punches and layered everything, topping it off with a stamped cupcake on a piece of Bazzill Bling cardstock (attached with pop dots).


On this birthday card, I used the sparkly blue paper from DCWV as my background. How festive! Then, I again used several circle punches and layered everything, topping it off with a stamped cupcake on a piece of Bazzill Bling cardstock (attached with pop dots).

Subscribe to:
Posts (Atom)