Tuesday, November 30, 2010

Reusing Your ScrapbooksPlus Bags

I love the bags that Debbie gets at ScrapbooksPlus. I know that she just orders an assortment... and what she gets is a surprise, but every shipment always has at least one design (and sometimes more) that I know will make a great minibook. I usually make these little books for my daughter to create her own special scrapbooks.... but this time around I decided to make one for myself. These would a great little Christmas gifts too!

Here's the how-to. There are a lot of pictures... but really it's very easy. Once you make one, you can make them over and over again with different bags or pieces of paper.

First, start out with one of the large size bags and fold it in half lengthwise.


Now fold your bag in half in the other direction.


Fold the bag in half one more time in the same direction as the last fold.


Spread your bag out flat. You should have 8 little rectangles.


Cut through all layers of the bag on the center fold line as shown below. You won't cut into either of the end sections on the bag.


Refold the bag along the lengthwise fold and pop both cut sections out. Pinch the folds into place.


Squish the book pages together....


... and fold into a book shape. I usually fiddle with the pages at this point to see which ones want to fall where. Whichever page looks the best can be the front. All the pages will not necessarily line up perfectly... some may extend a little more than others, etc., but that's okay


When I made my minibook, I cut 4.5 x 6 pieces of black cardstock for each page. then I added my pictures, Teresa Collin's Giving Thanks paper bits and Basic Grey buttons. Each page got a title with pretty Dear Lizzy foam stickers. Starting with a base for each and adhering them at the end is a lot easier and hides the fact that there is a little variation from page to page in the book.
On the cover, I used a Teresa Collins die cut and some lovely Bazzil leaves. The crinkly purple ribbon runs through the middle of the book inside the bag and pops out a little cut I made in the edge of the bag. The cover happened to be a page with an open bottom... so after I taped the ribbon in place, I used my ATG to seal it shut.


Since I was using black cardstock for each page, I inked the photo's edges with black Staz-On ink to match.


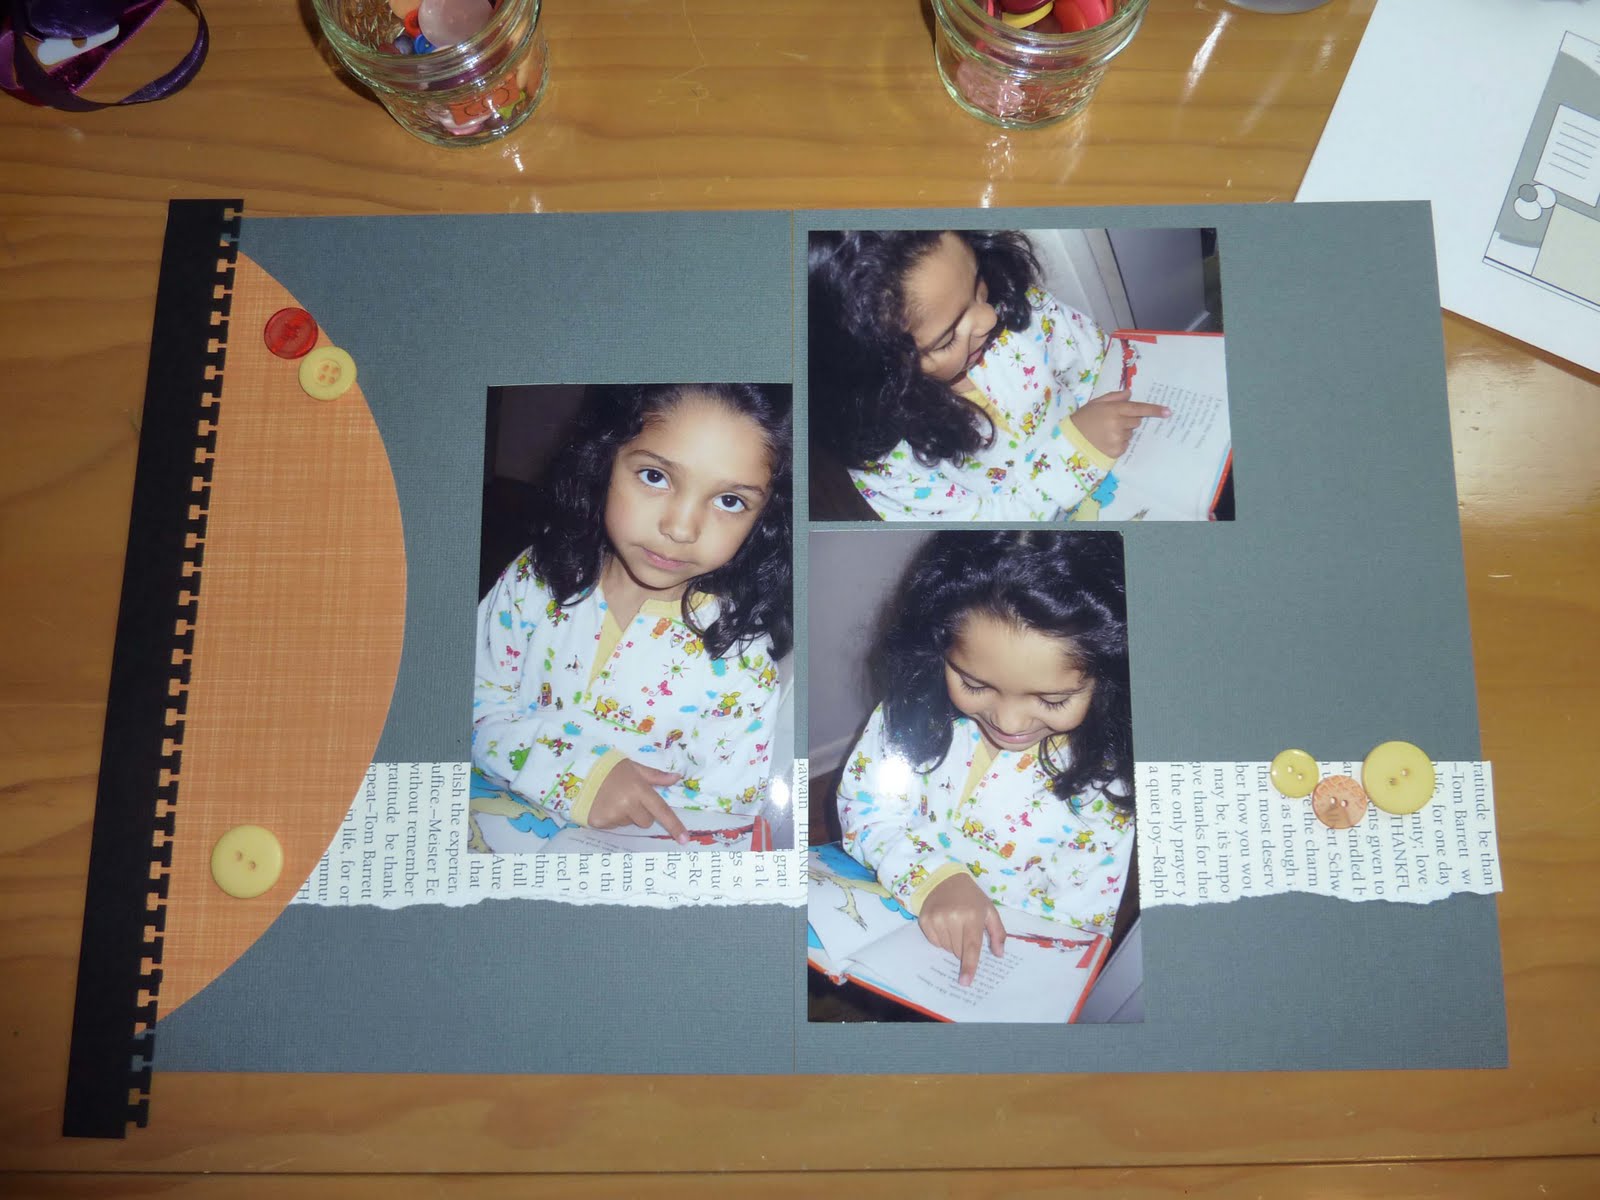
One or more of your pages will have a spot for a "pocket" depending on which way you folded your bag. You can use the pockets or glue them shut to make the book more sturdy. I made a little 4.5 x 6 card to slide into the pocket on the right (with the orange paper and black ribbon). This holds an extra photo that was landscape and I just didn't want to trim. The space on the back of the photo is for my journaling about the day.


Here is the last page... you can see the notch of cut for the ribbon to pop through on the right edge.


And here's the back! Once I have everything glued on, I'll go back and run some adhesive on the inside of the bag to secure it together and keep it's book shape a little bit better.


thanks for stopping by!
erin

Monday, November 29, 2010

What I'm Thankful For

Thanksgiving is the perfect time of year to reflect on the things for which we're grateful. I'm eternally grateful for my children, who bring so many things into my life (good and bad!).

What are you most thankful for?

Sunday, November 28, 2010

Thankful - Two Page Layout

This two page layout is a dedication to my daughter. I tell her how proud of her I am and how much I love her. She will be able to look back through the years after I am gone and remember what an awesome mom she had! Lol.

My favorite papers from the collection were used as the base of my design. I love the delicate design which frames the page. I used Teresa Collins - Giving Thanks Collection - 12 x 12 Double Sided Paper – Tags (Non die cut) for the gratitude quote and journaling blocks. The thankful sentiment is from the collection’s Die Cut Tags sheet.
 
The collection contains a nice variety of journaling boxes.

I used Prima crystals to accent the bottom left corner of the quote.  Crystals give an elegant look to any page.

This collection has a wide variety of beautifully coordinated embellishments.  Here I used the circle "Live with Gratitude" embellishment and mounted on black cardstock that was punch and embossed using Spellbinders dies.

Thanks for joining me today.

Robin

Friday, November 26, 2010

Deli by Day by Esther


Five images for a one page layout led me to create this page map. The visit to a resturant that was a deli in the day and a fine-dining restaurant in the night gave the inspiration. There was antique decor in an old house. We went to the deli for sandwiches one day to find paper napkins and cloths and thought we would return for the gourmet chef's night offering of fine linens another time.
The menu and one picture were shrunk to fit the page. Pictures were mounted on biege cardstock and corners shaped with the Chomper Deco. The half round on the left is a flower that was increased in size and cut on the Cricut with copper cardstock. A strip of the stripped paper is in the lower section. The more decorative Teresa Collins cardstock was used as the base. Lettering for the title was welded on the Gypsy and adorned with Stickles. It was adhered to the copper for a contrast leaving the decorative designs at top.
Buttons, a decorative lace flower and a date tag were used for accents. A bubble of music was added at the bottom. This is one way to add several pictures to the layout by overlapping some of the smaller pieces. I hope you have enjoyed this ornate Teresa Collins line of Showing Gratitude.


Thursday, November 25, 2010

Thankful for my family!

What's more important then to be thankful with your family on Thanksgiving. I tried to show this in a little chipboard shape house with Thanksgiving photos of my family. I first painted every page with orange paint. Then I used a this month's paper line from Teresa Collins on each page. I love how I put the family photo at the dining room table on the second page. This way you can see thru the windows and door.


I and drew brick lines on the front chimney.On the other pages, I added a little black cardstock just to emphasize the chimney. I tried to show photos of the family as well as our home and our late dog Lax. He even had Thanksgiving dinner in his own bowl. I also thought it was important to show our traditions for that day. We always fry the turkey
outside and have lots of good Pennsylvania Dutch food. I
enjoyed making this little book. It was great paper to use for some great memories.

Wednesday, November 24, 2010

Pre-Thanksgiving Make & Take

As we are all getting ready for Turkey Day, don't forget to pop into the store for this week's two-page layout and freebie. I used SEI's Moonrise collection... the oranges, browns, and touches of gold work with your fall and Thanksgiving pics as well as any vintage shots that you may have.


Wanna' see? Well, here's a sneak peek of the freebie's that I made from old book papers. Stop in the store to see it all.


thanks for stopping by!

erin

Be Grateful


Life is busy & crazy & stressful. There are many days when I have to kick myself & remember that I have nothing to complain about. My family is healthy, we have a home & the future looks good. We have not been swept away in a Tsunami, had our house torn apart in a mud slide or destroyed in a hurricane. I have to remember to breath & be so, so grateful that I was born in a free country. Instead of whining about too much laundry-I need to be grateful that we can afford clothes & that we have electricity. In scrapping these beautiful Teresa Collins papers this month I wanted to do a layout about the Oklahoma City Bombing. We visited the memorial as a family the day after the 11th anniversary of the bombing. It had a huge impact on me. The memorial is a powerful testimony to how frail life is, that it can be taken away in a second but also showed what strength people can have in the face of sheer disaster.
As I stood next to the Survivor Tree, this beautiful vibrant oak tree that is over 80 years old. I could feel it's quiet power. It survived the blast & even though everything around it was on fire somehow the tree survived & became a symbol of strength. This extremely well designed memorial makes you realize that tragedy is not something that happens on the 6 o'clock news. It happens to real people ever day & it changes their lives forever. Every day we spend alive & well, is a miracle & it reminds me to cherish this moment. On this Thanksgiving Eve most of us will be running around doing last minute shopping, scrambling to get things baked in the kitchen, & preparing to deal with the latest family drama. Take a moment & be thankful that you have family, that you live in free country, that you have time. Just breath.

Tuesday, November 23, 2010

From Sketch to Layout

Many times people tell me that they just can't scrapbook because it looks too hard. Or they say that they just don't have any good ideas. Well... I know that scrapbooking isn't hard.. it's just gluing photos on paper when you come right down to it. And as for the ideas part, there are lots of places to get ideas from. A great place to start is with a sketch. I love seeing everything that the Design Team creates on the reveal day on the 1st, and my first stop in the Crop Room at ScrapbooksPlus is the sketch wall. It is amazing how many fabulous layouts come from one sketch and how different they can look. So.... I thought I'd capture the process I go through as I work with the sketch to show how easy and flexible they are.

First up, this month's sketch was courtesy of Esther and had many elements in it. You can see it and all of our layouts here (at the very bottom). I found a set of four photos to use and started by arranging them on the page and cutting the circular element out of the orange linen patterned paper.


It seemed a little crowded for me.... so I decided to switch to a double 8.5 x 11 page instead and drop one of the photos. I also decided to switch out the black cardstock for some silvery grey.


Now, time to add some of the sketch elements. I used the text paper for the stripe crossing the page. I cut across the direction of the words to give me the feeling of the text while neutralizing the meaning of them. I decided to add a punched notebook page border to the left-hand side.


Esther included a number of round elements on the sketch. So I pulled out my button stash and found some oranges and yellows to complement the photos and the papers.


I still wasn't sure about my round elements... so I tried out some of the Sassafrass Lass stitched and layered flowers. I put them each on a punched black circle and added punches black photo corners to the outer corner of each photo. Putting three black items helps create repetition in the page and repetition just feels good! :) I added a tag under one of the photos for journaling and a little photo of the Green Eggs & Ham book since Esther's sketch had a small square in nearly the same spot.


Now for the title... had to go with black (these are old Heidi Swap letters) and now I needed to fiddle with everything to get the buttons and flowers to look just right.


Here is the final layout all glued in place. A ribbon for the tag and inking all around finishes it up.


thanks for stopping by!
erin

PS. The favorite 50 refers to the that that Dr. Seuss wrote Green Eggs & Ham on a dare from his editor that he couldn't write a story using only 50 words. This book was always one of my favorites as a child and I loved trying to see how fast I could read it aloud. It must be genetic... since my daughter came home with a copy from a book swap at school... and I've heard her reading it aloud to herself, really, really fast. :)


Monday, November 22, 2010

9 Years


The base of this layout is the Thank You paper, the side with the pretty border on both the top and the bottom. The half circle to the left side of the layout is the other side of the same paper. I used a plain piece of cardstock and a music notes stamp to make the photo mat for the picture on the left. The title, Thankful for... Us, is from the Transparency Labels in this collection. I used Zip Dry to adhere the transparent pieces to the cardstock in order to make them stand out a little better. The subtitle, "Thank you for sharing your life with me," and the journaling are both printed on cardstock and matted on black cardstock. I used a strip of the Gratitude Notes paper to run behind the journaling 2 inches from the bottom of the layout. I finished the layout with a Prima flower and in the center I used a Prima Music Notes Pebble to tie in with the music notes stamp I used in the layout.

Sunday, November 21, 2010

Riga, Latvia

When I was an athlete I had the unbelievably good fortune to train for a month in Riga, Latvia. This Baltic country at the time was still under the rule of the former Soviet Union. It was before the wall fell but I was there to watch some of history as the cracks in the wall were starting to show. This city was beautiful but had some decay after 40 years of neglect. I would love to go back to see it today.
This page map layout has a lot of Tattered Angels products on it. The color is beautiful & shimmery which doesn't show up well in the photo, so stop by the store & check out what the designers have done this month with this gorgeous paper line by Teresa Collins, chosen by Esther.
To start I played with lots of fun Glimmer Mist, I wanted the pattern to show through in places because the paper is beautiful but I wanted to tone it down & add more color. I used tattered angels screens & once the mist was dry stamped with some of their destination line. These beautiful stamps are detailed & dramatic. For my journal box I heat embossed with one of the stamps. My title is made with their embossed chipboard framed fonts. I glammed the title which gives it a nice glitter & shine, while painting it, all in 1 step. Stamping on one of the frames & g.misting gave a nice base for the glimmer glass air balloon. I attached "journey" one of the acetate titles from this gorgeous Teresa Collins line. Using Tim Holtz fragments to create charms is an inexpensive way to add dimension to the project, along with his metal sprocket & ball & chain hung through some eyelets. A piece of his tissue tape was the finishing touch. Almost all this product was bought at ScrapbooksPlus, if we don't have it in stock just ask & we will order it for you.

Saturday, November 20, 2010

Cards!

I had a lot of fun making cards with this month's kit. The patterns layer well - great for card makers!

For this card I used a Tim Holtz Texture Fade, embossing a tree onto silver cardstock. After embossing I lightly sanded the image.

And since the holidays mean gift-giving, here's a thank-you card:

Friday, November 19, 2010

Family

This is my interpretation of this month's sketch challenge. I used "Brocade" as my background page. I used a piece of black and white ribbon underneath my "Stripe" half circle. For the line of patterned paper underneath my title I used the bottom portion of the paper. I covered the "Teresa Collins" logo with my title. I just thought the paper was too pretty to go to waste. I used the "Family" tag as my title on top of a "library envelope". I stickled everything with silver Stickles. This is definitely my "Stickle" phase. TFL.

Thursday, November 18, 2010

Cards of Gratitude

If you haven’t stopped by to see the latest collection from Teresa Collins I highly recommend it! The Giving Thanks collection is both beautiful and elegant. The versatility of the collection allows you to create everything from cards to albums.

I thought I would design a couple of simple, yet elegant “thanks” cards. After all, there is so much to be thankful for and gratitude is never out of season.

This collection comes with an amazing selection of embellishments.  I used quite a few of the die cut elements on my projects. For the card above, I created the card base using black cardstock.  I cut a rectangle from the "Thank You" Paper, then mounted on an orange cardstock mat.   I used two die cuts from the Die Cut Tags sheet and mounted to the right side of the card base.  I added decorative ribbon and a velvet flower from Creative Imaginations.

Elegant is all I can say when I look at this card.  The beautiful black laser cut element is from Scherenschnitte Designs.  They are photo corners but I decided not to break them apart and use them as the focal point of my card.  The “Thankful” sentiment was cut from the Tags sheet.

Thanks for joining me today.

Robin

Wednesday, November 17, 2010

Good Friends!


This month's paper line from Teresa Colins worked out great for the photos I have of my friends and I scrapping at Lake Anna. Since we go there in the spring and fall, I have some colorful photos to use with this paper line. I used the solid orange paper to help my photos pop. Also I can then use several different pattern papers to outline the photos. Since I had many photos I wanted to show on this layout, I didn't want to make it too busy. That's why I didn't use many elements. I, of course, used letters for the title, a few small brads, and pretty green flower ribbon. I felt that was enough added embellishments to make this a perfect layout. Stop by tomorrow to get some new ideas.

Tuesday, November 16, 2010

Thankful Card by Esther


This simple asymmetrical card uses a piece of the copper metallic cardstock from the kit for the base. Thankful was one of the tags by Teresa Collins that fit the space with the message placed at the top. It is already finished nicely to highlight the shape. Two strips of ornately patterened cardstock were reversed to give variety. A frame was cut on the Cricut and placed at a diagonal in right corner. A round tag was placed in the card center. Vintage buttons, a pebble and Stickles were used to decorate the right corner in a cluster. A brown ribbon was brought from the left side for balance.


The inside has a journaling tab that says "grateful for" that was trimmed with decorative scissors by Fiskars. There is space to write a personal thank you message.

Wednesday's Make It Take It!


Well it's Wednesday, so it's time for another Make It - Take It!! This week I choice the Kahaki Collection paper line from Quick Quotes. I thought it would be versatile in that you could use it for Heritage, Thanksgiving, Fall, for a man, a boy or anything in between. Stop by the store and check it out this Wednesday. You will get a free element to use on the page. You will also have the opportunity to try the new elegant frames, Glitter Candy Dots or the brown chip board number stickers. Have Fun!

Monday, November 15, 2010

Thanksgiving Memories

Last year we spent Thanksgiving out of the states and the only turkey we saw was at the zoo - only it was alive and not interested in becoming dinner!

I really liked how the Teresa Collins paper makes a nice background for photos without being too distracting. And as a bonus I was able to the November card from the Calendar paper to bracket my brochure. I added some paper leaves I picked up at the store and make a medallion with a Tim Holtz die.

Sunday, November 14, 2010

Fun Day!


The nice thing about the Teresa Collins November kit, was the colors of the paper. You could go several different ways with it. Since Fall is my favorite time of year, I am still doing Fall/Autumn layouts with photos from last year.. I had fun working with these photos of my family at the Pumpkin Patch and had many more to use. The colors of the photos and paper worked out well together. I added a few flowers, some Jolee embellishments, and the new corrugated buttons by Jellie Bean soup. I inked the buttons and added fiber to make them pop. The kit had some great title tags in it. For this layouts title, I went with the Family tag. Stop by tomorrow for another great idea to use with this paper line.

Saturday, November 13, 2010

It's All About Family


The Teresa Collins Giving Thanks line came with some truly lovely die-cut accents. I wanted to do a family layout... but as I went searching for photos, I couldn't find any of all three of us together (well, any that I hadn't scrapped). Instead I settled on these shots from 4th of July when each of us took turns taking photos of the other two.


I turned my photos to black and white and printed them as 3.5 x 5's. I loved the orange brocade paper, so that was an obvious choice for my mat. I bordered that with the lovely borders on the reverse of the Thank You paper and added several of the Teresa Collins die-cuts. The clock die-cut has one of the cool pebbles from Prima in the center with the black bling surrounding it. I love those little things. The design underneath is a little piece of sheet music and it's subtle enough to really work with anything elegant. I also used a large Prima flower. I have a few of these in my stash and they are so absolutely beautiful that I have a hard time actually sticking them to a layout. :)


The white dots are my new toy... actually the applicator is my new toy. They are those new I-Rocks from Imaginisce. The tool is very easy to use: runs on batteries, so no cord to fight with, it only heats up when you are holding the button down... so there's no way to accidentally burn a hole in anything else, and it heats up really fast... so it's ideal for those of us who are impatient scrappers. :)


Just touch the tool to the top of the pearl, it heats up the glue and sticks them right to the page... so it's very easy to get them right where you want them since there's no picking them up to put glue on them and then trying to stick them back in the same place. You'll see and feel the glue activate slightly to know that it's stuck in place.

They come in lots of cool options... some colored bling, some metallic. Scrapbooks-Plus has carried the compacts of mixed colors and the tools... and they just got in some more of the tubes. I've already picked up some more to use. Very cute!


thanks for stopping by!
erin