...Nicole Michael! Congrats Nicole! Pick up your gift certificate on your next trip to Scrapbooks Plus!
I am sorry to say I have not been able to upload the photo of her layout due to a series of technical difficulties. It is on display in the crop room on the DT wall, however, and as soon as I can get things worked out, I will post the picture. Promise!
Make sure you check back here tomorrow to see the debut of Loretta Cooper's Kit for January.
Have a safe and happy New Year's Eve.

Thursday, December 31, 2009
Tuesday, December 29, 2009
I *heart* Rock Candy!
Well... actually I *heart* the new Rock Candy crackle paint from Tim Holtz. When I saw it in the store, I picked it up right away. It is brand new and is a clear, crackle paint. When I went to brush it on, it looked cloudy (and it's REALLY thick), but it dries perfectly clear.

I used it on these old chipboard letters. After the paint dried (and the thick coat took a while), I rubbed it with Tim Holtz's Antique Linen Distress Ink to highlight the little cracks and crevices. Just lovely!
thanks for stopping by!
erin
I used it on these old chipboard letters. After the paint dried (and the thick coat took a while), I rubbed it with Tim Holtz's Antique Linen Distress Ink to highlight the little cracks and crevices. Just lovely!
thanks for stopping by!
erin
Monday, December 28, 2009
Wintery Calendar by Esther
 The winter-looking papers from SEI were an inspiration to make a calendar. Layers of the decorative papers were adhered to blue Bazzill cardstock to make a dimensional setting for the bird. The bird became the theme for my winter scene and the wintery months. The strips of papers were cut to be edged with a red stamping ink pad and show beneath each other. The circle of a snowflake was raised and placed on the left to give accent and balance.
Once the decorative top was complete, I used red brads for another piece of 12" square cardstock to overlap for the calendar months. December and January were printed in Microsoft Publisher and decorated on meaningfully personal dates. Some are birthdays, special days and others are holidays.

Once the decorative top was complete, I used red brads for another piece of 12" square red patterned cardstock to overlap for the calendar months. December and January were printed in Microsoft Publisher and decorated on meaningfully personal dates. Some are birthdays and others are holidays.


Once the decorative top was complete, I used red brads for another piece of 12" square red patterned cardstock to overlap for the calendar months. December and January were printed in Microsoft Publisher and decorated on meaningfully personal dates. Some are birthdays and others are holidays.

The pearl finish of the American Crafts brad was just the thing to add a bit of shine to attach the month pages. Red brads were used to attach the calendar blank section to the top portion by overlapping. Silver Sticles was added to centers of snowflakes because you must have some bling. Now to plan a calendar for the next two months...
Sunday, December 27, 2009
Repurpose Christmas Papers for New Years!
 SEI Christmas Mint Paper isn't just for Christmas layouts. The colors and patterns work well for a variety of different themes including one of my New Year's layouts from 2008. Here I used the greens to match my scarf in this one-page layout of my husband and I at Disney in the freezing weather (believe it or not, it was colder there than here when we were in Orlando on New Year's Day in 2008! I had to buy that scarf - and a jacket - since I didn't take one with me.)
The flowers are Prima and can be purchased at Scrapbooks-Plus. The flourishes were cut from glitter paper using a Sissix die. I used some blue Smooch on them to alter the color a bit. I drew the hearts free hand and cut them out from glitter paper. I applied both blue and purple smooch to get the color I wanted and added just a bit more Martha Stewart glitter. I even added green Smooch to the rhinestone at the center of the flower to match my green-theme. And don't you just love the feathers? They are from a craft pack of different colors I purchased for a kids project a few years ago. I like the effect of the green one on the top right hand corner of the photograph - reminds me of Tinkerbell!
I wish you all a wonderful new year with the beginning of a new decade. Happy New Year!
Saturday, December 26, 2009
My Santa Baby

Here is my own personal Santa Baby...I hope that Santa was good to everyone. And everyone got what was on there Christmas list.
About my layout, I love to hide my journaling. It is the way I frequently go. And this time is no different.
Santa Baby was handwritten with a white pen. And then I used the strip from the sticker sheet and put it there more for a marker to indicate where the journalling need to stop.
See you all in 2010!
Friday, December 25, 2009
O Christmas Tree

I loved the SEI papers this month. To me the possibilities with these papers were endless! I loved the tree that was on the Christmas Mint paper. I knew I wanted to use but at first wasn't sure how. So I did the basis of this layout using the pagemap that Sharon designed. I did alot of fussy cutting on this layout. I ended up cutting out the presents twice! I had cut out one set and put it on the layout and realized that I wanted to add some dimension, so I cut out specific presents and pop dotted them onto the others.

I then decided that I was going to cut out the tree. I do have to admit I was somewhat nervous cutting it out. I wasn't sure how it was going to look,but, when I was finished I loved it! I put some bling and pearls on the tree to make it look like ornaments. I love the way that this layout turned out!
Enjoy!
Lisa
Thursday, December 24, 2009
Thickers, and Smooch, Oh My...
I had so much fun creating my own metallic letters. It is so simple and the possibilities are endless.
Take some white, or plain chipboard letters.

Add a little smooche, either to accent or completely cover (I completely covered) and you have...

Your own metallic letters! Smooch comes in all different colors, have fun and experiment - there are tons of possibilities!

I hope all your families are blessed this holiday season!
Wednesday, December 23, 2009
"It is Good to be CHILDREN sometimes...
...& never better than at CHRISTMAS." - Charles Dickens
Every visit with Santa deserves a special page to commemorate the event and the papers from SEI this month were perfect! I used a craft knife to carefully cut along the designs of the red velvet paper, creating a place for the photo to slip into place...just put the photo where you want it to be and follow the curves of the design. It's easy...I promise! You can use whatever Christmas quote you would like to help frame the picture...the little gold flourish on the top right of the was cut using my Cricut.

Did you notice how the large branch on the bottom left of the tree connects to a swirl on the red velvet paper? Just dumb luck, but I love it!
The oval frames were cut with Nestabilities. I inked the smaller scalloped edge with some gold ink.

I created the Santa title using my Cricut and the Design Studio Software to weld the letters together. The "S" and the flourish are from the Storybook Cart and the rest of the letters are from Base Camp. The little dots of white and red are just acrylic paint, applied with a toothpick. Some of the presents are cut from Christmas Mint paper and some are from the coordinating epoxy elements sticker set. The green file tab on the top right edge of the red velvet is from the coordinating cardstock sticker sheet.

The coolest part of the layout is that it opens up! The red velvet portion is actuallly a flap and there is a whole other layout inside...
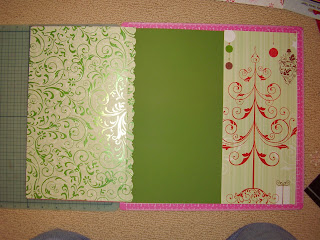
The inside of the layout started like this...
...then I adhered the flap along the left edge as you can see in this photo...

...added some pictures...because I always take tons of pictures and always try to include them all!
Every visit with Santa deserves a special page to commemorate the event and the papers from SEI this month were perfect!
 I used a craft knife to carefully cut along the designs of the red velvet paper, creating a place for the photo to slip into place...just put the photo where you want it to be and follow the curves of the design. It's easy...I promise! You can use whatever Christmas quote you would like to help frame the picture...the little gold flourish on the top right of the was cut using my Cricut.
Did you notice how the large branch on the bottom left of the tree connects to a swirl on the red velvet paper? Just dumb luck, but I love it!
I was originally looking for a photo to feature on the oval medallion frame I created for the tree, but Debbie has these fabulous Santa stickers from Mrs. Grossman's that were absolutely perfect!
The oval frames were cut with Nestabilities. I inked the smaller scalloped edge with some gold ink.

I created the Santa title using my Cricut and the Design Studio Software to weld the letters together. The "S" and the flourish are from the Storybook Cart and the rest of the letters are from Base Camp. The little dots of white and red are just acrylic paint, applied with a toothpick. Some of the presents are cut from Christmas Mint paper and some are from the coordinating epoxy elements sticker set. The green file tab on the top right edge of the red velvet is from the coordinating cardstock sticker sheet.

The coolest part of the layout is that it opens up! The red velvet portion is actuallly a flap and there is a whole other layout inside...
The inside of the layout started like this...
...I trimmed the Christmas Mint paper on the right as shown and adhered it to the right side of the Bazill cardstock...

I adhered the panel of red velvet paper (12" x 7")to the back of the Marzipan green foiled paper(12" x 8")...there was about a 1" overhang that I had punched with a scalloped edge punch (Martha Stewart).
.
I scored the Marzipan and folded it and applied a strip of red line tape to the back side of the Marzipan...

...then I adhered the flap along the left edge as you can see in this photo...

...added some pictures...because I always take tons of pictures and always try to include them all!
The journaling is on vellum, so the beautiful designs of the foiled swirl paper still show through.
The adhesive for the vellum is hidden underneath the overlapping elements, a simple but effective trick. The presents at the top were trimmed out of the same paper as the filigree Christmas Tree on the right side of the layout. They were on the left side of the paper and would have been covered up by the red velvet. I tied up little bows with floss because I love every bit of dimension and detail I can think to add! (Click on the picture to enlarge it and get a better view of the details.)
.
I hope this inspires you to create something special for your Christmas pictures this year!
Tuesday, December 22, 2009
Using Your Scraps

You don't need a lot to make a great layout. Sometimes all you need are a handful of scraps, a piece of cardstock and a square punch.
Here's what I made with the bits and pieces from this month's kit. I used a 2" punch for the squares, which fit nicely with a 4x6 photo. I arranged my collage on a piece of 8.5x11 cardstock and journaled around the entire collage.
Monday, December 21, 2009
Christmas Morning
There's only a few days left until Christmas. We usually end up taking a lot of photos Christmas morning of everyone opening gifts. I picked out a few of my favorites to make this two-page layout.
I love this SEI holiday line. The teal and red color combination is very fresh. And, happily, matches my kids' pajamas from last year!
 Remember those Kaisercraft wooden snowflakes from this post? I used another one on this layout. I sprayed it with Peppermint Stick Glimmer Mist -- a great rich red color with golden shimmer.
Sunday, December 20, 2009
Quick Tip: Getting your layout laid out just SO

When I'm laying out all the pieces for a new layout, once I get everything right where I want it, I make light pencil marks on the background paper around the corners of the photos, patterned paper or whatever pieces I am putting on the layout. This saves me time getting everything back where I want it when I add the adhesive and keeps me from needing to use my ruler... a win, win! Once everything is glued in place, I just erase my marks.
Here is my take on the sketch this month. The people in my focal photo are small... and I didn't want them to get lost on an end so I stretched the sketch out on either side of them. I added an extra mat and bumped the photo up just a little to give it extra weight. All of the DC Christmas decorations are similar in scale, so breaking them up on either side also helps point to the focal photo.
thanks for stopping by,
erin
Saturday, December 19, 2009
Snowy Layouts for a Snowy Weekend
 Who needs bread and milK? Do you have enough ADHESIVE!?! I'm not sure which DT member said this, but boy, is it true on a weekend like this? I went out yesterday to make sure I had enough photopaper and ink for my scrapping projects this weekend.
Here are two ideas for wintry layouts. The first (above) is my rendition of my page map design. The large snowflakes are sissix die cut on my Big Kick Sissix machine.
 The layout here uses all SEI WinterSong papers. The glitter on both layouts is Martha Stewart. Have a great day in the snow and enjoy the beauty of this first major storm. It's beginning to look alot like Christmas.....
Friday, December 18, 2009
Got Cards?

It’s almost Christmas and you can tell by the line in the Post Office! I stopped in to get my Holiday stamps last weekend so that I can get my cards in the mail. Some years I buy cards, and other years I make them myself. I always get comments and calls on the ones I do myself… it’s such a nice touch over a purchased card. Making all your cards, though, can be daunting. You have to have a plan and a good assembly line to make it work.
This card made with SEI’s Christmas Mint line is a great choice with a few pieces of patterned paper, some punches, a stamp, and a bow. The wreath was punched with the extra-large Marvy Uchida scalloped circle. Then I used a 7/8-inch circle punch for the center hole. A simple stamped greeting peeks out from underneath. If your circle punch doesn’t reach far enough into your wreath shape, just use the circle to punch out your greeting and adhere it over the top. Don't have a stamp? Handwrite a message or leave it blank instead (just use a darker color of cardstock or let the patterned paper underneath show through. A little bow finishes it off. A beautiful Christmas card without breaking a sweat! Voila! Truly tying the bow was the hardest part. Even the kids could help make the pieces for a great rainy day project.
Thanks for stopping by!
erin
Thursday, December 17, 2009
Holiday traditions

Our family has a bunch of family traditions that we celebrate year after year. We started these right after Matt was born. I have been trying to get layouts done of each year since the boys were born of them doing our family traditions.
I have to say that my favorite type of layout is using a block of photos to tell the story and some journaling to go with the photos. This is my go to layout when ever I am having scrapper's block!
The SEI papers this month were beautiful to work with and went perfectly with the reds and greens of my photos. I left a spot for journaling, which I will do when I get my layout back from Scrapbooks Plus.
Don't forget to come by Scrapbooks Plus and do our Monthly Design Team Challenge! Submit your entries using the pagemap and the papers the Design Team used and you could win a gift certificate to Scrapbooks Plus!
Enjoy!
Lisa
Wednesday, December 16, 2009
December Page Map

This month's page map is a versatile layout that lends itself to any kind of design project. It has strong vertical and horizontal lines that carries the eye into the center of the page. This is especially effective if you have two photos of equal size you want to scrap. Usually, two items of the same size and visual weight would compete with each other on a page, but this slight overlap gives them a flow and makes them feel like a single item on the page. It just 'works'. If you're stuck for a layout idea keep this map handy, and you'll never get lost!
... and a word about embellishments. I mentioned this in my last post, but I think it's worth repeating. Lots of scrappers don't know how to effectively use embellishments. Here's a clue: mix them, match them, layer them, sand them, paint them and add them to your titles and journaling blocks. The only thing you should not do to an embellishment is leave it alone and abandoned. They like lots of company!
Happy Holiday Scrapping!
Loretta
Tuesday, December 15, 2009
Pointsettas!
This month Sharon made a great page map for us to use. I love using page maps because it gives you a good starting point, you can still be creative but you have the foundation already lied out for you. I also enjoy seeing everybody's take on the same map. They are all so different, yet they all have the same foundation. If you havent' been into the store to see everybody's page map creations - please do so!

I chose to use the classic green and red SEI papers to create my map. As embellishments I used the Fiskars lace border punch and for my pointsetta I used a stamp which I cut out. After cutting out the stamped image I outlined it in a black gel pen and then put a little glitter on the edges to hilight and red stickles in the center.


I also chose to create a pointsetta for my card as well. Instead of using a black gel pen I used a white gel pen to outline the flower and then placed silver stickles in the center. Easy and simple yet so elegant looking with many different looks!

Monday, December 14, 2009
Sneak Peak

Are you dying for a some sneak peaks...
Well here is a sneak peak at this Wednesdays layout...But be warned, there is LIMITED SUPPLIES for this layout. It is made with Bo Bunnies limited edition winter paper...
So cute, and perfect for the recent snow that we had...or for past snow. Debbie already tried to reorder the supplies and Bo Bunny is sold out.
The layout is pretty simple but you will need your craft knife to cut out the die cut or your sharp scissors. And I hope that you will LOVE it as much as I LOVE it.
11 More Days... :)
Snowman ornament

I really love snowmen. When Scrapbooks Plus got the Stretchy Snowman set from Stampendous I bought it right away. I had all sorts of ideas in my head about the things I could create with these stamps!
I have to admit, I scraplifted this idea from the Hero Arts blog. I fell in love with the technique and have used it a bunch in making my Christmas cards this year!
To make the snowman part of the card you need the following products: stamp, Staz ON ink, Glossy Accents and glitter. I cut a 4 1/2 in circle from a Clear Scraps 12x12 acrylic sheet that Scrapbooks Plus carries. Stamp your image on to the acrylic (after you have remove the protective covering)with the Stazon ink.

Now this part is important, FLIP over your circle so that you are working with the side you haven't stamped on. Fill in your image with Glossy Accents.

Pour glitter over the Glossy Accents and set aside to dry. I usually leave mine overnight so that I know it has dried completely.

When it is dry, tap off the excess glitter, punch a hole in the circle add some ribbon and you have got an ornament.

I adhered the circle to a scallop circle that I cut out of my Cricut and inked the edges with a silver Smooch ink.
Enjoy!
Lisa
Sunday, December 13, 2009
There are how many days left till Christmas?

...oh my goodness...it is almost time for Christmas...crazy...My shopping is done at least...is yours? Did you tell you hubby that you wanted a ScrapbooksPlus gift certificate...Or did you get you wish list made at ScrapbooksPlus. It isn't too late! Hurry over!
This layout is really simple but it kinda got lost in messy thoughts...I really didn't know what to do, and didn't want to take away from the pictures...so I used the KISS method.
The stockings are sort of a family tradtion in my house. The stockings are handmade with love. They are sort of a secret passion, I love the hand beading...each one has a million little beads on it and hand sewen. The ornaments were my son's two favorite last year.
Saturday, December 12, 2009
Christmas Flora by Esther


This layout was highlighting flowers that were sent to two aunts last year for Christmas. Each aunt took pictures as the amaryllis bulbs grew to produce large red blooms for the holidays. The pictures were different sizes & orientations and were not fitting the layout.
I attempted to get balance and unity by cropping the picutres and mounting them on solid cardstock. All of the corners were rounded. They were then placed on a patterned paper.

The letters for Flora are fabric letters by American Crafts that were made green with a copic marker. A red & green Copic markers were used to color in the rubber stamped poinseittia at bottom left. At the top of the layout, I used Sticles to give gold lettering on a transparent sheet. It was attaced to solid cardstock with brads. This was like writing with cake frosting. The Stickles had to flow onto the transparency. The hardest part was waiting for it ot dry.

When you have pictures that are different in size to combine on a layout, look for ways to unify them to fit the theme.Recording the memory was more important than having all the pictures the same size.
Friday, December 11, 2009
A Two-Page Scraplift
 This month, my two-page design idea mo-jo was running really low, so I did a complete design scraplift. For those that are taking the "all about me" classes from Basic Grey, do you remember this February layout from Beck Fleck? Well you can certainly see the resemblence to my two-page version that I created to document the stories behind how we have so many ornaments on our tree!
 Using the same design, I made my Ornament page nearly identical to Becky's Go Figure layout. ( I still like Becky's better!)
So when you're stumped on those two-pagers, there is absolutely nothing wrong with lifting a great design with your own special twist. There are so many great designers out there. Find a few you like and copy their style with different paper choices , themes and photos.
And have a great time decorating your tree this holiday season - and don't forget how you got all those great ornaments. Scrap the story!
Thursday, December 10, 2009
Christmas Cards
Haven't started your Christmas cards yet? I'll admit - I'm behind this year. Here's a few made with this month's SEI lines for your inspiration.
 I layered red cardstock between two of the SEI papers for this one. Remember those large foam Heidi Swapp alphas we used a month or so ago? I pulled out a couple of unused numbers, sanded the color off the top (it's very easy to do!) and sprayed them with peppermint stick Glimmer Mist.
 This card uses a large block of the embossed velvet paper. The embossing is so beautiful you don't need much else in terms of decoration. But I added a stamped sentiment from the matching SEI clear stamps that I picked up at the store.

Finally, I layered this beautiful pattern on top a scrap of white swiss dot cardstock then a red cardstock base. The stamped tree is also from the SEI clear stamp pack.
 I layered red cardstock between two of the SEI papers for this one. Remember those large foam Heidi Swapp alphas we used a month or so ago? I pulled out a couple of unused numbers, sanded the color off the top (it's very easy to do!) and sprayed them with peppermint stick Glimmer Mist.
 This card uses a large block of the embossed velvet paper. The embossing is so beautiful you don't need much else in terms of decoration. But I added a stamped sentiment from the matching SEI clear stamps that I picked up at the store.
Finally, I layered this beautiful pattern on top a scrap of white swiss dot cardstock then a red cardstock base. The stamped tree is also from the SEI clear stamp pack.
Wednesday, December 9, 2009
December's Page Map...
...is courtesy of Designer Sharon Mozer:
 ...and here is my take on it:
 I really loved the paper from the Christmas Mint line. Something about it reminds me of a quilt...
You have until midnight on the 21st to submit your layout for the DT Customer Challenge using Sharon's page map. You can choose to submit it either in person at the store, via email ( debbie@scrapbooks-plus.com ), or a link to Sharon's post from the first of this month. Remember there is a gift certificate for Scrapbooks Plus up for grabs - Good luck to you all!
 ...and here is my take on it:
 I really loved the paper from the Christmas Mint line. Something about it reminds me of a quilt...
 .
Anyway, I followed the pagemap pretty faithfully, but I did add one fun little element. If you look at the page map, you see there is a line around the edge of the page. I decided to make my line with glitter (Martha Stewart/Brownstone). It was very easy. I took 1/8" red line tape and laid it down about half an inch from the edge all the way around, then poured glitter on top. I applied a little pressure with my finger and tapped off the excess glitter - voila!
.
This layout actually was started and finished as a one page layout...but then I decided I had other pictures from that event I wanted to include.  First I added a pull tag behind the right hand picture on the first page - if you pull it out, there are (2) pictures, back to back. The second page has 4 more pictures that you can see, plus (2) more hidden by the pull tag on that page. So that is a total of (10) pictures PLUS a journaling tag...I am pretty happy about that...I take LOTS of pictures!
First I added a pull tag behind the right hand picture on the first page - if you pull it out, there are (2) pictures, back to back. The second page has 4 more pictures that you can see, plus (2) more hidden by the pull tag on that page. So that is a total of (10) pictures PLUS a journaling tag...I am pretty happy about that...I take LOTS of pictures!.
I hope you have picked up your free copy of Sharon's page map. You will find it on the display in the crop room, along with the papers from this month's kit:
Subscribe to:
Posts (Atom)