Saturday, June 30, 2012

Thanks A Bunch Card


Although we all love receiving cards,  we just don’t send them often enough.  Wen I first saw, the Mason (or if you prefer Ball) Jar stamp with the message “thanks a bunch” I knew I wanted to make a thank you card with a bunch of flowers.  The BoBunny Alora line of paper made this easy.  


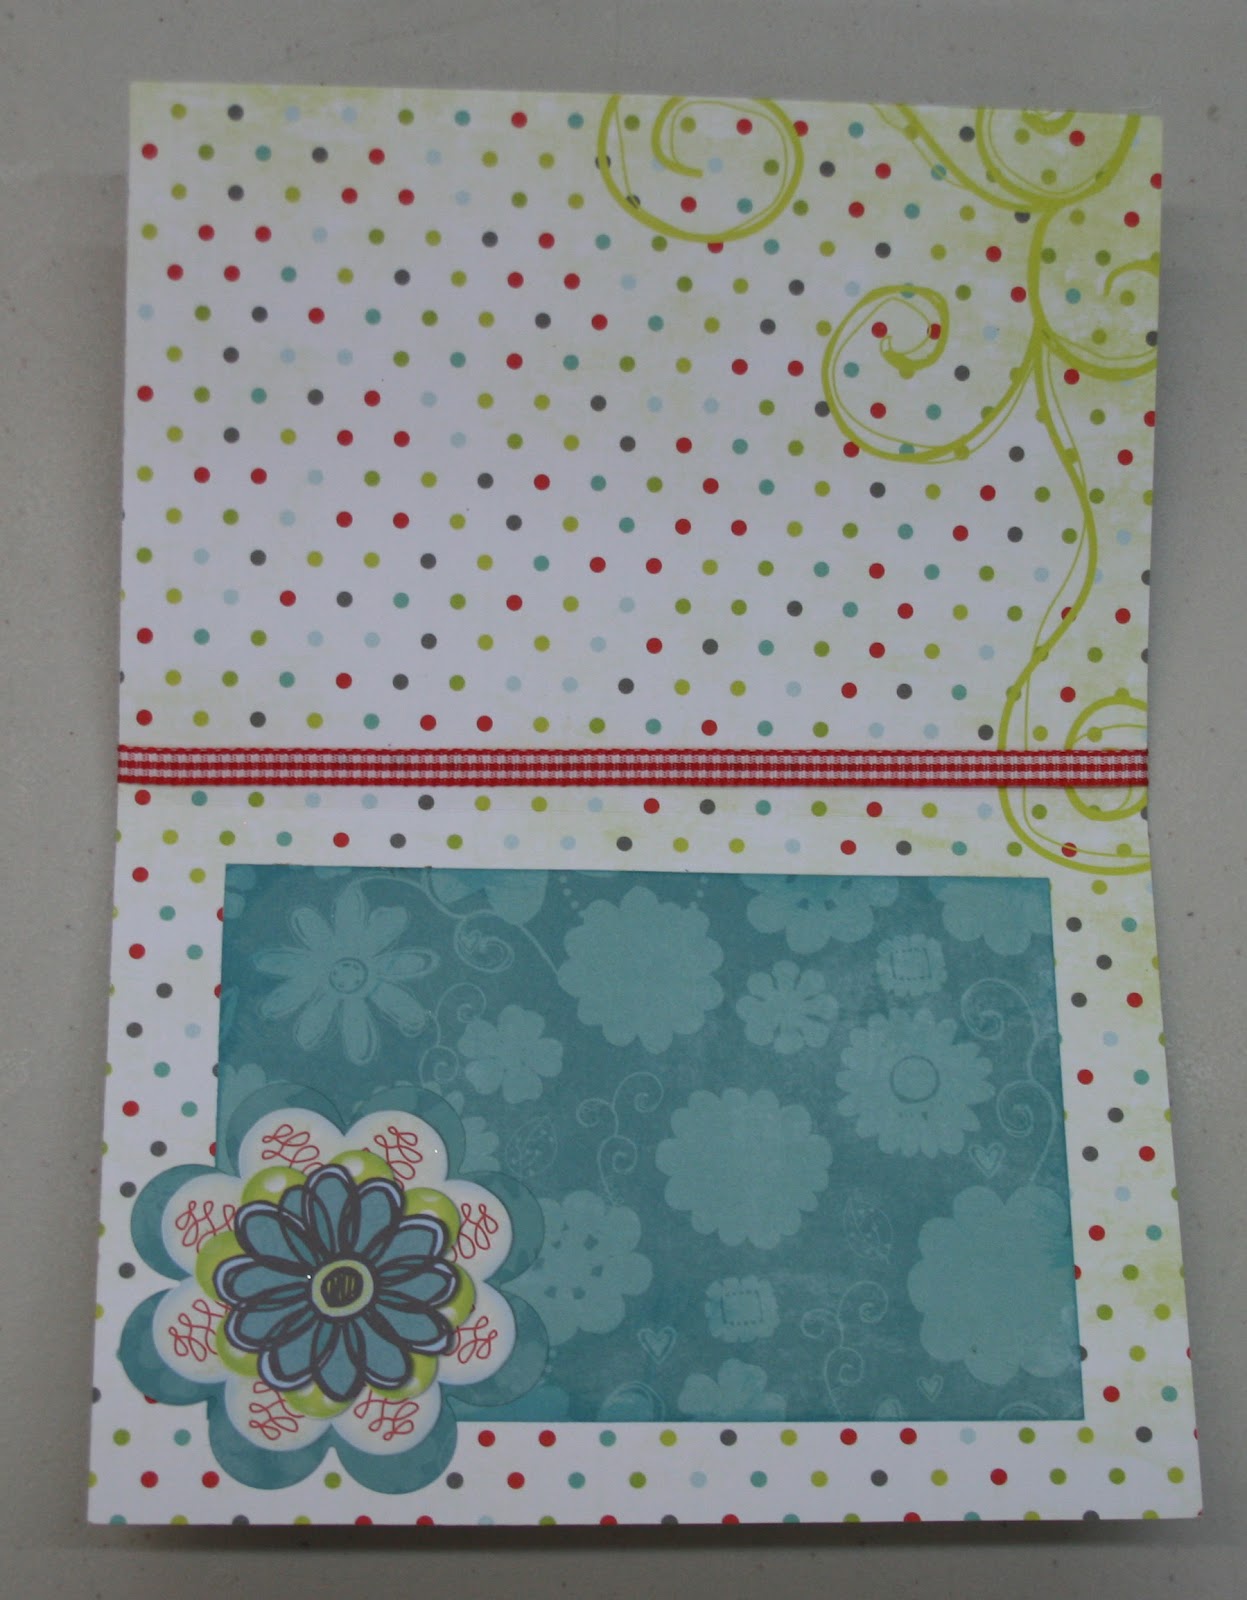
I used the Alora Stitches paper to make the card base.  (This meant the inside is polka dots of various colors with a cute flourish in the corner if you cut it out just so.)  I cut a rectangle slightly smaller than the rectamge; from the red side of Alora Wish.  I cut a square of four flowers from Alora Cut Outs.  


I stamped the Mason jar with VersaMark and embossed with Stampendous shabby green embossing powder.  (This embossing powder is great as it has different types of flakes so you get a much more interesting texture than with solid embossing powder.  It comes in several colors so check it out at Scrapbooks Plus.)  To add a little more, I used an Inkssentials Embossing pen and the same embossing powder to make the centers of the flowers match the jar.  (To use the pen, you simply highlight the area you want embossed and then emboss as usual.  You can emboss writing or use to outline as I did.)   I stamped the message in the jar with black ink.  I tied a ribbon around the top of the card.

 On the inside I affixed a rectangle of Alora Dimples to make it easier to include a message and added a couple of flowers from the Alora Combo Stickers.

Thursday, June 28, 2012

Simple Double Page Layout


Continuing my simple trend this month, I have a simple double-page layout. I left a wide border around my photo/paper grouping and used a large block of the Bo Bunny paper, clustering embellishments and title in three groups.

If you notice, I used the three clusters to make a visual triangle around my photos. Meaning, that if you draw a line between each cluster to make a triangle, the photos will end up in the middle of the triangle (mostly). You can use design strategies like this in your projects to draw attention to the focus of your layout.

Wednesday, June 27, 2012

Hot July Make & Take

This week’s Make & Take, using Basic Grey’s pb&j line, provides space for three 4” x 6” pictures.  Your free element is  a metallic & blue vintage fan made with Tim Holtz Sizzix Movers and Shapers die,  In addition you use five colors of twine (the big spool kind so you can buy just what you need) and wooden buttons.  As designed the page is for “Hot July” memories, but use your letters to make a different title and the layout’s bright summer colors are great for a birthday, spring, garden, pet, family, life or love layout.  This layout gives you lots of flexibility so I’m sure you have some important memories to scrap that will be perfect on this page. 

Tuesday, June 26, 2012

Storage Box

For June's design team altered item I made a trinket box.  Using thick chipboard and Bo Bunny Alora papers available at Scrapbooks-Plus, I created this fun yet sturdy box to store keepsakes in.  For the feet and handle on the box, I used buttons from the Bo Bunny line and custom made buttons with my I-Top button tool.  I love that you can easily make this fun box in different shapes and sizes to fit whatever needs you have!  With the Bo Bunny Alora line, possibilities are endless!!  Have fun and let your imagination help you create eye-catching projects that help you reflect on specific events in life or to decorate your home/office.

Saturday, June 23, 2012

Make a Wish!

With the Alora paper, it is about as easy to make a page as to make a wish.   I chose the Alora Stitches' polka dots for an a family birthday layout.  I cut a strip that said “Make a Wish” from Alora Wish for my title and inked the strip and the background with Barn Door Distress Ink.  After affixing the strip to the background, I added two horizontal  (3 ½” x 5”) and a vertical (5 x 3 ½”) photos in a grid-type layout.   All that remainded was to add a few embellishments and journaling.  I used the “Love” and “Wish” boxes from the Alora Cutouts for Journaling.  I added the date under the title with Alora Tiny Type Stickers.  I used a couple of flowers from the Alora Combo Stickers.  Strips of jewels frame the top of the photos and large jewels dot the “I” in the title and form the center of the circle.  That’s all there is to it!

Friday, June 22, 2012


Siblings

I used BoBunny, Country Garden line
for my Designers Choice of the month. 
Materials
Country Garden Stripe
Country Garden Cut Outs
Country Garden Weathered
Country Garden Seeds
Country Garden Dots
Country Garden Trinkets
Country Garden Jewels
Country Garden Brads
Country Garden Tiny Type Cardstock
Country Garden Combo Sticker

I used the above combination of papers and accessories, but you can use less, more or substitute to create a similar layout.

1.       I used the front side of the Country Garden Stripe paper as the base of layout, with the stitch side on the left of the page.

2.       I used the backside of the Country Garden Seeds to cut about a 6”x12” piece (make sure that you cut the paper so the printed frame on it shows, see picture) that I layered over the base just to the right of the printed stitching.

3.       I used the Country Garden Tiny Type Cardstock “make the Best friends” to fill in the printed frame.

4.       I used my new favorite die, the Tim Holtz word play to die cut “siblings”. (The yellow side of Country Garden Dots).  I adhered these to the left side of the page (see picture for placement).

5.       I cut a large mat & layered over a second and centered this just to the right of “siblings” just above the frame containing “make the Best Friends”. 

6.       Cut and mat the “butterfly journaling block” (see picture for placement). 

7.       I typed up “God made us siblings but we made us friends”, matted this (see picture for placement).

8.       I added brads, jewels, & charms (see picture for placement.)


Thursday, June 21, 2012

Spring Flowers

This double page layout was easy and fun to create!  I used my Cricut to cut out the blue background shape to tone done the bright red in the Alora line.  The embellishments and papers in this Bo Bunny line made it very easy to dress up this super simple layout.  I was able to carry out the theme of my grandsons planting Spring Flowers in my gardens nicely with all the bright flowers!  I also fussy cut the branches off of one of the papers in the line and LOVE the way it turned out!  Fussy cutting is such an easy way to economically add dimension to any scrapbook page using papers from the line!

Wednesday, June 20, 2012

Sweet Nothings

Here is today's Wednesday Layout!  It features Kaiser Craft's Sweet Nothings collection.  Stop by the store to purchase the materials for the layout (listed below) and get the cute little gold birdcage as your free element.

Materials:
1 piece of each:    Dozen Roses               Love Letters
                                     Devoted                      All Yours
                                     You & Me                Silver Lining
                                     With Love                  Cupids Arrow
                                     Sincerely
Embellishments: Petaloo Beaded Hat Pin
                                May Arts ribbon
            Kaiser Craft: Rhinestone Flourish
                                       & Sweet Nothings Sticker Sheet
Instructions:
                        Build background on light color cardstock.  Start by cutting Love Letters and Dozen Roses each into 2 pieces (12x6.)  Place Love Letters across the top so that the angel is in the upper left corner of the left page.  Adhere Dozen Roses across the bottom of the LO. 
                        Create large layered area by layering You&Me 11 ¼ x 11 ¼ , then Devoted 10 ½ x 10 ½ , and on top Cupids Arrow 10 x 10. (make sure not to cut design on top left corner of Cupids Arrow.)  Place on LO 3 ½ “from the right edge overlaping left page by 2 ¾ “.
                        Cut three photo mats 3 ½ x 3 ½ of With Love.  Place these on the left page down the left side of the large layered block, 1 ¼ “ from the edge of the layered block. 
                        Cut apart the green border sticker from the Sticker Sheet into pieces and place over the seam that runs through the middle of the LO left to right where Dozen Roses and Love Letters meet up. 
                        Cut 3 butterflies and the flower from the lower left corner of All Yours.
Cut a 10 ¼” x ¾” strip of Silver Lining and a 11”x ¾” strip of Sincerely.  Cut a length of ribbon 11” long.  Fold over and adhere to the strip of Sincerely along the lower edge.  Add the strips to the lower left corner of the LO.
Cut flourish into 2 and place on the LO.  Add the flower, butterflies, title, hat pins, and bird cage with string to LO as shown in photo.

Tuesday, June 19, 2012

A Simple Layout


Do you like bold patterns but are hesitant about using them? Afraid your layout might be too busy? Here's a trick: focus on one strong pattern and use solid cardstock or very faint patterns for the rest of your layout.

For this simple layout I used one big block of patterned paper, one block of red cardstock and several smaller elements. The photos aren't overshadowed by the pattern, and the pattens complement the layout without overwhelming it.

Sunday, June 17, 2012

Fun 3D Card

I had a lot of fun creating this card.  It uses a single rectangle with cuts and folds.  The scalloped frame on the left is cut directly from the Alora paper as is the border at the bottom.  The Happy Birthday is stamped and punched with a scalloped circle and framed with a red scallop.  Here's the card lying flat:
The dimensional flowers, bird and birdhouse were all made using the coordinating Alora stamps by BoBunny.  I colored them using my Copic markers, cut them out and glued them to my peaks and valleys in my card.  Here's the final card:

Thursday, June 14, 2012

Using the Alora Line to Make A Thank You Book

I warned you last month that after I found out how great it was to make a book with coordinated papers and embellishments that my altered item might be a book every month.  Two months doesn’t always make, but the BoBunny Alora line had such cute items I couldn’t resist making a book as a thank you gift.  My aunt included three extra Moms, who weren’t going to be with their children on Mother’s Day,  in the celebration that she was having with her kids.   A book with some pictures of each Mom seemed a great way to say thank you.

And since this was a thank you for inviting us to her home, a house was the perfect shape.   I made the book with a house die that is available for you to use at ScrapbooksPlus.  It is just the right size for a book.  I made both covers from chipboard and then covered them with Alora papers.  One thing I love about making your own book shape rather than using a purchased one is that you can cut the papers to cover the pages with the same die.  Oh so easy!  For the inside pages, I simply glued two pages together.  Even though the Alora papers are double-sided, I still glued them together as I didn’t think a single-sheet was quite sturdy enough.  Another alternative is to make a chipboard base for each page.  This would make your book much more durable.  (One thing I would do differently is to cut off the edge of the roof on the side that I am binding together for the book as it catches.  If you just use your trimmer to cut that side straight the pages will turn easier.  I plan on doing this when I pick mine up.)  

I encourage you to take a look at the larger dies available at ScrapbooksPlus for you to use.  You can use them while you’re at a crop at no charge.  During non-crop hours, use of the room and all the tools (including dies) is free if you spend $5.00 .  You can buy the chipboard you need at the store.  Another advantage of cutting your book at the store is you only buy what you need.

I punched holes for the ribbon to hold the book together with my Crop-a-dile and inserted We R Memory Keepers Eyelets.  Not only do they keep the holes from ripping, but they add a bling.   The turquoise ribbon that I used to hold the book together is a bit shimmery as well.

On the front and back cover, I stamped “thanks a bunch” and a heart inside a jar with a stamp available at Scrapbooks Plus.  (The stamp includes some other cute items you can include inside the jar.)   On the back cover, I wrote below the jar what the “thanks” was for with a pen, making the book like a thank you card.  I decorated the covers and pages using letters, borders and designs from ComboStickers, Tiny Type Cardstock Stickers, Alora Brads and Alora Jewels.  The Alora Jewels are practical because they include rhinestones and pearls in a variety of sizes. I love using them for flower centers.  On one page, I used a flower border sticker and put a jewel inside every flower.  I found two more  great ribbons at ScrapbooksPlus to use as accents in the book.   And I cut out Alora papers in a variety of shapes to add to the pages and serve as photo mats.  I especially like the alarm clock and fan cut with the Tim Holtz Movers & Shapers dies.

I think my aunt is going to like this a lot better than the usual thank you note. 

And as I’ve discovered, if you simply buy paper and embellishments from the same line, you can make a book quickly.   You can choose from pre-made shapes of chipboard and cover them with paper, make your own shapes as I did or simply use a square or rectangle shape.  Whatever shape you choose,  I’m confident the recipient will be happy.


Wednesday, June 13, 2012

Tweet Life on Wednesday!

This bright and cheery paper is from Little Yellow Bicycle's Hello Spring! line and is the Scrapbooks Plus Wednesday layout.  The layout features some great embellishments that coordinate with the line and the title, Tweet Life, is the free element!  The flower pot is a '10 things' premade embellishment from LYB and is oh so cute!  The banner at the top center of the layout can be used for journaling or to feature small photos!  So many options with this layout!  Hurry in today to pick up your instructions and supplies for this layout and get those recent Spring photos scrapped!  Enjoy!

Tuesday, June 12, 2012

Mother's Day Layout with Recipes

I created a 2-page layout to capture a special Mother’s Day that I spent with my aunt and several other mothers.  It was a potluck where everyone brought something so I thought it would be nice to include a picture of all the mothers along with the  recipes for the item each brought.  

The background is Alora Squiggles  I chose one of the less busy backfounds since I was going to have so many pictures.  I used one of the Cut Outs to make a frame for the title.  I cut off the two outer frames so it would fit my page better and used the Combo Stickers for the title.

A holder for each person’s recipe was made from Alora Wish and affixed to the background with  1/8” Wondertape so the recipe cards would fit and the tape would hold as the cards are pulled in and out.  I made the recipe cards by cutting rectangles from Blue Alora Dimples and  cutting the top with the Sizzix Tim Holtz on the Edge File Folder die.  (This die is great to make all kinds of file folders of any size you want.)   Each recipe can then be printed on white paper and glued to the recipe card. 

I put a picture of a Mom on each recipe holder and their name (made with a labelmaker) on each recipe card.  Some of the pictures were made with a circle punch and a slightly larger circle punch made the photo mat.  To call attention to the hostess I used a chipboard frame for her picture.  Each recipe holder was decorated  with a variety of Alora items – chipboard, stickers, brads, journaling cards and jewels.  I also used three different Bazzill Half the Edge strips.  These come in a package of 2 each of 10 different designs in a variety of colors.

I think with this page I'll remember the special day that my aunt hosted so that all the mothers she knew had a special Mother's Day.

Sunday, June 10, 2012

June Cookout!

This collection from Bo Bunny came in handy for my summer photos. I couldnt resist this one - its perfect for those individual photos that you may want to showcase.

This particular page had most of the work done. All I had to do was add a few embellies and away we go!

I used a chipboard embellishment that added dimension, a border punch from Martha Stewart and a few strips of paper from the collection!

Saturday, June 9, 2012

                                       Box Fun


I used the new Graphic 45 Kraftboard Altered Art Box (5” x5”) which includes an accordion-fold Kraft Album inside the box; love these!  I painted the edges of the entire box, inside and out along with the edges of the accordion album with lime green paint.  The papers within this line have so many colors you have multiple choices of paint colors to choose from.  Once the paint dried I simply cut papers to fit the box from the 6” x 6” BOBUNNY Alora paper pack.  I laid a piece of paper over the inside back of the front cover and penciled around the inside front square opening.  I then cut this out with scissors; you can also cut with a 12 inch paper cutter if you want to be more précised. 
You will need to cut two pieces of paper this way, one for the front cover and the other for the inside front cover.  I cut smaller side pieces for both the inside and outside of the box.  I like the paint showing so I cut about ¼” short so you will see the paint.  If you like you can actually cut all the papers to cover the box and not paint the box.  I also brushed some of the lime green paint over the papers covering the box.  After the box is covered inside and out with coordinating papers I then covered the accordion album with the BOBUNNY coordinating green cardstock.  I used the stickers from the COMBO Sticker sheet, punch out dies from the coordinating dies, brads, and BOBUNNY jewels.  You are now ready to put the finishing touches on the outside of your box; you’ve got lots of options to choose from with all the coordinating accessories that come with the BOBUNNY line. I used the COMBO stickers, BOBUNNY jewels, and the coordinating chipboard to finish off my project.  For the portion of the chipboard that sticks out over the box I painted the back of it to remove the stickiness and to have color on the back instead of white.  You can also brush a little baby powder on it to remove the stickiness but again then the back that is exposed will be white.  The possibilities are unless with these new Graphic 45 Kraftboard Altered Art Box sets; you can make albums in a box, use the box as a shrine to display, combine the book and shrine as one, etc.  Stop by the store and get yours today.  Don’t forget the fun BOBUNNY Alora paper line and coordinating supplies, a great start for a summer splash of color.


Friday, June 8, 2012

The Bo Bunny Alora papers are so bright and cheerful, they are the PERFECT papers for Spring and Summer!  This octagon card was super simple to make and is great for last minute card needs.  Octagons are a very popular scrapbook trend right now.  I love that I didn't need to do any complicated techniques to make this card look great - thanks to simple lines and a great paper line!!

Thursday, June 7, 2012

Hello Spring Layout

With Spring being my favorite times of year it is not surprising that the Hello Spring line caught my eye.  I especially loved the tree with the brightly colored leaves and flowers so I used Blossom Breeze as the background for my Spring page.  I cut a strip off the top and replaced it with a strip of each Poppy, Teal & Petal Pink Linen.  

Making a kite out of each of these colors was fun and added some action to the page. To make the kites,  I stamped a  kite (using Snag ‘Em Stamp Kite stamp available at ScrapbooksPlus) on the paper. (I did not ink the tail.)  I cut out the kites and glued them on the background.  Then I stamped a tail on each kite.  Because the stamp is clear, it was  easy to line up the stamp with the kite so the tail lines up perfectly. 

I also used the solid colors for a photo mat and to create some flowers with the Tim Holtz Sizzlets Tattered Flower Garland die.  To finish the page, I stamped “Spring” (using another Snag ‘Em Stamp), added a couple of journaling cards from the  The Hello Spring Paper Tear-Out Ticket & Journaling Card Book and used some Hello Spring Jewels to accent the page. 

You can get all the supplies you need to make this page (including the stamps) at ScrapbooksPlus along with the instructions.

Wednesday, June 6, 2012

Wednesday Layout


This week’s Wednesday layout features the My Mind’s Eye Indie Chic Ginger Collection. This collection is filled with bright, bold, and funky patterns and colors. It’s a perfect layout for those summer photos –be it a trip to the beach, an amusement park adventure, or an ordinary day at the pool! The best part is this layout is simple leaving plenty of room for you to embellish and add your own flare. Enjoy!

Tuesday, June 5, 2012

Strawberry Fields in Alora

Our recent strawberry picking photos seemed perfect for the Alora papers by BoBunny that the Design Team is using this month. It was a happy, fun day spent with kids and grandparents and an unusual weekend where we didn't have 20 things going on! The happy, fun Alora paper with it's teal, lime green, light blue and bright red were perfect to offset my berry picking kids.  I have recently spent a lot of time scrapping 4x6 photos without cropping but while I stuck to my 4" height on my photos, I did crop the length of several to fit my layout design.  Recently I've been simplifying my scrapbooking by using uniform sized photos.  I've been able to quickly design my layouts and enjoy the process more. I've also been buying papers that have matching accessories.  It really makes my scrapbooking easy and fun.  Check out all the great accessories that Scrapbooks-Plus has for the Alora line!

Sunday, June 3, 2012

Banner Craze

Banners are hot right now in scrapbooking - and all over the place. I've fallen under the banner spell, too. The patterns of the Bo Bunny Birdie paper just begged to be cut out, however they weren't the right shape for the usual banner swagged across the top of the page.


So, I layered them under my photos. I've seen versions of this design in a few places - if you're on pinterest you can see examples here, here, and here.  I layered pieces of paper, a few cut freehand in a banner shape to break up the line and some circular patterns cut directly from the Bo Bunny Birdie paper.

For a photo mat, I used a scrap piece of the Giggles paper left over from another project. I liked the lime green color, but I wanted something without a strong pattern. However, my original plan to put a 4x6 photo behind the banner didn't pan out, in that my scrap was too small.

I found these Hipstamatic pictures taken with my phone. The camera app takes square photos and adds a border, among other effects. I printed out several to try out and decided on using these two. One would've worked fine and left room on the mat for journaling. In fact, I may try this design again but use a single 3 1/2 x 5 photo and let the bottom show below the "banner."

Once I had all the paper adhered down I grabbed some buttons, brads and chipboard elements to add more interest. And a noticeable smudge on the edge of the paper became an "embellishment opportunity" -- I trimmed part of a tag and added date & location info.

Friday, June 1, 2012

Alora for June

 
I'm excited to be the designer of the month for June.  What a fun month!  The weather is warm and sunny, the kids get out of school and the Summer gets into full swing!  
The Design Team kit is made up of a lot of Summer fun all wrapped into a BoBunny line called Alora.  There are fun papers and embellishments for all your Spring and Summer cropping!


Alora boasts colors of red, lime, shades of light blue, turquoise and an accent here and there of grey.  There are fun embellishments from chipboard to letter and shape stickers to die cuts to beautiful brads to 3dimensional flowers making the possibilities with this line almost endless!  So pop in to Scrapbooks Plus today to check out what our fabulous Design Team members have created with this fun line and pick up your own kit today!