Sunday, October 31, 2010

Happy Halloween


Happy Halloween everyone! I was so excited when I realized I got to post on Halloween. I saved this layout just for today's blog post!
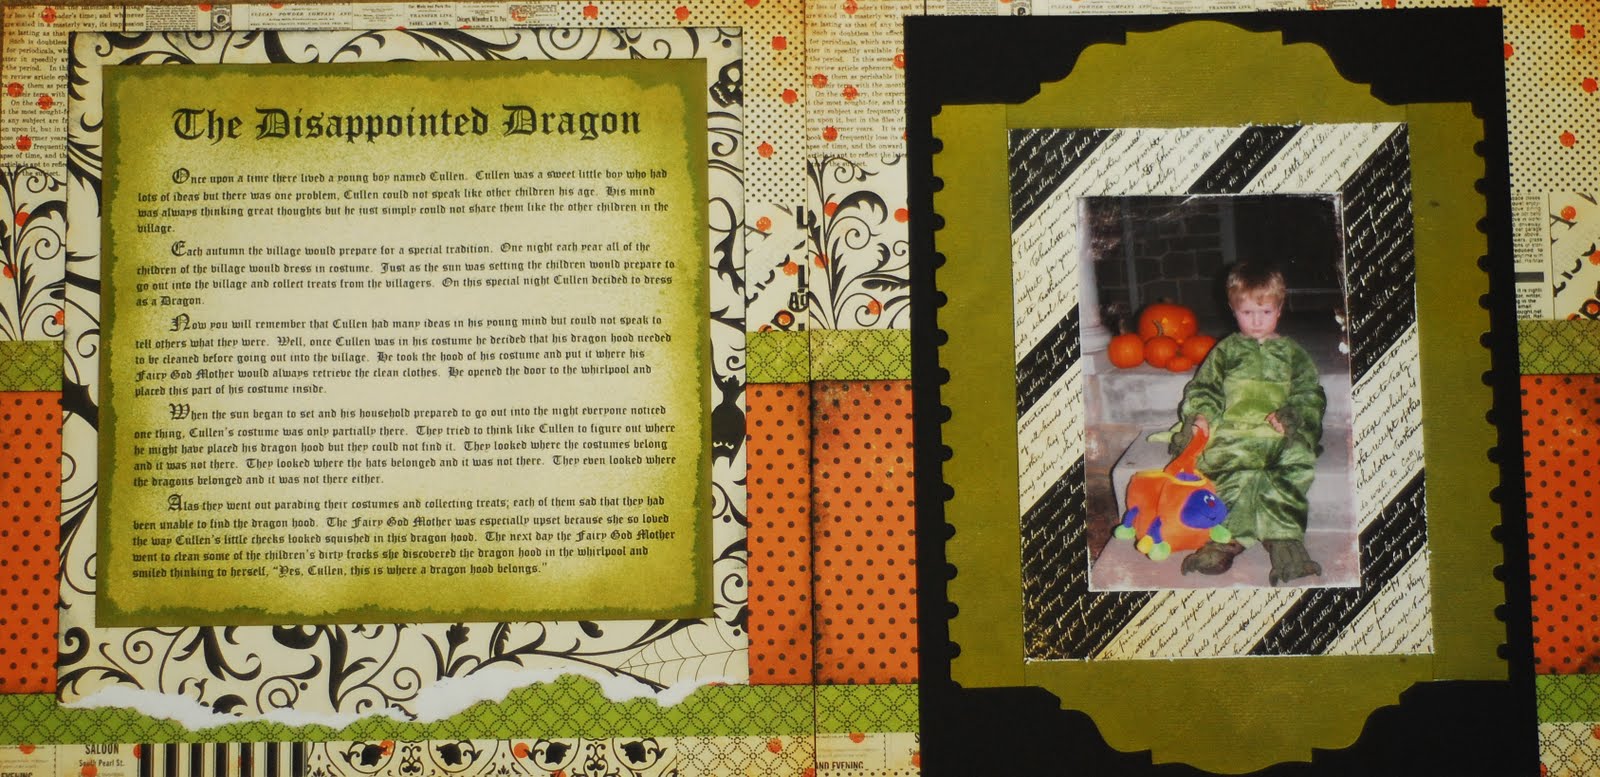
I had the idea to journal about the story behind this photo in a sort of Fairy Tale Format. The journaling then inspired the rest of the layout.
I was looking through my stamps and punches to pull out things that might work on this layout and I saw my Tim Holtz On The Edge punch by Sizzix, the perfect punch for my layout.
I used it to punch the photo mat out of chipboard. I then inked it with Crushed Olive Distress Ink and misted it with Iridescent Gold Glimmer Mist. I also used the same ink and mist on my journaling box. I let it dry completely before printing my journaling onto it.
Iridescent Gold
is a great mist to have because it doesn't have a color to it, just the gold glimmer. You can use it on anything you have inked or already has color to get the glimmer effect. So, if you haven't tried misting because of the expense I'm here to let you know you will love it and you will get addicted but you won't have to break the bank. You can pick up a few basics like Iridescent Gold and Silver and you will be able to mist on project after project no matter what the color scheme.

Saturday, October 30, 2010

Peek-A-Boo

This month's pagemap was so versatile and easy to work with. The combination of a space for one feature photo and three supporting photos worked with a lot of my "waiting-to-be-scrapped" pictures. I decided to go with some Halloween photos from a couple of years ago.


I decided to pair one shot of my daughter peeking around a lightpost with three shots of her getting her face painted. With the purple in her costume and face paint, I backed everything with solid purple cardstock. I put the clock side of the Bewitching Hour paper behind the photos of her transformation from regular princess to butterfly princess and put a torn strip of Midnight Flight just above. I love using my old school label maker for the journaling strips and date. All I added was a collection of buttons and one of the cute flower accents from the Toil and Trouble line to finish it off.

thanks for stopping by!
erin

Friday, October 29, 2010

Halloween Photos

Halloween is just a couple of days away (as my kids keep reminding me). If you have youngsters dressing up and going out, don't forget to get some photos of them in their costume.

Plan ahead! Dress them up early and take them outside for some pictures while it's still light out. Pose them in front of Halloween decorations or among the leaves that have been steadily falling into your yard. For example: spooky spiderwebs covering bushes, carved jack-o-lanterns, piles of candy, giant purple inflatable spiders (like a neighbor has)...

I learned this lesson the hard way. We were running late two years ago and all I got was a shot by the inside of our front door - not an attractive background at all! Last year I remembered. Whew!

And if you need an idea of what to do with your photos, here's my two-page layout for the month.


Thursday, October 28, 2010

Spooky!


How fun is this? While surfing through Teresa Collins’ website I came across this wonderful design. It was simple, yet elegant. I put a scary twist on the design by adding lots of fun embellishments and a “spooky” title.

The bat lamp post is a die cut I created using my Silhouette. The Silhouette design store had so many great Halloween themed designs that it was hard to choose. I wanted to put something fun against the more serious damask design of the paper.

I love using green as an accent color. It worked perfectly with my black and orange theme. The letters from Pink Paislee are beautifully glittered and come in great colors. My leaves are stamped using a leaf stamp from Heartfelt Creations and I used Memento Ink – Rich Cocoa to stamp the leaves.

Supplies
Paper and “Happy Haunting” embellishment – The Girls’ Paperie and Prima
Ribbon – May Arts
Ink – Memento – Rich Cocoa
Flowers – Prima
Bat Lamp Post Die Cut – Silhouette
Stamp – Heartfelt Creations Swirly Leaf Stamp
Alphabet and small green flowers – Pink Paislee

Thanks for joining me today.

Robin

Wednesday, October 27, 2010

It's Wednesday!


It's Wednesday! You know what that means? Yep, the Wednesday layout with a free embellishment. This week's layout features the Haunted paper line by My Mind's Eye. And the free element is this spooky little guy right here:


So stop by the store and pick up the papers and instructions for this layout and you get this spooky embellishment for free, while supplies last.

Scary

This month's page map was great for my pictures and embellishments. I once again "Stickled" around all my pictures and embellishments. The Tim Holtz die cuts were sprayed with "Black Magic" Glimmer Mist, both from ScrapbooksPlus. I made my own larger rosette out of crepe paper and Glimmer Misted it with "Garden Fairy". I then glued the embellishment on top. The black "Scary" letters are Making Memories from ScrapbooksPlus. Play with this kit was a lot of fun. TFL.

Tuesday, October 26, 2010

Falling Leaves by Esther

This is a collage of real leaves printed on the photo paper. The layout was scraplifted from "Sarah and Andrew" by Elise Flannigan in the June 2006 Creating Keepsakes Magazine. Strips of cardstock from Toil & Trouble by The Girls' Paperie line were cut and arranged to give the background onto the orange and black dotted cardstock. Dark brown Bazzill was included & used behind the title. Journal box is computer printed in brown on biege. Buttons were used to decorate the diagonal lines. This type of layout is ideal for one large photo to be the feature of the layout. It also lends itself to using those many scraps we all save.

Monday, October 25, 2010

Margie and Friends!


I tried to use a little bit of all the papers in the paperline for this layout. On the left side I punched out 1 1/2" circles and adhered them along the wavy line of the green paper. I then sewed thru the circles for some texture. I used the trims on the bottom edge of the paper on the left side and made a bow on the bracket on the right side. This ribbon is so cute. It's orange but looks like a ruler. I then carried over the circle pattern on the right side by making it the title "Margie & Friends". As well as the circle flowers that came with the kit. This way the circle flowed on both layouts. I had fun as the Designer of the Month for October and choosing Margie's paperline. I took several classes from her over the years and had the opportunity to just hang out. She's a lot of fun, just like her paperlines. I hope you enjoyed all the ideas from the design team members this month, as well as purchasing the paper at ScrapbookPlus.

Sunday, October 24, 2010

Stash Usage

This was one of those pages where I just kept adding & adding. I had the best time making this layout & actually got to use up some of my stash. This is a 2 page spread- I started with Theresa Collins Noel sheet music & glimmer misted like crazy. I used the new prima stencils. Taking the DT kit for the month, Toil & Trouble I cut out hinges with Alterations, & the swirl & the branch with my cricut. Adding a 7 gypsies tag sprayed with tiger lily GM & covered in golden goddess Gglam for a quote tag. I cut the clock from the paper line & adhered it with a My Minds Eye brad & hardware. Next a metal key & date tag from basic grey was added at the bottom of the photo. I added bling to the hinges with the new irock. This is a great tool that adheres pre-glued bling with heat. The cool thing is you can place your bling & move it around or change it before adhering & it sticks really well. Next a Hambly acetate sheet was cut using THoltz's "on the edge" & colored with copic marker & placed along the left side of the photo. I added a strip of dazzle along the acetate & attached with the tiny attacher , than added prima bling. The title is punch outs from graphic 45. For the 2nd page more GM (glimmer mist) & a fun row of crazyness. I punched the paper with TH alterations flowers & GM, adding more bling. The butterfly is tattered angels, journal card my minds eye, I even threw a Starbucks gift card in there. Actually I called to double check the card had been used & there was a $10 balance-num! This page was all about using the nummy Girls Paperie papers & getting as much of my ScrapbooksPlus stash on the layout-mission accomplished.


Saturday, October 23, 2010

Round & Round

I betcha didn't expect to see circus pictures up this month, did you?

I was looking for other subjects to use with the fun Toil and Trouble line from The Girls' Paperie... and the bright happy colors of the circus were perfect. I cut the black and white side of Toil & Trouble into strips to use as my border. I mitred the corners and made sure not to use any strips with an obvious skeleton or spider on them. I cut a couple of scalloped circles from the green side of Writing on the Wall (this is my favorite paper) using some of the Nestabilities dies and my Cuttlebug. I love the Nestabilities die sets and they give fabulous results! Inside the circles I used the lined side of Bewitching Hour to hold the "3" that starts my title and to leave a space for some journaling when I get around to writing it (no pun intended!). For my embellishments I used some of the fun layered flowers from Sassafrass lass and some black and yellow bling.

thanks for stopping by!
erin

Friday, October 22, 2010

a TATTERED layout


There was lots of stamping going on to create this layout. First I used some of the stamps from the Tattered Angels ~Tattered Traveler stamp set. These stamps are so neat. The set comes with 25 stamps which can be used separately or they can be layered together to create new designs.


I used the pocket watch stamp as the outer stamp and the month/date inner stamp together to make the embellishment in the upper left corner of my layout. I just wanted the circle so I cut off the dial of the pocket watch to make it just a circle which incidentally adds yet another creative option with these stamps!


To make the embellishment in the lower right corner of my photo I first stamped the clock face stamp from this same set on my cardstock. I covered it with crackle paint and once it was completely dry I used Distress Ink ~Antique Linen~ over the top to make the crackle effect stand out a bit more.


The three cards along the bottom are made with other Halloween themed stamps I've picked up over the years. In order to create some symmetry among these images I cut the cardstock squares to the same size and inked all of them with Jet Black StazOn ink around the edges. Finally I added my title "Halloween" along the bottom of the center card and tucked my journaling card behind the photo.

Thursday, October 21, 2010

Haunted Musings


I am teaching a new class that is up at ScrapbooksPlus if you want to come check it out! Come join me for some spooky fun!

In this fun technique class you will learn all about the Tattered Angels Glimmer products. We will make a unique & spooky mini album complete with it's own coffin holder. Also because this class is after Halloween you will be able to chose your new photos & change around the colors of the album if you want to. Don't have kids? Take pictures of your neighborhood decorations or make this a gift for a friend, or donation to your local school as a basket auction prize. We will unwrap the mystery's of Glimmer mist, Glam & Glaze. Learn to use them in layers, & on their own. We will do some cool resist & water color techniques. You will have a keepsake as well as the directions so you can use these techniques again. Most of the stamping & embossing is done for you so if you have the products (these will be available at ScrapbooksPlus) & knowledge to "glam" it up this can be done as a kit. In addition to the basic class kit please bring your favorite permanent adhesive (I use TomboMono, Gel Medium, glossy accents, fabri-tac & redline or scor tape). A craft sheet & heat tool is highly recommended. A cup for water to clean brushes, medium (1/2") & smallish brush is helpful, baby wipes. If you want to use different colors bring your Glimmer Mist/glam/glaze (please mark them with your name). Also optional but if you have it-alcohol ink dauber, & brayer. Class will be November 7th from 2-6pm. Fee is $55. Teacher Karen Bearse .


Wednesday, October 20, 2010

Wed. October 29th Make and Take

Hey all - I put together today's make and take. I picked the Mix and Mend paper collection from Sassafras Lass for it's cool shabby-chic look. Get the look of lots of layers without the bulkiness (and work!). Be sure and stop by the store for your copy!

Halloween Mini Book

I really loved this paper line from The Girls' Paperie. I think it's my favorite Halloween paper ever. And I was just dying to use it in a minibook. I grabbed a Bo Bunny album from the store, the October kit, some Sassafras Lass chipboard flowers, fuzzy vinyl stickers from My Mind's Eye, and lots of Tim Holtz goodies. I don't think I've had as much fun making a project!

First, I had picked up some gold wire at ScrapbooksPlus last month. After looking at it for a month, I decided to string black beads and make a spider web for the cover. I inked the acrylic cover with several colors of alcohol ink, stamped with orange Stazon and added a large grungeboard key painted black.

Here's a close-up of the cover. You can see the orange stamped webs under the beads.

You can see the entire book in the store this month - I'll just post my favorite pages here. I left lots of room for photos and ephemera from all of our activities this month.

Here's the first full page - the tag shows through the cover. The chipboard branch was painted black before I added a layer of rock candy crackle paint. And, of course, generous inking all around the edges.

On this page I made a small photo mat then added an embellishment grouping. I love these Halloween tickets - and you can only get them at ScrapbooksPlus. I've also got a crepe paper flower from The Girls' Paperie. I made the pin using this tutorial, Tim Holtz memo pins and a bit of Glossy Accents.


This page is embossed grungeboard made using a Tim Holtz Alterations texture fade. The key is from Kaisercraft, painted black. And on the backside of the grungeboard....

... is this page. I used a bit of ribbon and a fabric sticker.

Tuesday, October 19, 2010

Fright Night


This month's kit is one of my all time favorite to work with. I am calling this my ADD/Stickle project. I used Bazzil Halloween chipboard shapes - once I added one I couldn't stop. I painted and "Stickled" them. The papers and ribbon from this line were a lot of fun to work with. TFL.

Monday, October 18, 2010

Halloween Cards

Can I just tell you how much fun the Silhouette Digital Cutter is? It’s WAY fun! Look at this adorable Jack-O-Lantern card base. When I saw it in the design library I knew I had to purchase it for my October card projects. The “Boo” sentiment is also from the Silhouette design library. It is my “go to” when I get stuck for title designs.

I wanted the card to be fun, yet classy. I am not really into cutesy anymore since my little one is all grown up. Sigh…. I hope you like it.  If you are interested in the card design I can cut one for you.  Just leave a comment on this post.

Not everything about Halloween has to be scary. I am loving Maya Road’s doily transparencies! This card is very simple, yet the addition of the two transparencies makes it much more substantial. The card base was created using patterned paper from The Girls’ Paperie Toil and Trouble collection. I then embossed a piece of black card stock using a Cuttlebug embossing folder. The “Trick or Treat” embellishment is also from the Toil and Trouble collection.
 
Trick or Treat! I used a color combination of black, green and orange which scream Halloween! The crepe paper embellishments are fabulous. I liked them so much that I bought two packages.  Black card stock is one of my favorite things to work with. Using it as the card base makes the design pop! The black scalloped circle was cut using Spellbinders.

Thanks for joining me today.

Robin

Sunday, October 17, 2010

Falling Leaves - Pretty Colors - Skyline Drive!

Well here we are again, one of the prettiest times of the year, especially here in VA. If you take a ride up to Skyline Drive in the Front Royal, VA area, you get the best photos ever. That's why I find it easy to create the layouts with these photos. Especially when you have a great paperline to work with. I was pleased with the paper I chose for this layout - Toil & Trouble by Margie Romney Aslett. The paperline was not too bold or too theme related. You could use it for almost anything. But since I have these photos that I take every year, the paper brought out the great colors in my photos. If you ever get a chance, check out Skyline Drive in Front Royal, VA - especially in the Fall.

Saturday, October 16, 2010

Page Map by Esther


These picutres were waiting for this layout given in the page map. The base green is a Bazzill with a circle with scallops in orange. Dotted designs of Midnight Flight peek from beneathe the main picture that was blown up and cropped to fit the template. The other picutres were shrunk and mounted with two colors of cardstock. Embellishments include a buttons on a starburst die cut shape and a pearl brad on an orange flower. Ribbon was used under the welded title. The bracket was rubber stamped with clear powder to the left of the journal block. Black lace across the lower portion ties the journal block and scalloped circle together.

Friday, October 15, 2010

Page Map!

When I saw this month's pagemap I immediately thought hmm... a large circle... it's October... how about a pumpkin! I started with a large circle cutter and sketched lightly on the paper, then freehanded it a bit to make it more pumpkin-like.

Instead of three squares of paper or three photos on the left-hand side I opted for a line of large embellishments -- Sassafras Lass chipboard flowers -- accented by ribbon. This ribbon is super light and easy to adhere. I used a bit of American Crafts This to That and lightly folded and crumpled the ribbon as I lay it down on the paper.

Thursday, October 14, 2010

Who turned 60?

OK, I'll come clean, it was ME who turned "60". Well, at least it was fun making this cute little chipboard album with the Toil & Trouble paperline by Margie Romney Aslett. I used all the pattern papers, the great trims, and paper flowers all from this line. I added a few other flowers, stamps, buttons and fun embellishments that went with the birthday theme. All products, of course, are offered at ScrapbooksPlus.


I love to paint the outside of each page (orange in this case) were it would be easier then covering it with paper. Plus it gives each page a finished look.

Next time instead of making a few two-page layouts for an event (in this case a birthday) try a small chipboard or acrylic album. It really takes no time at all when you have all the photos and you use the same paperline.

Wednesday, October 13, 2010

Wed, Oct 13th make and take

Hi everyone! This weeks Wednesday Make and Take was designed by Karen Bearse. She used Webster's Pages papers for this weeks design. Make sure you stop by Scrapbooks-Plus and pick yours up!

See you at ScrapbooksPlus!

Tuesday, October 12, 2010

The Colors of Fall

I'm never one to pay attention to what a patterned paper is for. In fact, I really enjoying finding other uses for themed paper lines. Many times there are several patterns in a line that are great supporting pieces... usually they are your dots, stripes, and geometrics. They can be used practically anywhere for anything.

As I was working on my layouts this month... and tiring of the purple costumes (how did dear daughter end up in almost the exact same shade two years in a row?)... I came across several photos that my husband took of our daughter and her freshly made pigtails. The photos aren't fall-ish or Halloween-inspired, but the reddish background and green ponytail holders work with the color scheme.


I started with three photos, but I had a lot of journaling strips. I love using a regular old label maker for my journaling... it's fun, easy, and legible... and doing journaling by hand often is not any of those things. :) I ended up eliminating one of the photos to make room for everything. The cutie butterflies are Flora Doodles by Petaloo and work perfectly with the theme. A few buttons, a scrap of ribbon and some kraft journaling spots from Basic Grey finish it off.

thanks for stopping by!
erin

PS. Stop by later this month to see how I used skeletons and spider with my circus pics!

Free Falling.

This months DT kit used the beautiful "The Girls Paperie" line Toil & Trouble. I started with the dramatic damask type in orange. I thought this paper would be perfect for Glimmer Mist & stencils. I used Sugar Maple, Forrest Green & Charcoal chalk mist with Tim Holtz's music notes mask & the new Prima stencils. I love the designs of these new stencils & was happy how the air balloons turned out. Next I put letter stickers right on the photo. Added ribbon & flower from this collection. The "Fly" postage stamp is My Minds Eye from their new Lost & Found Collection. I raided my stash for the Thickers letters & covered them with Golden Goddess Glimmer Glam, this added glitter & gloss & changed the color to better suit my page. Stamping & distressing a piece of card stock helped the title to pop. I used another piece of the collection which conveniently, is lined, for the journal box. I tested out the new i.rock from Imaginese to add the bling. This fancy little tool heat sets the pre-glued bling which makes it very easy to use & the gems don't seem to be going anywhere! The great part is you can place your bling & move it around before having to adhere-not something you can do with the regular bling. Then I added the swirl bling that was clear but I colored it to match my page using Copic markers.I bought most of the product on this page at ScrapbooksPlus. Come check out the design team wall. The photos on the blog don't do our pages justice & you can't see the shimmer & shine unless it is up close. Enjoy!

Monday, October 11, 2010

Halloween Cards


These Halloween cards came together so quickly. I absolutely loved this month's kit. All the papers were so fun to play with and embellish. I actually ran back into the store to buy more ribbon and embellishments.

For the pumpkin card I cut out a pumpkin with my cricut and embellished the face. For the monster card I used "Mini Monsters" cartridge to cut out the card base and card. I made a paper ribbon, stickled it and then placed an embellishment on top. For the eyes I used some of my kid's googly eyes - what is a halloween monster without googly eyes? TFL.

Saturday, October 9, 2010

Two Pages of Fun!

This was one fun project to create. I do not have too many Halloween photos of my daughter, but the few I found were a perfect match for the Toil and Trouble collection. The Girls’ Paperie really did a nice job with their Halloween line. The designs are fresh and clean with a hint of elegance.

I put my Silhouette to work to create the bat, spiders and webbing. I painted each die cut with black stickles to create a beautiful shine. I then mounted each spider and the bat using foam squares.

The tags and scalloped circles were created using Spellbinder dies. I used a 2” circle punch for the smaller photos. The lettering is from Pink Paislee. They have the most wonderful glittered alphabet!

Supplies
Patterned Paper - The Girls’ Paperie, Bo Bunny
Spiders, Web and Bat Die Cut – Silhouette
Tag Die Cut - Spellbinders
Stamp – American Crafts
Alphabet – Pink Paislee
Punches – Martha Stewart Crafts
Crystals - Prima
Ink – Memento Tuxedo Black; Distress Ink – Black Soot
Stickles

Thanks for joining me today.

Robin

Friday, October 8, 2010

Cards by Esther


With the ensuing orange & black celebration upon us, I fashioned the "Boo!" card with a positive message inside - "Be Happy." The Boo is welded with the Gypsy & glittered before being adhered to the orange checked Ghost Story rectangle. Layers of cardstock were used from Girls' Paperie. Flowerettes are used to decorate the layers.
The second card is formed on a dark brown cardstock with the clocks of Bewitching Hour as a feature. The sentiment is rubber stamped onto a solid biege with brown inked edges and mounted on the orange print design. Inside message - "We all have the same number of hours in a day; it is what we do with them that counts."

Thursday, October 7, 2010

Trick or Treat


How fun was it working with this month's paperline Toil & Trouble by Margie Romney Aslett. I took full advantage of using the Halloween theme for this layout, which was also the pagemap for the month of October. I love the spiders and bats (which I cut out and added to the moon like circle). I took the background pattern paper, cut a 10 x 10" square in the center and used the outside for the frame. Distress and tear here and there and you have a cool looking frame. I stapled it on top of a solid black 12 x 12" cardstock and was ready to decorate the center. I love the little paper flowers in this kit as well. This particular one says "Trick or Treat". I then added an orange toile strip with a Tim Holtz stapler and 3 pumpkin embellishments and I was good to go. Stop by ScrapbooksPlus to see all the wonderful creations made by the Design Team with this great paperline. Have fun!

Wednesday, October 6, 2010

Smithsonian Crafts by Esther


When using glitter on your layouts, less is better. It will shake off even after the glue dries. Of course you can shake it after application, but there will still be some to come off with movement. At the top of this layout, I used a decorative element and wording made on the Cricut with the Gypsy that was glittered. The black was dull once I place it on the top of the layout. Therefore, the black glitter idea.

In order to bring some unity to the layout, black was used with the Around the Block label maker to make the picture labels. The green side of Toil & Trouble from the Girls' Paperie line was used as the base with areas of Writing on the Wall between the pictures. The pictures are mounted on Bewitching Hour . Green strips and 1/4" black strips were place to teach outer side to frame the layout.

Other decorative elements included a flower in our kit made with strips of paper & button. In order to bring this into the other side of the layout & have an odd number, I made two similar ornaments with string laced through Basic Grey buttons.

Wednesday 10/6 Make and Take


This week’s make and take created by Robin Shakoor features the beautiful Olivia Collection from Bo Bonny. This week you will get to work with chipboard stickers and journaling sheets. You will receive a free element along with easy to follow step by step instructions from the designer with the purchase of your kit.

Happy Crafting!

Tuesday, October 5, 2010

World Card Making Day . . .

... was on Saturday. Did you make any cards? Here's three cards I made with this month's Girls' Paperie kit, a few cardstock scraps and a couple of stamps.


I used a cobweb stamp from Tim Holtz and stamped in wild honey distress ink, also inking the edges of the paper.


For this one I added a couple of black chipboard circles I had lying around, a few googly eyes, these uber-cool Halloween tickets you'll find only at ScrapbooksPlus, and a flocked vinyl sticker from My Mind's Eye (part of their Haunted collection).


And finally, I had this picture of a ghost decoration we hung from our tree last year. I decided to add another My Mind's Eye flocked vinyl sticker and a bit of paper.