Monday, January 31, 2011

Snowflake Girl


I was so inspired by this Bo Bunny paper line. I wanted to create a layout that used several of the different papers, so here it is.

I used several different strips of the patterned papers behind the large photo in the center of the layout. I also threw in a bunched up ribbon for some texture.


The real fun came in making this title tag!


I used the Tim Holtz Tag and Bookplates Die to make the tag.

Then I misted the tag with Moonlight Glimmer Mist.

I took some letter stickers and put them on the tag where I wanted the words "just a" and "kind of girl". Then I covered them with Snow Tex but you could use any acrylic paint or opaque ink. I let it dry and I removed the stickers to reveal the words.

Then I added the words "Snowflake" and "Girl" using Glitter Thickers. To add a bit of whimsy I used a snowflake as the "O" in snow and I dotted the "I" in girl with some bling.

When you come up with the perfect title but its a bit long try using different lettering for the words. Not only does it create visual interest but it also allows you to use longer titles when the situation calls for it.

Sunday, January 30, 2011

The Snow Queen

For this month's sketch I stuck pretty close to the design Robin created for us.

Here's the sketch:


And here's my layout:


I took out one of the mat layers and switched out the vertical and horizontal strips for flourishes. The flourishes are actually some of the Bazzill die-cut borders that I cut in half and layered. I added some rock candy Stickles to the edges and dotted a few extra spots here and there. I don't like placing my title over my photos when I have letters with tails (like "p" or "q"), so I took an "O" and cut up a tilde symbol from the set to make the tail. I used a little piece of a Jolie's white doily sticker for the crown on the "Q"... a few Kaisercraft jewels make it into a proper royal accoutrement.


thanks for stopping by!

erin

Saturday, January 29, 2011

Tags O' Fun - the Sequel


We've got more tags - and more techniques for you. Join us as we will be "Holtzing Up" six new tag designs. Here's a preview of four of them. The class will be on February 12th from 11 a.m. - 3 p.m.

Get ready to get inky & grungy & learn new & fun ways to spruce up your crafting. If you missed our last class feel free to jump in, if you took our last class we will be doing a new technique for each tag. Learn resist, masking, & how to use those sizzix type die cut machines in new ways. We will be using lots of stamps, metal & grunge to complete these season current tags.

Use them as a gift tag, mini book or on your scrapbook pages. We'll have a few valentines and several all-purpose tags.

Class supplies: Bring the basic class kit (on website) plus popdots, redline or scor tape, glossy accents, a Ranger blending tool & foam. If you have one bring your craft sheet, heat gun, & distress inks.

- Deborah & Karen

Lots of Photos

What do you do when you have a lot of photos? How about a two-page spread that holds eight 4"x6" ones?


These pictures are from a weekend trip to New York City in December. I wanted to show all the many things we saw - Christmas windows and decorations, Rockafeller Center, and vendors selling roasted chestnuts.

I use Photoshop Elements at home to edit and print my pictures. If you have this program (or similar one) you can open a new document that's 12" x 24" and rearrange, resize and design to your heart's content -- without wasting photo paper or supplies. I'll often use it to come up with my basic photo layout before I start printing pictures.

For this layout, I decided to just use 4"x6" photos, all lined up in two rows. That allowed me to use scraps of my Bo Bunny paper on the right hand side of the photos.

And here's a tip - I didn't use the Bo Bunny paper as the base of my layout. Since I knew a lot of it would be covered by photos, I grabbed two old sheets of paper that I wasn't in love with anymore. Because I didn't have to use a whole 12x12 sheet of Bo Bunny paper for each side, I get more projects out of my kit.

For the left hand side of the layout, I used a Tim Holtz stamp to frame my title. A border-punched piece of Bo Bunny paper and Tim Holtz tissue tape make a great transition from the photos. I cut one of the larger snowflakes from the paper and adhered it with a pop dot. A Tim Holtz memo pin sticks right through that snowflake (into the pop dot!) and holds a ticket made by Susie Bentz.

Friday, January 28, 2011

Cards to Warm Your Heart

Hello everyone,

First I would like to thank everyone for their support over the past year.  This is my last post as a Design Team member.  I have met so many wonderful people and have made a few friends along the way.  Congratulations to the 2011 Design Team!  

When I started crafting one of the things I always wanted to make was a card.  Being on the team allowed me to make cards which was one of the things I really looked forward to each month.  This month, I used my Silhouette to create card bases for both of the cards pictured below. 

I love the simplicity of this card.  I used the darker patterned papers in the collection to give a nice wintery feel.  The tree and sentiment stamps are from the Tattered Angels "Chillin" collection.  I used Flower Soft to apply snow to the tree brances.
 
This card is more playful than the first.  I used the lighter colors from the kit to create this card.  The sentiment was embossed with white embossing powder to allow the letters to stand out.  I finshed the card with two different types of ribbon and a beautiful bow.

Thank so much for joining me today.  Happy crafting!

Robin

Thursday, January 27, 2011

Snow Weeks


For this two page layout I used Midnight Frost Ice as my background pages. I spritzed both pages with Diamond Glitter Mist and edged them with my silver leafing pen. The snowman is made from three chipboard circles that I painted and glittered.

The background paper on my pictures is Bo Bunny's Dark Denim dot. The snowflakes on these pages are various ones from my stash and from Bo Bunny's Layered Chipboard stickers.

My title was cut out using my Cricut with the Winter Wonderland cartridge. The title is covered with Glossy Accents and glitter. TFL.

Wednesday, January 26, 2011

Snow Card by Esther


Making cards is always a fun part of using the kit because I can use the scraps and combine patterns while using things from my stash of supplies. "Let It Snow" was a tag in the kit. A base of dotted cardstock was used to mount a rectangle of Dark Denim Dot. It was shaped with The Chomper and adhered off-center. The Ghost Shape Heidi Swap snowflake was attached with a glue dot in the center that has a rhinestone center. The Inkadinkado snowman was stamped with StazOn Stone Gray & he was embossed with white powder. A clear button was threaded with blue Pearl Cotton thread.

I enjoyed the look of the monochromatic blues in the Bo Bunny kit.

Wednesday Layout 1-26-11


This week's Wednesday layout is very Basic... Basic Grey!!!

I used papers from the Origins and Olivia lines to create this layout.


This week you get three free elements when you purchase the materials to make the layout. I used stamps from my stash to make the title background, journaling block and the camera embellishment.

Tuesday, January 25, 2011

A Big Snowflake!

For my fourth project this month, I wanted to used this month's Bo Bunny paper for a small album. I found cardstock snowflakes that were hooked together for a small book. I sprayed 3 snowflakes with Blue Smooch Spritz and one top coat with Pearl Glimmer Mist. I outlined the top (1st page) snowflake with Diamond Stickles. Then I added stickers for the year. The other 3 snowflake pages, I sprayed 3 coats of just the Pearl Glimmer Mist. I wanted to get a great shimmer on each page. Then I used a 2" circle punch for my photos.
I added some small embellishments: snowflakes, bling, words, and letters. I also stamped small snowflakes with navy ink on the ends. It's just a little book with big memories. This is my last blog with the Design Team 2010. Now I will stop by each month to get new ideas for all the new products from ScrapbooksPlus. Be sure to stop by the blog as well as the store so you can keep your memories alive. Thanks for letting me share my memories with you.

Monday, January 24, 2011

Winter's Butterfly Album

I have wanted to do a mini album with the Bo Bunny journal packet for awhile. I guess I was waiting for the perfect paper & here it is! Midnight Frost, even the name is great. I started by running a piece of metal through THoltz's texture fade, than painted it with black acrylic paint. Once it slightly dry I wiped off the access leaving the majority in the debossed parts. Time for alcohol ink! Using blues & purples the metal was covered by dabbing in different directions.
The chipboard tree was inked & stamped & ARTc beads were glued on it. The journal pages were adhered to chipboard & made the perfect background. My title is Thickers cool sparkly chipboard alphabets. Here Tim's filmstrip was used with some index prints. I added a metal embossed snowflake that was cut out & inked.
Heat embossed stamped title & flourishes were used on this page, along with a dazzle flower & some bling. I spritzed THoltz's flowers with glimmer mist & added pearls.
More heat embossing, as well as using distress powder for the branch. Most of the stamps I used in this album are either Tim's or Tattered Angels. The snow flake glimmer chip is also Tattered Angels, with a spritz of glimmer mist. The Holtz die cut chipboard bird was heat embossed & stamped, a technique I will be teaching at ScrapbooksPlus soon so keep an eye out for it.
This page had more embossing with the pine tree & snow flake stamps, some dew drops & an alcohol inked, embossed piece of acrylic. I added a bird charm.
A mat was painted with white acrylic & than crackle paint added on top with some more ARTc beads, along with the photo. I cut the other side using Tim's snow edge die cut & blinged it up using some Bo Bunny embellishments.
The little wood birdie was distressed & stamped with silver heat embossing. My sleepy sons page has a boarder punch snow flake chain, some bling, & a sticker from the kit.
Ok so my students know when I Glimmer Mist, I put a paper towel down to catch the extra nummy, glimmery, splatter. The photo mat is used from leftover paper towel-super shimmery. Some more stamping & distressing. The acrylic sheet is the cover of the journal packet. I added the photo & put a border of stickles around it.
The opposite side of the acrylic is the same. Added some journaling on the last page. The back is the same technique as the front, using a texture fade. I used rings with ribbons & fibers to bind the album. This was a fun album to make & I plan on designing another for a class. Let me know if you are interested.

Sunday, January 23, 2011

Snow, Snow, Snow!

I am not a fan of snow, but there is something about pictures of the snow that I do love! I took quite a few photos last winter...since we had so many opportunities to do so. I hadn't scrapped (or even printed off) any of them, so when we got the Midnight Frost collection from Bo Bunny, I went straight to the computer to find some of those shots to use. I found these from the very first snow early last December. At that time we had no idea all the snow that would be coming all too soon. I had one shot of my daughter trying to catch snow in her mouth and it gave me the idea for the layout. This snow was just a taste of what was to come!


I took my feature photo and printed it as an 8x10. I really didn't want to zoom it... I wanted to get all of the snowy scenery around her. I matted the photo with the Flurry paper. It had some touches of burgundy in it, which helps make it look like it goes with that bright red coat a little better. I found a beautiful dark, coppery flourish at ScrapbooksPlus and placed it so that one of the swirls lined up with one of the swirls in the patterned paper. For the second page, I matted the photos on the back of the Ice paper and added some scraps that I trimmed off to the edge. Some copper embellishments - photo anchors and a dangle on a Karen Foster clip up - tie into the flourish. I only had gold and silver jump rings to hold my dangle onto the clip. I thought about tying it with string or thread, but then I decided to try altering the jump rings. I took one of each metal and coated it with caramel alcohol ink. I just let them sit in drops until almost dry. They both ended up as almost perfect matches.

thanks for stopping by!
erin

Saturday, January 22, 2011

Snowman

Here is another layout I made using the Tim Holtz Winter Wonder Dye.

I folded the paper into four layers that were not quite as wide as the snowman in the punch. When I lined it up on the punch I made sure that the left elbow and the left side of the bottom snow ball were not going to be cut all the way. I kept the edge of the paper inside the blades on this side. I ran it through my die cut machine and when I unfolded the paper I ended up with a chain of snowmen! There is a really great example of this on Tim's blog. He used the gingerbread die cut but its the same concept.


I used Snow Tex to add some white texture around the blue snowmen. I shaded the top hats with weathered wood Distress ink and added some bling for the eyes.

I hand tore one of the snowflake swirls from the Midnight Frost Snowfall paper and placed it behind the snowmen. I also used the same paper as the photo-mat for my photo.

The background of this layout is a series of layers. The base layer is dark blue side of the Midnight Frost Dot paper. Next I used the Midnight Frost Stripe paper and hand tore the edges for texture (about 1/2 inch on each side) and on top of that I use Bo Bunny's Dark Denim Dot paper. I added a few snowflake embellishments and some rub on lettering I had in my stash for the title.

I love the kit this month!!

I hope you find it inspiring!


Friday, January 21, 2011

Ski Time

Just loving this great Bo Bunny paper! This 2 page layout has lots of technique on it. First I printed my journaling directly on my photo. I cut out a chipboard pine tree & painted it with Glimmer Glam, than stamped a flourish on it with Staz-On. Flocking was glued on for snow. The snow flake trim was cut with a punch.
The large snow flake was stamped using a Tattered Angels stamp & cut out, with some Prima bling in the center. The elements were then layered on the page.
The large snow flake is made using a technique Tim used in his "12 tags of Christmas" this year. It starts by covering chipboard with THoltz tissue tape, cutting it out using a Sizzix die, & covering it with alcohol ink. This technique creates a rich bright multicolored surface. The tape tends to start to pull off so cover the surface with stickles to add glitter & help glue the tape down. Bling was put in the center.
Glimmer Mist works great on crepe tissue so I sprayed multiple colors of blue & purple on the white tissue. Once dry I put a strip of scor-tape down on the layout & gathered the crepe as I stuck it down. I added ribbons & some bling & brads. Heat embossed, stamped snow flakes are scattered over the layout. I love using this technique as it really makes your stamps-pop! The title was added by painting chipboard with a silver dauber by Ranger. Finally chipboard accents by Prima were added.
This was a fun layout to create. Now go get inky!

Thursday, January 20, 2011

Snow Time!

Once again there's snow in the forecast. Thankfully we're not having the huge amounts of snow as last year - but all that snow made for some great sledding (once you were able to dig yourself out of your house)!

Does your phone take photos? I've downloaded quite a few photo apps for my iPhone and I've found that I can get fairly decent pics if the light is good. Which is good, because sometimes you really don't want to have to bring your camera. Like when you're taking the kids sledding.


For this layout I used several pieces of Bo Bunny's Midnight Frost. I started with Midnight Frost Ice as the background, then used the reverse side of Frost Stripe to hold my photo block, backed it with Midnight Frost Dot.

In the middle of my layout I used Bo Bunny's matching lace and two layers of punched borders. A few punched snowflakes, chipboard snowflakes and KI Memories Frosting snowflakes complete the design.

The Thickers I used for the title I picked up at ScrapbooksPlus last year, however, you can get a similar effect by covering chipboard with flocking or glitter. ScrapbooksPlus recently got in some great flocking -- Diamond Soft in polar white (by the same company that makes Flower Soft) -- that would be perfect to use as snow.

Wednesday, January 19, 2011

It's Wednesday


This week's layout features papers from Basic Grey's Hopscotch collection and a uber-cute stitched calendar by KI Memories. You can place six photos across the top with space for four smaller ones across the bottom. The calendar has plenty of space to record your daily events, journaling or more photos.

Stop by the store this week to pick up your supplies!

Blizzard


I had a very hard time working on these snow pages. We had a computer virus over the summer and I lost the majority of my snow pictures. Of course, in my mind's eye they were all perfect!

This was one that was still on my memory card of our front yard after blizzard number one.

I used the "Midnight Frost" as my background paper and painted the edges with Tim Holtz "Picket Fence" crackle paint. I then sprinkled glitter on the paint while it was wet. I used a border sticker down the left side of my page from the "Combo Stickers". All the snowflakes are from the "Combo Sticker" sheet - I altered them by dusting them with glitter on the sticky side.

My title is chipboard letters painted white and coated with glossy accents and more glitter. TFL.

Tuesday, January 18, 2011

Winter Wonderland


I chose the Midnight Frost paper collection from Bo Bunny because of it's beautiful wintery palette. I also selected Midnight Frost because of all of the wonderful embellishments that Bo Bunny makes to accompany their collections. It makes it so easy to coordinate your pages and is good for all skill levels.

I created two sketches for the team to use this month.  I chose to use another one of my designs for the team and I kept this one just for me. lol.  The title was cut using my Silhouette digital cutter. This is my "go to" machine for fabulous titles.

Thanks for joining me today.

Robin

Monday, January 17, 2011

Blizzard of 2010!


The January kit had such great products to work with. As soon as I saw the paper, I immediately thought of the blizzard we had back in January 2010. I have soooo many photos to use. I took advantage of using the great sticker embellishments we received in the kit. I thought it enhanced the page well. There also was a page with several titles that you could use. I chose "A Taste of Winter", which we surely had with this blizzard. I used a Fiskars snowflake punch to give the layout some texture. Again, to make the page pop, I added some blue bling. I love this layout. Sure hope I won't be doing a Blizzard of 2011 layout.

Sunday, January 16, 2011

January 2011 calendar by Esther


The 5.5" x 11.75" base is Midnight Frost Flurry and the second layer is the blue side of Dark Denim Dot by Bo Bunny. All corners were rounder with The Chomper. Vellum was stamped with Staz On and adhered with brads at top and a wrapped strip of cardstock that is adhered to base.
Snowflakes were stamped with black and Stone Gray Staz On. The silver embossed wooden snowflake is raised just enough to be the main accent. Stampendous powder was heated several times to get the luster and smoothness even on the wood.
The calendar is printed on photo paper using Microsoft Publisher to get a table for the days. The contrasting blue columns make it easy to read. This was a fun thing to do. The size is good and decorative next to a computer. Besides, it is a way to use some scraps after the layouts are finished.

Saturday, January 15, 2011

Sticky Backed Canvas

It's hard to pick a favorite product, but Ranger's Sticky-Backed Canvas is certainly in my list of top ten favorites. You can do so much with this canvas - ink it, stamp it, spray it, curl it into flowers, run it through your printer... And adhering? A piece of cake. Just peel off the backing and stick it down.

And ScrapbooksPlus carries it in several sizes, including ATC-sized pieces.

Here's a few uses:

First, I used a piece as an accent on a card after stamping a snowflake on the canvas.


And on this tag, based on Tim Holtz's 12 Tags of Christmas -- the canvas was sprayed with two different spray mists, cut with the Tim Holtz Tattered Flowers die, then rearranged to make a poinsettia.


And here's one more based on Tim H0ltz's 12 Tags of Christmas, I ran the canvas through my printer. After adhering it to the tag I used Distress Inks to color it.

Friday, January 14, 2011

My Snow Angel!

As I mentioned last time, I just love this months design kit from Bo Bunny called Midnight Frost. The colors are just perfect for this time of year. Or for past snow storms which we all have had. But since the paper is two sided, there are great patterns that you can use for other events as well. This layout was fun to work with. I added a few strips of the different pattern papers in the kit, as well as the bracket page. We received a large snowflake in our packet. I wanted to match it with the paper. So I first sprayed a few coats of Blue Smooch Sprintz on it. After that dried, I sprayed 2 coats of Pearl Glimmer Mist by Tattered Angels. It matched with the pattern paper perfect. I used some of the sticker embellishements that also came with the kit. Topped them off with blue bling. To finished it off, I added Emily's name.

Thursday, January 13, 2011

Blue Isn't Just for Boys

This month's Midnight Frost kit from Bo Bunny is a lot about snow and cold.... but that doesn't mean that you can use the beautiful blues for something else. So how about a baby page? I have a lot of blue photos of my little girl... from the blue swing seat, to the blue bouncy chair, to the blue carseat cover... I think you get the idea! :)


My absolute favorite paper this month was the Ice paper. The side I used is the back and is mostly white with gray patches of text as well as blues and grays washed over the edges. (I love the other side too... it's like a snowflake honeycomb design that is so lovely!) I punched the bottom edge with one of my EK Success edge punches. The scallop lends itself to the baby girl theme of my layout. I placed that on a sheet of the Snowfall paper... once again the back which has soft blues with blue and green script around the edges.

For embellishments I scattered some Petaloo flowers across the page and added bling centers. I added a pair of Jenni Bowlin butterflies, a frame from American Crafts and metallic bling from Imaginisce. I stapled a little piece of ribbon around my photos and stamped the journaling directly on the paper. To get the staples in the right place, I first glued my photos to a scrap strip of paper. Then I stapled the ribbon in place before adhering it to the layout.

thanks for stopping by!
erin

Wednesday, January 12, 2011

From Tag to Scrapbook.

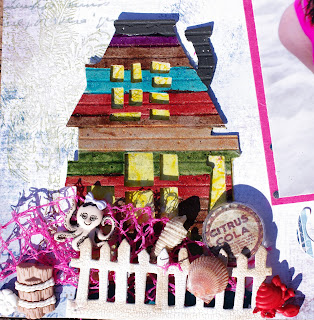
As soon as I saw this paper from the Bo Bunny Midnight Frost line I thought waves, beach. Then I thought of the perfect way to use it. This layout was inspired from Tim Holtz's 12 Tags of Christmas-Day 1. He used the Rickety House die & showed different ways to showcase it. I took the idea & applied it to my layout with a few shortcuts.
First I ran grunge paper through the notebook texture fade to get that wood board look. I cut the paper using the Rickety House die cut from Sizzix (THoltz alterations). Next it was painted with GGlam in various colors, this gave the house a nice shine. The outside plastic from a pack of stickers was alcohol inked than cut & adhered to the wrong side of the house windows, to look like window panes. Next cut chipboard using the "on the fence" die & paint with picket fence crackle paint. Once it is dry distress with vintage photo ink. I added netting, shells, buttons behind & in front of the fence. A bottle cap was cut from the Lost & Found paper line & a circle cut from the philosophy tag packaging which fits perfectly.

A Tattered Angels flourish stamp was used in the corners with weathered wood distress powder, to add to the papers wave look. I added photos & a tag & bracket, from the Bo Bunny kit. For the title, letters were cut from acetate & alcohol inked, then attached with the tiny attacher.
Finally I stamped the flying birds in the corner with weathered wood distress ink. I did forget the ticket but will add that later-cause I like it! For more info on the 12 Tags of Christmas check out Tim's blog, he has detailed, step-by-step directions, & lots of great ideas. Be sure to go to ScrapbooksPlus which has the largest Tim Holtz, Ranger, Alterations collection in the area.

Tuesday, January 11, 2011

Wednesday 1/12 make and take


This weeks make and take features We R Memory Keepers Merry January papers. Stop by and pick yours up on Wed, 1/12.

Winter Wishes

I loved working with this kit that Robin put together. This was a very simple card that was literally made in minutes.

I used a piece of the white lace ribbon from the Bo Bunny "Frost Wraps". I then dusted it with Perfect Pearls for a little shine. I then added a glitter covered snowflake from my stash and stamped "Winter Wishes".

TFL.