Showing posts with label Glossy Accent. Show all posts

Friday, September 7, 2012

Embellishments Plus

This bright paper made me happy -- just to looking at it.  Once I got started embellishing the embellishments I had a great time.  The end result is a lovely layout with 5 pictures from a wedding I recently attended and lots of room for journaling.  (You can’t see it in this picture because I hid it!). 

On a background of Smile Beam, I used a 11 ½” square piece of Bright Blossom.  I put the five 3 ½’ x 5” pictures on a piece of Smile Bouquet paper ¼” larger on all sides than picture block and added this to a piece of Smile Beam about ¼” larger on all sides than Smile Bouquet.  I inked the edges with Tumbled Glass Distress Ink

I used the new Tim Holtz Brushed Pewter Distress Stain to make the two silver (okay actually peweter) accents, one of which is a pull tag for the hidden journaling.  Here’s how you make them.  Cut  2”  X 4” and 2 x 6” pieces from neutral-colored cardstock.  Using the Sizzix Tim Holtz On the Edge Brackets Die cut one edge of each piece.  Put a piece of scotch or masking tape across the edge of the design (the part above the tape is what will show.)   Color the part above tape on each piece with Brushed Pewter Distress Stain. Quickly after adding 2nd coat, cover with clear embossing powder and heat emboss.  Affix the shorter strip to bottom left of photo block. Apply Range Wonder Tape ¼” around sides and bottom fof the photo block.  Affix to backgroung forming a large pocket for the journaling tag.  To finishe the pull tag, put a small brad from the Everday Decorative Brads in the center of the remaining strip.    Add piece of thread or ribbon around brad to pull in and out of pocket and you’ve got a pull tag.  (I colored white thread with the Brushed Pewter Distress Stain.)   Add journaling now or later.   (I printed mine on Playful Mischief paper and scalloped the top & bottom before affixing to pull tag.  I really like it with the scalloped edge showing just above the photo block.) I added the “Tell Me A Story” label  from the Label Sticker set.

I used embellishments in three corners.  Instructions for making them follow. 

Upper right – Start with Decorative Brad from the Everyday Decorative Brad set.   Attach to a 1”scalloped circle from Smile Beam paper and inked with Tumbled Glass Distress Ink with a pop dot.  Affix to a 1 1/2” scalloped circle from Smile Beam and inked with Tumbled Glass Distress Ink with a pop dot.

Lower right – Start with Bright Chipboard flower that is same flower as is in the background.  Affix to a 1 ½ ” Smile Beam scalloped circle inked with Scattered Straw Distress ink with a pop dot.  Affix to a 2.5 circle cut from Smile Beam and inked with Tumbled Glass Distress ink with a pop dot. 

Lower left –Start with a 3” circle of Smile Beam inked with Tumbled Glass Distress Ink and affix it to the background.  Add a 2.5” of Remember Record.  Ink a strip (approx 9 ½”)  of net ribbon (available at Scrapbooks Plus) with Brushed Pewter Distress Ink.    Fold into a bow and secure with two heart pins Little Yellow Bicycle Stick Pins.  To create the center, you start with a 1” scalloped circle of Playful Mischief (inked with Scattered Straw & Tumbled Glass) and insert a brad from the Everyday Decorative Brad set.  Insert this in the center of the bow you have made.  Add two smaller brads.   Using 450 glue or Glossy Accents affix the bow to the circles on the page.

A variation of this page could be made with a variety of the papers and embellishments.  And if you don’t to journal (and I know many of you don’t), either just use the brackets for embellishments and don’t make into a pull tag or use the pull tag for additional pictures instead of journaling.

Saturday, April 14, 2012

A Graceful Holder for Your Magazines, Patterns or Papers


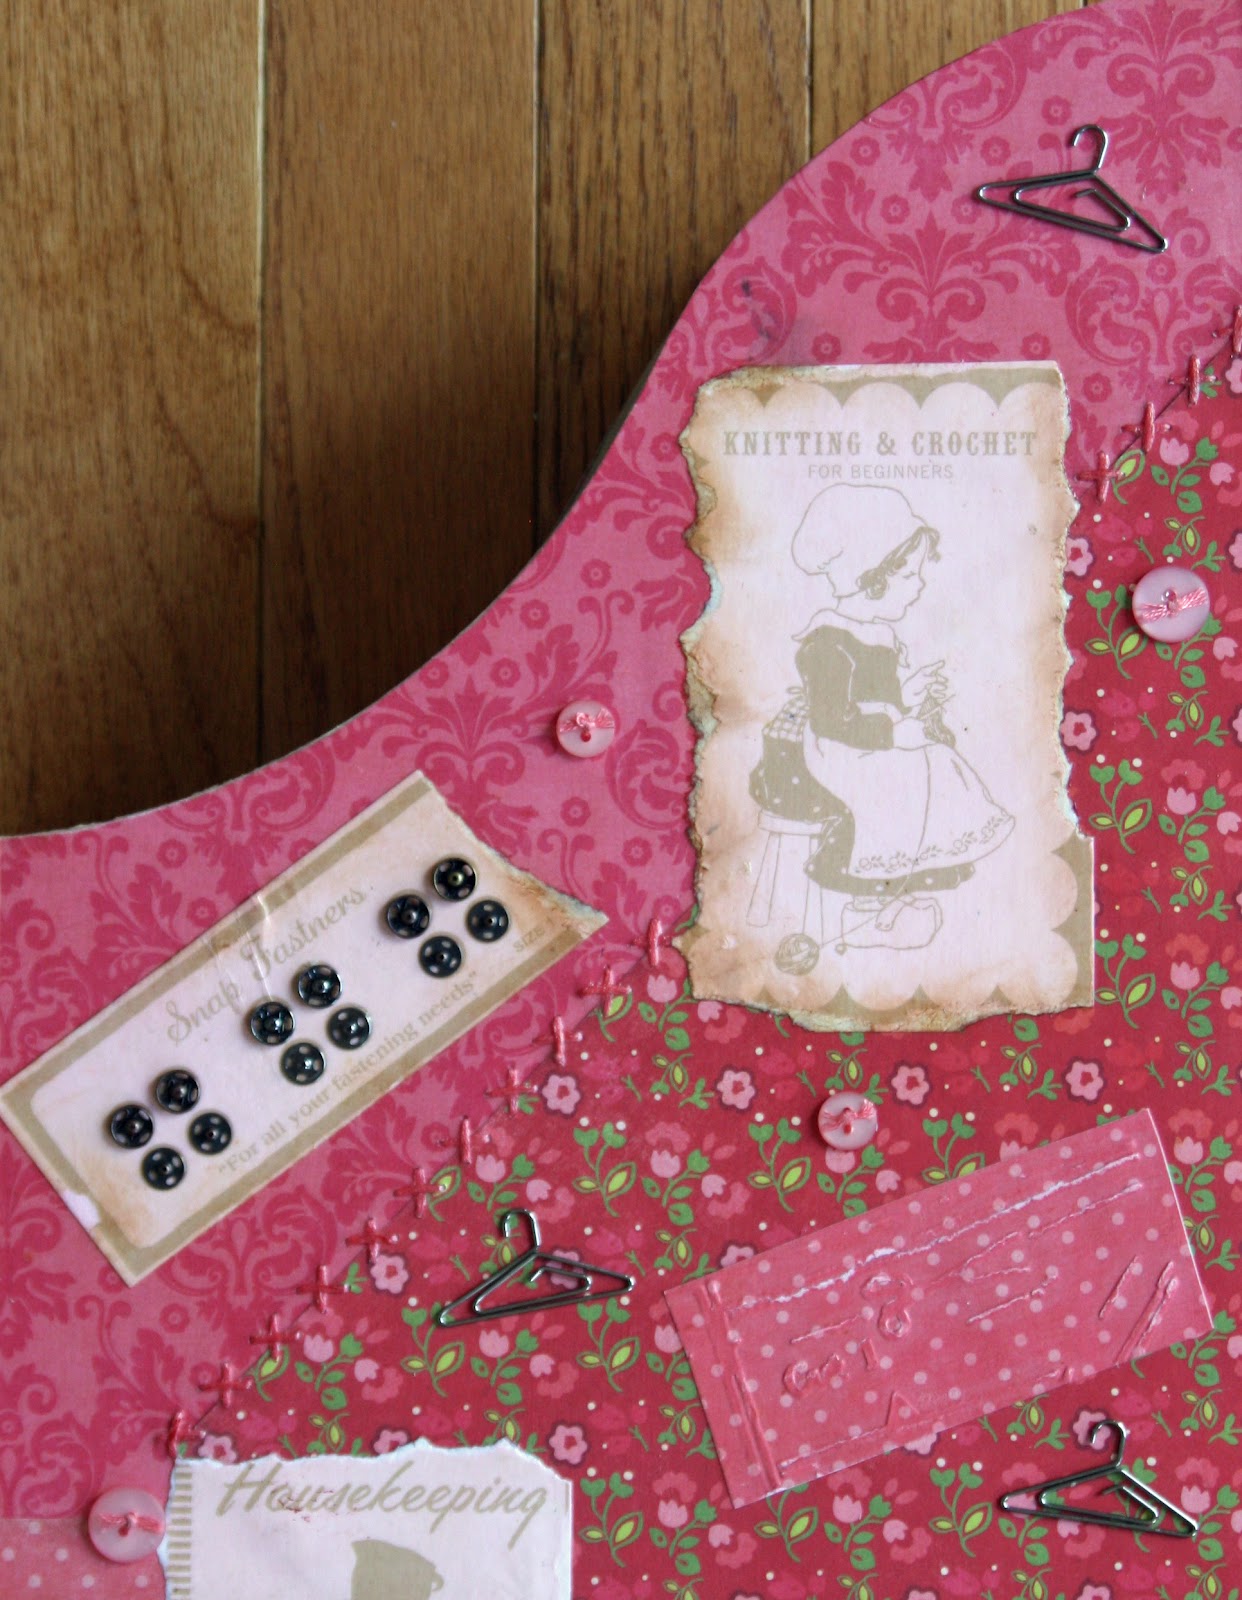
For years, I’ve had my knitting and crocheting books in an unfinished wood magazine holder but now I have a charming decorated holder using the This & That Graceful line from Echo Park and a few embellishments.

To do this, you use the basic decoupaging  technique.  If you haven’t done this, you simply affix paper to the wood object using Decou-Paige, Mod Podge,  or any waterbase sealer-glue-finish product.   To make sure it is flattened, I roll brayer over each piece I add a few times.  Once you have the entire object covered, you add a coat or two on top. It only needs to dry about 20 minutes between coats.  You can glue embellishments on before or after the coats of finish. 

Here’s the specifics of what I did. I painted the inside with a light color of acrylic paint before I began. (Alternatively, you could cover the inside with paper.)   Then I covered the outside with coordinating colors of coordinating paper.   I used a variety of sizes and shapes, scalloping the edges of some; tearing the edges of others.   Since I am going to use the magazine holder for needlecrafts, I stitched some of the pieces using the Sew Easy tools before affixing them to the holder.   It puts the holes in the paper for you so that they are all even in the pattern you choose. Then you sew them with coordinating thread.  I used a couple of different stitches. 

Once you have the base cover you can add embellishments and decorations.  The rectangles on the other side of the Red Floral were perfect for this holder since referred to buttons, lace, snaps and knitting.   I tore them and inked them.   With the exception of the “Lace,” I affixed  them to the holder prior to adding embellishments.    On the one that said “Lace” I added some lace that I had inked with Scattered Straw Distress Ink.  (I put this one before coating with finish so that the lace would be protected from wear and tear.  I cut out letters for my title using Tim Holtz Sizzix Market Sizzlets Decorative Strip die.  After adding some decorative stickers from the This and That line, I put 2 coats of finish all over the outside of the holder. 

After it dried,  I added Tim Holtz Hangar Clips, Tim Holtz snaps and buttons with thread tied through  the holes.    I affixed  these with Glossy Accents.

On the narrow sides of the holder, I added KaiserCraft Wooden Doilies.  I affixed them to each other with Glossy Accents, added a small circle of paper and buttons. 

This is a great project to make during a crop.  You can complete it in one evening.  By doing it a crop, you can pick up just what you need as you go. 

Tuesday, February 7, 2012

A Snowy Valentine's Day Card

I really wanted to make a Valentine’s Day card this month but when I saw the papers with blues, greens and browns, it appeared that this was not going to work.  Then I saw one of the Cardstock Stickers in the set  said “I’d Melt for You.”  Presto I had a Valentine’s Day card idea.    

To make the card, just like I did you cut out two  6 ¼” x 4 ½” pieces of cardstock, score and glue them together so you have the Winter Plaid on the outside and the Snowy Aspen on the inside for writing.  Look carefully before you cut as there are some nice white designs on the plaid that you may want to place on the edge of your card.  Cut a 6 ¼” x 2 ¼” strip of Skate Scratch and put a small a strip of Brown Snowy Scratch cut with a scallop punch on each side.  Affix to the center of the card.      

Stamp a snowman on the Snowy Aspen paper with VersaMark.  I used the Basic Grey Snowman but any stamp would work.   Emboss with Chestnut Zing Embossing Powder and cut out.  Make a hat using the same technique.  Stamp three little hearts with VersaMark and emboss with Barn Door Embossing Powder.   Paint the snowman with Chandalier Glimmer Glam.    (You could also use small heart buttons or cut small hearts from a pretty paper. If you are affixing something to the snowman, paint with Glimmer Glam and then affix objects.)  Draw a face on the snowman with a pen.  Fastened the snowman to the right side of the card with pop dots.  Glue three chocolate hearts in red and silver foil to the left side using Glossy Accents.

Paint the Cardstock Sticker that says “I’d Melt for You” with Chandalier Glimmer Glam.  Stick the sticker on a piece of Brown Snowy Scratch and cut around the edge leaving a small border.  To make the card a little more Valentiney, make the word “Melt” red.  I used Claudine Hellumuth’s dash of red acrylic paint.  The tip on the bottle is so tiny that I was able to fill in the tiny word directly from the bottle.   Affix the Cardstock Sticker to the card.  

Stamp your Valentine’s message inside the card. 

Friday, December 30, 2011

Share Your Sentiments with an Exploding Box

An exploding box is a small box that when opened has pages and pockets for pictures or messages, giving you a special way to share your sentiments.  They are great for special relatives or friends.  My  box is filled with inspirational messages for a friend, who is going through a tough time.  You have a total of 20 sides inside the box on which you can put messages, pictures or embellishments.  In addition, you have pockets for 8 tags or special memorabilia.  This is one of the projects that looks tough but the basic framework is easy if you follow the pattern.  The Simple Stories Life Documented collection works especially well.  The double-sided coordinating papers are of just the right weight – they are easy to work but thick enough for a box.  The embellishments can be as simple or complicated as you want. 

For this project you need four pieces of paper/cardstock – three for the boxes and one for the top.  For the outside of the box, I used Live Life 24/7.  A 12" x 12" piece forms  the outside of the box and one set of inside flaps. For the middle box, you need a 10.5” square.  I used Newsprint.  And for the inner box, which requires a 9” square,  I used Orange/Grid. 

Begin with the 12" x 12" paper.  Imagine your paper is a grid with 4" squares as in the image below.  (My drawing is not to scale; all should be 4" squares.)   Score on dotted lines and cut on solid ones.  To assure that all my lines were straigiht and corners square, I used my trimmer, changing from a cutting blade to scoring blade as needed.   Score a diagonal line from the outside corner of A to the inside corner of A.  Repeat with C, G & I.


A

B

C

D

E

F

G

H

I

Inside of Outer Box
Fold along score marks.  The four corner squares will become triangles once you complete folding.  Use glue to hold the corners in the triangle shape.  The flatter they are the better it will be when you fold the box.  I inked all the edges with Fired Brick Distress Ink.  The four squares that you have on the inside can be decorated.  I would recommend that you decorate these with flat objects as the two other sets of “pages” will be on top of these.  I stamped messages on coordinating paper and affixed to the squares.  If you use, a lighter paper on the inside you could stamp your design directly on the flap.  Cut out objects, border trim, etc. would be really great for this. 
 
Middle Box Pocket & Tag

For the middle (10.5" square) and inner (9" square) boxes, score and cut as shown in diagram above.  Squares should be 3 1/2" and 3" respectively.  (Note: Do not score diagonal lines as you did for the outer box.)  For these two boxes, you fold along the scored lines to make four pockets for each.  Seal the side edge of the square.  I used 1/8” redline tape to hold the pockets in place. You only need to adhere on side since once box is glued in place a bottom will be formed.  Remember in selecting colors and folding to consider what color you want the pockets to be.  The pockets will be the color of the paper that is facing down.  

Inner Box Pocket & Tag


I inked the inner box with Spiced Marmalade Distress Ink and the middle box with Weathered Wood Distress Ink.  I stamped a variety of  positive messages, butterflies and birds using Tim Holtz stamps. (Stampers Anonymous Odds & Ends, Stuff to Say,)   I used some hearts cut from the papers, circles and scalloped circles.   Life Documented provides lots of circles and messages that could be used.  On the inner pockets, you can use items with a little more depth.  For example, I used some Bazzill flowers.   (Since you are going to decorate the bottom, it is best to put the thicker embellishments at the top.)

 
I used the Simple Stories journaling cards to create tags to put in the pockets. I trimmed them to fit the size of the pockets.   I affixed an eyelet and tied a ribbon to the top.  (I used white ribbon and sprayed it with Spiced Marmalade Glimmer Mist.  The tags can include a message, a picture or one on each side.

Inner Box
Once you have all boxes decorated, glue the boxes together.  You can use your favorite adhesive.  I used Glossy Accents because I wanted to make sure it stuck.  Once the boxes are together, you can decorate the bottom of the inside of the box.   I made one flower with a Gluber and a strip of linen ribbon that is available at ScrapbooksPlus.   (If you  haven’t used Glubers, you need to try them.  They are really easy to use to make a variety of flowers.)  You simply roll the ribbon and push down into the massive (and strong) glue dot.  Of course, you could use any kind of flower or other embellishment you like.  The remainder of my flowers are  Bazzill paper flowers. This is where you can make the box fit your theme and use lots of the fun embellishments available at Scrapbooks-Plus.  The only limit is the space you have.


Inside of Box When Closed


Fold the box closed and secure with a ribbon.  I used the elasticized ribbon from the Tim Holtz Ideo-ology Lavish Trimmings set.  After it was sprayed with Spiced Marmalade Glimmer Mist it looked great with the paper.  I fastened the ribbon with a Tim Holtz Idea-ology Memo Pin.  An Idea-ology Trinket Pin would work the same way – perhaps even better because it wouldn’t have a sharp edge.  You can tie it shut with any ribbon, but using this elastic ribbon means you don’t have to re-tie every time you open the box.

Voila!
A Beautiful Box wtih a Special Inside

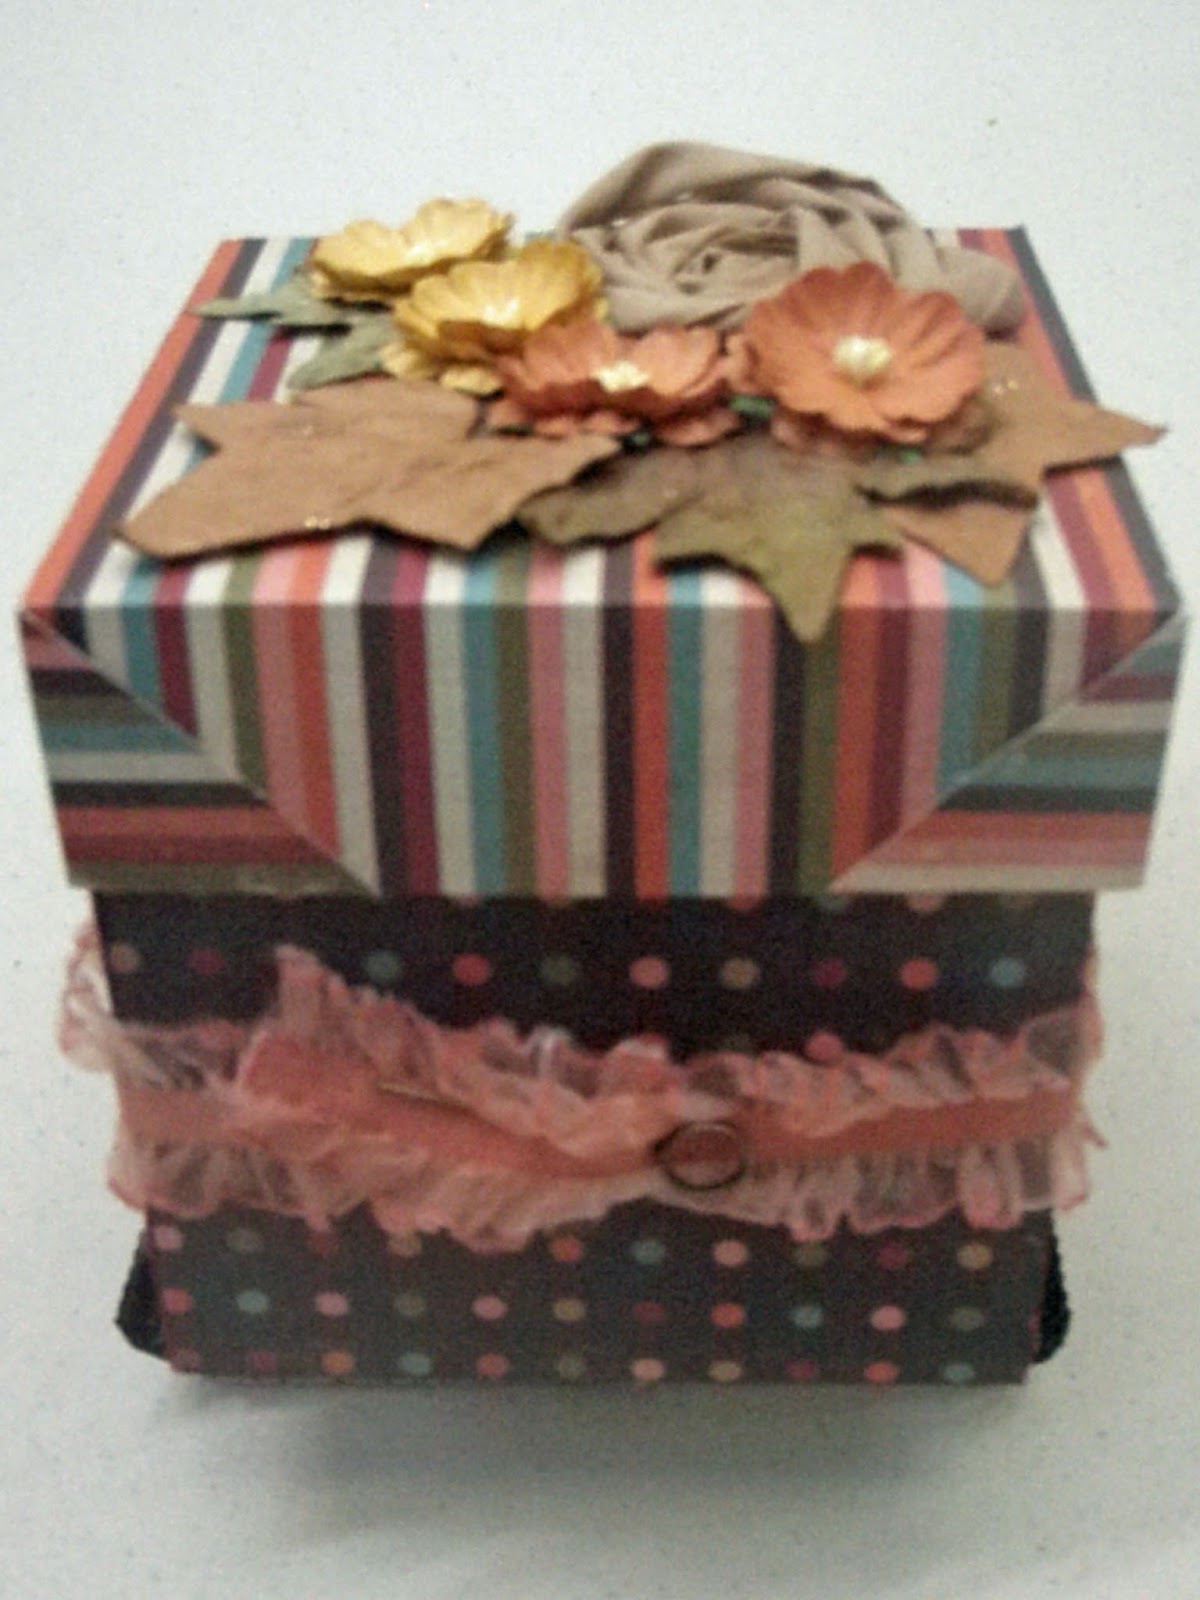
For the box top, you need a 5 ¾”  piece of paper/cardstock.  Score 1½” around all four outside edges of the box.  In the corner squares, cut a straight line from the out edge to the inside edge of the square.  Fold along the scoring lines, gluing the corner edges. 

All that is left to do is decorate the top of the box.  I made mine match the decorations that I put in the bottom of the inner box so I used another flower made with a Gluber and linen ribbon and the same Bazzill flowers.  I added a few Prima leaves.

These are perfect when you want to give a little more than a card, but not a big gift.  What grandmother wouldn’t love one of these with pictures of the grandkids?  Or it would be a great way to share your  feelings or memories with your Valentine?  I’m thinking it would also be a great thank you gift for a hostess.  And you get the fun of making it.  Try it!


Sunday, August 7, 2011

Decorating A Plastic Box for your Copics

A plain plastic box is a boring place to keep your Copic pens. For this month’s project, I decided to take care of that and decorated my basic Copic box. I used vintage papers and Tim Holtz embellishments and stamps. It was so much fun to make and took only about an hour to complete. It looks great on my shelf. Another great part of this project I used a lot of leftover items. I’ll tell you what I did and you can use this as a starting point for decorating your own plastic box.

I started with paper from the Off the Records line by Echo Park. In some cases, I wrapped strips all around the box; in others I just pasted left over strips to cover spaces. (Since the box is not a perfect rectangle strips don’t go around squarely.) I used some items from the Off the Records border page. I really loved the border the one that provided space for a list. I just kept pasting

scraps on until whole box was covered. On top, I used boxes from the Off the Record
Journaling set. Some of the scraps had edges cut using Tim Holtz Sizzix Brackets Die and some were inked with Distress Inks before gluing to box. You really can use whatever scraps you have.


I added stickers from the Off the Record Sticker Set. This allowed me to use some of the stickers that I really liked that didn’t fit on my pages. Next I pulled out a stack of stamps and stamped wherever I pleased with a variety of stamps using Black Soot and Fired Brick ink. Lots of Tim Holtz stamps seemed perfect since so many deal with art or creativity. I then glued on at least one of every Tim Holtz embellishment I could find (gears, snaps, washers, paperclips). Okay, I did not use hangars, which I adore, or the film strip ribbon. (If found this after I was done or definitely would have added this. I also added a piece of chipboard that I had embossed with Peeled Paint embossing powder.

Once it looked the way, I wanted. I covered it with Modge Podge so that it would last a little better.

For the final look, I glued ribbon around the lip of the bottom section. (Make sure it is dry before you put the lid back on.) I tied a Tim Holtz Muse (coin shaped item with a word on it) to the ribbon and glued it to the top of the box so it hangs over the side to finish the look. I used the “Unique” muse as I think the box is unique.

I really encourage you to decorate a box you have. You’ll have so much fun. If you don’t have a plastic box for your Copics, they are available at Scrapbooks Plus. If you haven’t yet dived into Copics, sign up for a class at Scrapbooks Plus. You’ll learn to use this great new tool. Next class is August 17th. Call (703) 263-9503 to sign up.