

So….are you feeling inspired? Are you ready to make your own holiday ornaments? If so, I’ll tell you in just 5 steps how you can make your own! **NOTE: The images shown in steps 1, 2, and 3 were obtained from Google images, as such they do not contain paper from the Bluebell Collection but are being provided to enhance the instructions.**
Step 1: Purchase several paper mache ornaments. I selected ornaments of varying sizes and shapes. You can find paper mache ornaments for $1 (no joke - $1) at a local dollar store, Walmart, Michael’s, etc.


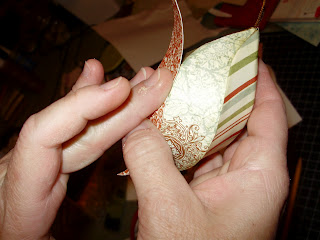
Step 3: Adhere the cut out patterned paper shape to your paper mache ornament. I used a combination of hot glue and Helmar Quick Dry 450. Keep in mind the seams don’t have to be perfect!
Step 4: Once the paper is adhered to the shape place Scor Tape (or double sided tape) along the seams and add glitter – nothing like a lil’ BLING to hide those imperfections! ;)

Step 5: Add ribbon, flowers, pearls, pins, etc. as desired! The key: be creative; use those left over items that you only have 1 or 2 of. For example, I had two Tim Holtz Bauble Pearls left in a package so I used them on my ornaments, not only do they look AWESOME, but I also used up an entire package of something! Yippee, see, now I have an excuse to justify buying more! ;)

Paper
My Mind's Eye – the sweetest thing, bluebell
Embellishments
Ashland – flowers & leaves
Celebrate It – ribbon & pearls
Tim Holtz - bauble pearls
Melissa Frances - rhinestone broach
Thanks for looking! Enjoy.
Erica
1 comment:
Erica,
I love these, you did a great job!
I am going to make some myself.
Beth
Post a Comment