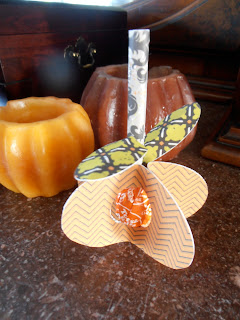
This pumpkin treat was made very easily with my Cricut Cartridge, Art Philosophy. It holds one (inverted) Tootsie Pop. Simply cut the following:
- 5 of the <Oval 3> key at 2 1/2"
- 2 of the <Oval 1> key at 1"
- using your paper trimmer, cut the stem piece 3" x 1 1/2"
In
the center of each of the 5 Oval 3 (pumpkin) pieces, use a 1 1/4"
circle punch to cut a hole. Roll and glue the stem piece lengthwise.
Score each of the Oval 1 (leaves) pieces down the center lengthwise with
a bone folder. Fold slightly to create dimension. Pinch one end of
each of the leaves to create a flat section and use a glue dot or two to
secure to the stem. Start gluing (or extra strong tape- I used my ATG
gun tape) one side of the backside of a pumpkin piece. Be sure to put
glue above and below the punched hole as well as on the side. Line up a
second pumpkin with the first pumpkin half with glue. Press the sides
together, leaving the section above and below the punched hole exposed
and not glued down yet. On pumpkin #2, add glue to the other half that
isn't glued down and attach pumpkin #3 the same way as the prior.
Continue to add until adding the last one. Before pressing the last side
together to form the pumpkin, insert the Tootsie pop (stick end up) in
the punched hole and add the Stem over the stick. Make sure the stem is
in the area above the punched hole and squeeze together to hold the
stem in place. Then press together the final glued pumpkin piece to
form the pumpkin treat!
If you don't have the Cricut Art Philosophy cartridge you can stop in the store and use the template to trace and cut your own.
Laura Petruso


1 comment:
adorable!!! LOVE, LOVE, LOVE. ;)
Post a Comment