Showing posts with label family photos. Show all posts

Saturday, February 9, 2013

Old Pictures + New Mind's Eye Paper = Family Memories

The newest My Mind’s Eye Lost & Found Ruby line is perfect for old photos so I used it to create a two-page layout of black and white photos from 1955.  They feature me with every member of my family that existed in 1955 except my Dad, who I believe was in the Air Force in Morroco and my two uncles. 

I used the Paper Lace paper to provide my background.  To use the design of the paper that I loved , which was on the paper’s right and left edges, I simply used the edges of the paper and put a different paper for the center of the layout.  And just like that I had the same design as the initial paper, but as a two-page layout rather than a one-page one. 

 I added gray paper from the line, which is a solid color but textured to make a photo mat.  To add glitz and focus to the layout I added some embellishments.  I started with three of the layered stickers, which had glitter and the one that said “Happy Days are Here” seemed appropriate for pictures of people wearing party hats.  The layered doily wasn’t quite large enough so I added a red doily sticker underneath.  To add a little glitz to another layered sticker, I added red rhinestones.    I used the little pennants from the chipboard set across the bottom.  I added a few more up the right side.  Finally, I added a crown and mirror I created with a Spellbinder set that has stamps to match.  And to tie in, I added the red rhinestones I had used on the layered sticker to the crown.

This line has so many items you can use it for almost any type of layouts.   To see how you can personalize your layouts very easily with the many coordinating items offered in this line.   added lots of embellishments. 

Sunday, December 30, 2012

Storing Christmas Memories


If you’re like me you have hundreds of pictures from Christmas, some adorable and others not such great pictures but you can’t throw them away because they have a special memory to you.  And then there’s a special tag that one of the younger members of your family made.  There’s a program from a Christmas play that you want to save and the menu and receipes from your Christmas dinner.  Of course you could make layouts that include all of this memorabilia, but this is a time consuming project and you’ll likely not find the time. 

I have a way of storing all these memories quickly so they’ll all be available when you want them – Scrappin’ Folders.  This way you have an attractive folder that displays some of the great pictures, two pockets for other memorabilia and a CD pocket so all the pictures are preserved. When you want any of these items you’ll know exactly where they are.

You can use any line of cooridinated papers, but Simple Stories papers are always so easy because the variety of coordinated colors and messages allows you to put together pages in the perfect to tell your story.  The Handmade Holiday line is perfect for Christmas.    It is festive, has lots of borders, vellum picture frames, journaling blocks and stickers so it is easy to customize to your special Christmas.   

One of my favorite parts of the Scrappin’ Folder that I made with Handmade Holidays line is the  little matchbooks for notes and little pictures that are attached them with magnets so I can remove to look inside but they always go back in the same place.

To make a Scrappin' Folder, you cover the outside of one folder with paper and the inside of the other.  You decorate each.  I add a couple of pockets to the inside – one for a photo CD and one for a small book I make by just folding 12” x 12” paper to make a book with 4” x 6” pages. You then glue the folders together at the bottom using a permanent and strong glue.  Using Wonder Tape you affix the sides, leaving a pocket on the front and back.  I make a file folder for each of these pockets.

If you prefer, I’m teaching a class at Scrapbooks Plus on  January 12th from 11:00 – 4:00pm.  In one afternoon, you’ll make a Scrappin’ Folder for either your Thanksgiving or Christmas memories.    In this class, you’ll learn how to make such a folder with just a few supplies.  You’ll use lots of tools and techniques, including the Tim Holtz Vagabond and dies, Martha Stewart Scoring Board, inks, punches, magnets. 

And you’ll leave with either a Thanksgiving or Christmas Scrappin’ Folder.  With your class fee, you’ll get a full Collection Kit (either Autumn Lane or Handmade Holidays), extra paper and instructions.  A sample of each is on display at the store so let us know which one you want when you sign up.  You’ll just need to bring basic tools, a paint brush and a variety of adhesives.

Sign up at the store or by calling 703.263.9503. 

Sunday, December 23, 2012

Creating A Great Layout without Great Pictures

The most interesting story from last Christmas in our family was the challenge my son and niece had in putting together a ping pong table for my nephew.  Even though it was an important aspect of our Christmas that I wanted to journal, I did not have great pictures so I couldn’t tell the story with pictures.  Using a little creativity, I created a layout that tells the story in an attractive way with only two small pictures and not great ones at that.  Perhaps this layout can inspire you to tell some stories even though you don’t have great pictures.  Alternatively, you could use this layout  with a large picture in the photo box.

I used the KaiserCraft Just Believe Magic paper for the background and added an almost square piece of Keepsake paper to the right bottom corner.  I punched the left side with  a small scallop edging punch. 

I really like the metallic paper (sold at Scrapbooks Plus in a variety of colors) so I used the turquoise metallic paper for title and accents.  Since I didn’t have good pictures, I made a large title the focus of this page.  I cut letters in three different sizes, three fonts and two different papers with my Cricut.  To add a graphic representation of their rush against time, I added an alarm clock cut with the Tim Holtz Sizzix Movers and Shapers.  I made a photo mat using a 6” square of metallic paper  and a slightly smaller square of Keepsakes.  I added two small photos and a subtitle using the line’s Alpha Sticker set. 

I printed the journaling on a 2 ½” x 11” piece of Hymm paper.  I punched the bottom with the same edging punch used on the background.   To add some focus, I added a strip of the metallic paper at the top of the journaling and punched the bottom with the edging punch.  I added the label strip from Keepsakes paper to the metallic strip and added natural-colored small rickrack at the top.  To add the final touches, I added the date from the sticker set and ½ of one of the journaling blocks from the Collectibles set.

Monday, November 12, 2012

Holiday Scrappin' Folders

Harvest Lane Scrappin' Folder

 Using Simple Stories papers is always so easy because the variety of coordinated colors and messages allows you to put together pages in the perfect to tell your story.  Using the Harvest Lane line, I created a Scrappin’ Folder to keep my Thanksgiving pictures, recipes and notes about those special Thanksgiving memories.  Scrappin’ Folders are a concept that I came up with to record special events without having to create a whole scrapbooks or lots of pages to showcase my photos and memories.  I create a folder that is appealing to look at, has space for a few pictures and a pocket for a CD so I can keep all of the pictures, lots of space for notes and other memorabilia.  The Harvest Lane line was great for this.  In fact, I liked my Thanksgiving one so much that I created a Christmas one using the Handmade Holiday line.  It is festive with two files for lots of notes and extra pictures, etc.  One of my favorite parts of these Scrappin’ Folders is that I made little matchbooks for notes and little pictures and attached them with magnets so I can remove to look inside but they always go back in the same place.

Handmade Holiday Scrappin' Folder


Rather than putting the pictures and memorabilia someplace intending to scrap them later and then usually not being able to find everything when I have time to scrap, now I put everything from an event  in a Scrappin’ Folder.  In a few hours, I have an attractive showcase that I can easily pull it out and enjoy it time and again and all my memoires from the event filed in one place.  And if I have time, I have everything in one place to make the scrapbook pages of the event

To share this concept with you, I’m teaching a class at Scrapbooks Plus on November 24th.  In one afternoon, you’ll make a  Scrappin’ Folder for either your Thanksgiving or Christmas memories.    In this class, you’ll learn how to make such a folder with just a few supplies.  You’ll use lots of tools and techniques, including the Tim Holtz Vagabond and dies,  Martha Stewart Scoring Board, inks, punches, magnets. 

And you’ll leave with either a Thanksgiving or Christmas Scrappin’ Folder.  With your class fee, you’ll get a  full Collection Kit (either Autumn Lane or Handmade Holidays),  extra paper and instructions.  A sample of each is on display at the store so let us know which one you want when you sign up.  You’ll just need to bring basic tools, a paint brush and a variety of adhesives.

Sign up at the store or by calling 703.263.9503. 

See you on the 24th!

Matchbooks Held in Place with Magnets


Tuesday, October 23, 2012

Halloween Layout with Lots of Pictures

If you’re at all like me, when the kids are dressed up you take a bunch of pictures, but then what do you do with all the pictures?  As I was trying to select two to three pictures for a layout from the dozens of pictures of my nephew dressed up as a gangster, I enjoyed the pictures which showed him “acting the part.”  It occurred to me that it would be fun to do a timeline.  So I picked out the one that I thought showed him and his costume the best and printed a 6” x 4.”  Then I printed a series of small ones (2 ½” x 2”) that seemed to tell a story.

To add even more focus on the large picture, I framed it with the Chillingsworth Orange/Tan paper and then black cardstock.  Keeping with the gangster theme, I framed the small pictures, which I had printed with a white border, with the black cardstock.  Using the Chillingsworth Paper Pumpkin for the background, I added a strip ompletely across both pages for  the small photos with a piece of  Chillingsworth Dictionary paper  that was the same height as the pictures.   (I inked this and other paper with Black Soot Distress Ink.)   Although, I was mostly sticking with the black and white theme, I added a little color by cutting out the tags from Apothecary Labels paper  After placing them across the bottom of the strip, I added small strip from the Green/Grey paper across the bottom and the grey strip from the Apothecary Paper with a spooky message across top.  I used a loopy black ribbon from ScrapbooksPlus across the green strip that addes some texture and downplayed the green.   I added the large picture and the one small one that looked  like a mug shot.  The final touch was adding the title.  I used Tim Holtz Idea-ology Alpha Parts Newsprints letters and I just put them across the top of the pictures, going up and down as the pictures did.

I was really happy with the results.  It would work great with any of those pictures where you have a lot of pictures that are similar – i.e. all horizontal or vertical, same subject, approximately same size image. Then you just adjust the background and colors you’re use to fit the theme or colors of your pictures.  If you have more than one child, you could do a  page for each, making them the same but using different colors.  If you have a girl dressed in frilly things, you might want to add some glitter, rhinestones or other glam.

Here’s an idea!  I bet you know what your child/grandchild is being for Halloween this year already so head over to Scrapbooks Plus and get the supplies you’ll need.  You can make the page and the day after Halloween you can have the pictures scrapped! 

Wednesday, September 19, 2012

Vintage Finds Make & Take -- A Little Glim & A Little Glam

Need a layout for some special pictures? Try this week’s Make and Take featuring Teresa Collins’s new Vintage Finds  collection. It includes beautiful papers and fabulous embellishments.  

To the stickers, bingo cards, glittery borders, labels, buttons, tickets, clocks, banners and other ephemera of the Vintage Finds collection, I added some chipboard keys and black rhinestones.  

As always, this Make and Take is easy to make (you can even do it while at the store) and you get a free element when you purchase the items to make this layout. This week’s free element is a vintage typewriter with silver trim made with the Tim Holtz Sizzix Die cut. 

The layout is designed for four 3 ½” x 5” vertical photos.   I think it would be great for old family photos, wedding or dance photos.      

Sunday, August 12, 2012

Scrap Folders for Special Events

Not enough time to scrapbook all the pictures you want.  Scrap Folders may be jsut what you need.  I was excited to try this  new technique that I'd been reading about.  They are a lot like Scrapbooks except instead of many pages for a single event, you make a folder per event and include lots of places to store extra pictures and memorabilia.  I chose to make my first attempt with the Basic Grey Clippings line and pictures from last year’s family reunion.  I think it turned out pretty well.  And in addition, to what you see in the pictures, I have a photo album in a pocket, two files for extra stuff and a CD with all the pictures in a pocket. 

You start with a basic file folder -- like the ones you use for normal filing.  You can use one and decorate both sides.  I used two to make it a little sturdier and to allow me to use brads. (Although I didn’t end up using any.) When you use two, you make one the inside and one the outside and then glue together. 

I figured out how I wanted the inside of the folder to look and that I wanted two pockets – one for a photo CD and one to hold a small photo album and extra memorabilia.  When I had this figured out, I cut out the pieces of paper to fit the folders.  It is not necessary to do this exactly as you can trim afer gluing down.   On the bottom left side, I used two pieces of Novella, so that the pocket totally blends into the page.  For the right pocket (for a photo CD)  I cut out a design out of the Flannel Suit paper and turned it upside down. I stitched the two pockets to the paper..  (If you’re not into sewing, it would work just as well to attach the paper forming the pocket with RedScor Tape or other strong tape.)  Before covering the sides, I put a strip down the center with crease where needed for folder to fold.  Then I put the paper (with pockets on each side) and affixed a strip along the right edge.  I affixed all of these with a glue stick and a brayer.   I needed to trim some of the edges a little.  Also, I inked various pieces and edges of file folders with Fired Brick, Vintage Photo and Peeled Paint Distress Ink.

The  “Generations” you see in the photo is a small hoto album.  (I’ll blog on how to make it on the 14th.)  I used a large letter “K” to represent the family name.   I love these letters and you  get them in a few different colors at ScrapbooksPlus.  They add a lot and are very inexpensive.    

I used a variety of Clippings items to decorate the inside, the outside and the photo album, including Sticker Titles, Stickers Elements, Printed Chipboard and Alphas, and Garland.  Just get a pack of each and you’ll have plenty of embellishments for a few files.  (I cut the “2011” from the Typewriter paper with a small circle punch.)  I added a picture and mat to the plain black box on the CD pocket and using those great Clippings Alpha letters I added title.  The banner at the top is held on with Tim Holtz Muse Tokens.  

Then I covered the outside of the other folder using Gazette and Typewriter.   I knew from the beginning that I wanted to spell something with the letters from the 5th Avenue paper.  So I spelled “Family.” To make the letters a little more interesting.  After distressing the edges of each letter, I embossed the edges with Stampendous Aged Taupe Embossing Powder.   I “inked” the edges with VersaMark.  Like with inking I didn’t make it even, I simply rubbed the edges with the VersaMarc so it is thicker in some places than others.  I then sprinkled the edges with the embossing powder and heat embossed.  This embossing powder includes a variety of granules so it can create interesting textures.   (I just learned that with this embossing powder it is better if you heat from the bottom.   I just heated from the top as usual.  Try it both ways and see which you like best. ) I also used it to emboss the word “Photographs” on the cover.  I added a picture and some strips along the bottom.  To make it sturdier, I covered the outside with a couple of coats of Modge Podge. Then I added two large Tim Holtz Word Keys.  (Note: Because of the shape of folders, I used you see a good portion of the inside right across the top of the top when closed.)   

Once the outside and inside were done,  I fastened the two folders together along the outer edges.  As a result I have two large areas to store memorabilia, etc. I made two smaller file folders made from Drafting Table paper and the tabs from the Tim Holtz Sizzix On the Edge Folders to keep some additional photos or memorabilia.  You can see tabs in the photo. 

This is one of the most fun projects, I’ve done in a while.  I encourage you to try to make a Scrap Folder for some of your precious memories. 

Saturday, June 23, 2012

Make a Wish!

With the Alora paper, it is about as easy to make a page as to make a wish.   I chose the Alora Stitches' polka dots for an a family birthday layout.  I cut a strip that said “Make a Wish” from Alora Wish for my title and inked the strip and the background with Barn Door Distress Ink.  After affixing the strip to the background, I added two horizontal  (3 ½” x 5”) and a vertical (5 x 3 ½”) photos in a grid-type layout.   All that remainded was to add a few embellishments and journaling.  I used the “Love” and “Wish” boxes from the Alora Cutouts for Journaling.  I added the date under the title with Alora Tiny Type Stickers.  I used a couple of flowers from the Alora Combo Stickers.  Strips of jewels frame the top of the photos and large jewels dot the “I” in the title and form the center of the circle.  That’s all there is to it!

Tuesday, June 12, 2012

Mother's Day Layout with Recipes

I created a 2-page layout to capture a special Mother’s Day that I spent with my aunt and several other mothers.  It was a potluck where everyone brought something so I thought it would be nice to include a picture of all the mothers along with the  recipes for the item each brought.  

The background is Alora Squiggles  I chose one of the less busy backfounds since I was going to have so many pictures.  I used one of the Cut Outs to make a frame for the title.  I cut off the two outer frames so it would fit my page better and used the Combo Stickers for the title.

A holder for each person’s recipe was made from Alora Wish and affixed to the background with  1/8” Wondertape so the recipe cards would fit and the tape would hold as the cards are pulled in and out.  I made the recipe cards by cutting rectangles from Blue Alora Dimples and  cutting the top with the Sizzix Tim Holtz on the Edge File Folder die.  (This die is great to make all kinds of file folders of any size you want.)   Each recipe can then be printed on white paper and glued to the recipe card. 

I put a picture of a Mom on each recipe holder and their name (made with a labelmaker) on each recipe card.  Some of the pictures were made with a circle punch and a slightly larger circle punch made the photo mat.  To call attention to the hostess I used a chipboard frame for her picture.  Each recipe holder was decorated  with a variety of Alora items – chipboard, stickers, brads, journaling cards and jewels.  I also used three different Bazzill Half the Edge strips.  These come in a package of 2 each of 10 different designs in a variety of colors.

I think with this page I'll remember the special day that my aunt hosted so that all the mothers she knew had a special Mother's Day.

Thursday, April 26, 2012

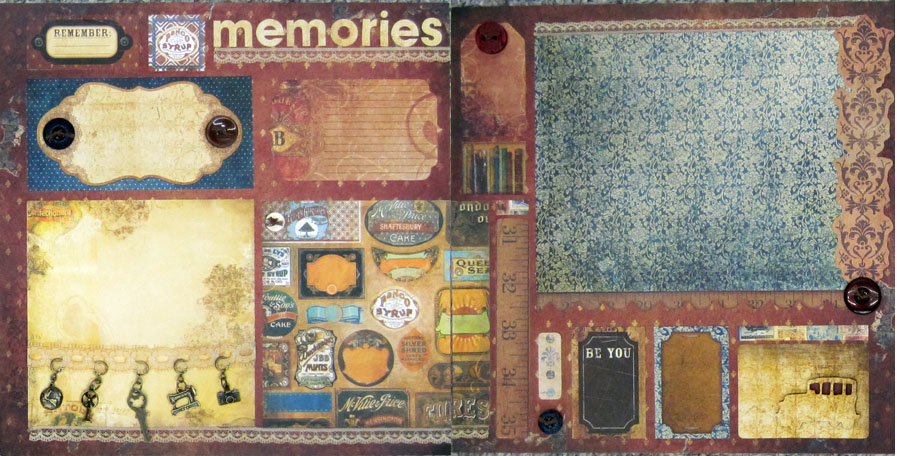
Memories Make & Take


Make & Take April 25th
Create a beautiful  layout to showcase those wonderful family or travel memories with this year's Make and Take.

When I say the new BoBunny Weekend Market line I fell in love with it.  I especially loved the tiny charms—a sewing machine, globe, camera, key and fan.  I was thinking of a variety of different things I could use them for.  A card for my seamstress sister with the sewing machine.  A page for my travel pictues with the globe.  I had at least one idea for every charm.  

Instead, I designed this week's Make and Take using all five charms.  Combining the charms, lace and the BoBunny papers created a antique looking page that is great for family, travel or even food memories.  

It is designed with room for pictures of a variety of sizes since if you’re like me, my older pictures aren’t always a standard size.  And even if they are, I sometimes want to cut something out of the picture.  With matching stickers, buttons and diecuts, making an interesting page is easy as can be.  The free element is a card with a Tim Holtz Jalopy cut out. 

Head to ScrapbooksPlus for everything you need to make this page.  Buy a couple of extra pieces of paper and use the leftovers to create another great layout. 

Saturday, April 7, 2012

Making a Great Page with Not So Great Pictures

The Echo Park This & That  papers are perfect for so many family pictures.  This month rather than using new pictures, I decided to tackle my boxes full of old pictures.  In trying to pick out pictures, I realized my pictures from the 80s are not nearly as good as those I take today.  Perhaps most importantly, I can’t fix them digitally.   I had several pictures (and none of them great) that document a major activity for my son.  I decided it was important to scrapbook them for the memories even if the pictures were not good.

Since they were dirt bike pictures, This & That Charming line full of great boy colors combined well with the Tim Holtz Cogs for just the right look.  I cut a large photo mat out of Numbers (green side) and placed it across the two pages of Vintage Fans (wood side).  I cut yardsticks from the Yardsticks Paper and a  “You Make the World Go Round”  strip (great for bicycle pictures of your son) from the Border Strip paper and used these to trim the photo mat on the right and bottom.   On the top of the photo mat on left, I used the Tim Holtz Sizzix On the Edge Steampunk Die to cut a border.  I then cut out lots of cogs in green (Numbers) and brown (Dots from the This & That Graceful Line) using the Sizzix Tim Holtz Gadget Gears die.  Most were affixed to the page.  In three, I used brads from the set in the center and raised them with pop dots.

I cut a base for my title from the Tim Holtz Baroque Movers & Shapers Dies and the Tim Holtz Movers & Shapers 3 Punches Die.  (As an aside, I kept now buying these because I couldn’t see paying over $10 for a die ot punch 3 holes when I had lots of ways to make holes.  Definitely, a mistake. The way these work is you put them wherever you want on a piece of paper in the Mover & Shaper tray and since they are magnetic, they stay in place and cut the holes exactly where you want.  I’m a convert.  They were in stock at ScrapbooksPlus last time I was there so pick up a set.)  I affixed the base with brads from the line and added a title cut using a Tim Holtz Vintage Market die. 

For my journaling, I printed on Instamatic (white side).  I inked with Vintage Photo Distress Ink and und using  the EK Binding Edge Edger  punch I punched the top edge. (I love this punch.)

My final embellishments were the new KaiserCraft  Wooden Flourishes Cogs.  They were a little too light for my page so I stamped them with Vintage Photo Distress Ink to give them texture and to darken them so they matched the paper better. Where they were still too light, I rubbed a little extra ink on them.  I affixed these to circles of brown and green paper and put them at the three corners of my large photo mat to draw the eye to the picture.

Wednesday, January 25, 2012

Layout for Your Holiday Photos--Today's Make & Take

Start the year off by getting your pictures in scrapbooks.  Today’s Make and Take, which can be made quickly,  features October Afternoon’s new Holiday Style line.   Using a old fashioned “City Sidewalk” theme, the 2-page layout is perfect for Christmas pictures that don’t include children.  In addition to the beautiful papers, the layout uses two sizes of red Bazzill flowers, silver pearls and lots of blue, clear and silver jewels.  The free element is a journaling tag.  This line includes some really cut papers so you may want to get more while you’re at ScrapbooksPlus.  Don’t forget your 40% off coupon so you can get yourself a gift.  The coupon is only good on Wednesday so visit the store today. 

Tuesday, November 29, 2011

'Twas the Night Before Christmas Layout

Deck the Hall is just one of the fun Christmas papers used in this week’s Make & Take.  

How many of us still have pictures from last Christmas that we haven’t scrapped yet?  I know I do.  So whether you want to use this layout for last year’s Christmas pictures or to get a head start on this year’s, come into the store and get the supplies and instructions to make this layout.  4

Knowing we all have a lot to do this holiday season, I made a simple layout that you can create in no time.  I used a ‘Twas the Night Before Christmas theme, but the pack of dimensional stickers has other stickers that can change the theme to Home for the Holidays or the generic Merry Christmas. 

As always, print the coupon from the web site and you get 40% off on Wednesdays. 

Friday, September 30, 2011

Creating More Journaling Space

Sometimes things fall into place when you just go with the flow.  I was struggling with the school theme of this month’s papers.  I really liked the papers but I didn’t have any school pictures to scrapbook.  After much thought, I decided that I would use the paper with books and just use a title about learning, such as “Learning Outside the Classroom” and started to work on a page with pictures from a August trip to Springfield, Illinois.  As I was working on the page it dawned on me that the paper fit perfectly – our favorite place was the Lincoln Presidential Library and Museum.  No need for special title.  Simply the Lincoln Presidential Library and Museum. 

For the most part the two-page layout is fairly straight-forward so I’ll just highlight a few things. I used the Life Documented Flash Cards for journaling.  One titled “Life Documented” for the place, city  and date.   I used Cosmo Cricket Tiny Type for the actual words.  I love using these as they are small enough they don’t take up too much space and I don’t have to worry about handwriting.  To list the things we saw in Springfield, I used a flash card with numbers.  These Life Documented Flash Cards have many uses.  I urge you to get a page or two before they are gone.

However, I still did not have enough space to tell the story of the day and display all the pictures that I wanted so I created a journaling flap. To make the flap, I used a plain piece of cardstock for the page base.  On the right side, I affixed strips of Study Hall & Letterman’s Jacket.  I then attached a 12” x 9 3/4” piece of the Fencing paper on the left side of the cardstock, affixing the top, bottom and left edge.  On the right edge, I affixed the piece of the Fencing paper only 2” from top and bottom, thus creating a flap in which to insert the journaling.  

For the journaling, I typed it on a piece of Oxford Dean’s List.  I folded it in half so it would be a little more durable and trimmed to size needed.  You could of course add more pictures on this.  I made two tabs for the journaling page using two pieces of ribbon (also folded in half).  I affixed these with Tim Holtz snaps.  You might prefer to use your stapler as the stamps are a little thick when inside the flap.  The ribbon shows when the flaps inserted.  This ribbon came from ScrapbooksPlus and is so elegant.  With other papers, twine would work well also.  That’s how simple it is to make extra space for that precious journaling of special moments.

I embellished the page with pencil stickers and Tim Holtz Idea-ology philosophy tags.   I used ones to express meaning.  I threaded a double string of brown floss through holes and tied.  (I used threaded needle to get the thread in the holes.) I affixed with Glossy Accents.  As usual,  I inked things liberally.  For this page, I used Black Soot Distress Ink.

Friday, September 23, 2011

Basic Grey Papers & Flowers for Special Memory

I had a special picture of my cousins from our annual family reunion.  As with all pictures with a lot of people, it is hard to know what to do with them.  I know from trying to sort out old pictures of my Mom’s that it is important to name the people because even though today we may be able to identify them all, 50 years from now people will say who is that?

Rather than simply putting boring labels at the bottom, I decided to put each person’s name on a flower stem. (The stems were cut from Oxford Deans List. The person’s name was written on it with a pen.)  I then used flowers (made in a variety of ways) to identify to which family each person belonged and where in the picture they are.  Let me explain.

My sister and I are flowers made from Tim Holtz Sizzix Tattered Flower die cut from Basic Grey paper.   (Both flowers are the same; the die contains four flowers.)  My Uncle Dick’s kids are also represented by flowers made using the Tim Holtz Sizzix Tattered Flower die, but I used a different paper and flower.   All my Aunt Joann’s kids are all Bazzill Paper Flowers 1.5 Primula French Vanilla.  (These flowers are great and ScrapbooksPlus has them in  lots of fun colors and different sizes.) My Aunt Marilyn’s kids are all blue BoBunny buttons and Uncle Tom’s are tan BoBunny Buttons.   (Smaller buttons the centers of  the flowers.)  I tied a knot in each of the buttons with blue sewing floss.  The flowers are placed vertically and horizontally to correspond to where the person is in the picture.  For example, my cousin Tommy is in the back row and the furthest to the left so his flower is one of the tallest and on the left side of the page.
I also used symbolism to enhance the meaning of the page.   For example, the #19 represents the total number of cousins.  It is from the Pink Paislee Daily Junque Mini Note & Label set, which contains 43 embellishments.  l  also used two cards from this set on the right side to provide balance.  In the upper right, I used a Kaisercraft Wood Flourishes leave to  provide two leaves to represent the two cousins who are no longer with us.  

This page was a lot of fun to make and will provide special memoires for years to come.

Wednesday, September 14, 2011

Making Holiday Tags with Oxford Paper

I know it is only September but if we are going to hand make things for the holidays now is the time to do it so we have time to enjoy the holidays.   I liked the Oxford paper, but didn’t have any  school related pictures to scrap.  The burgundy and green colors made me think of Christmas so I made extra large tags.  These could be used in several ways --  for those really big boxes that a small tag just doesn’t do the trick, on cards or as decorations.  Another thing I love about making your own tags is that you can mix and match what you have and they all coordinate.

Reindeer
I cut the tag and a cooridinating shadow tag with the Cricut using Oxford paper.   Christmas needs a little shine in my view so I spritzed both the tag and shadow tag with Sun Sisters Glimmer Mist.  I cut a tree and painted it with Dirty Martini Glimmer Glam.   Using plain cardstock I cut out a reindeer and a star for the top of the tree..  I embossed it three times with gold embossing powder.  I added BoBunny Zoology Jewels for eye and collar.  You could also use jewels or buttons to decorate the tree. Tie with a ribbon and you are done.  You could make several of these in no time at all.

Snowman
The approach was similar to the reindeer tag except I used Silver Glimmer Mist on the tag, shadow and the snowman.  I  left the tree plain.  I embossed the snowman’s hat.  The eyes and buttons same from the Bo Bunny Jewel set.  The Bo Bunny Father Christmas buttons would also be great.  There are hearts in the set that would be adorable on a snowman.  Again, add a ribbon and you are done.  Scrapbooks Plus has a great supply of ribbon. 


Since I’m in France now, I may decide to carry the French theme all the way to Christmas and make some holiday tags with the Eiffel Tower!  Another idea is to add a picture of that special person.  That’s the advantage of making your own tags – they can be uniquely yours.

Wednesday, September 7, 2011

Stars of My Life

This month’s page map gives you lots of options for how to make it your own.    You have 9 squares in the center.  It is up to you whether you use them all for pictures, all for decorations or a combination of pictures and decorations.  My squares included some with pictures, some with embellishments and some words.   My page includes a picture of me with each of my aunts and uncles when I was young.  Since I have only four, that left me five squares to use as accents.   

I used the Oxford Frat House paper for the background.  To bring the focus to the center where the pictures are, I made a large photo mat (10” x 10”) to hold all the pictures and other décor. I printed 3” x 3” pictures and placed them equally on the grid.  I cut 3” x 3” squares from coordinating paper.  In the center square, I placed a subtitle made from letters cut from Oxford Fencing paper. Instead of a square in the upper left, I used a journaling block from Life Documented Flash Cards.  I inked it with Peeled Paint Distress Ink.  All squares were inked with Peeled Paint Distress Ink.  

 I inked ribbon (available atScrapbooksPlus) and Tim Holtz idea-ology trimming lavish flower ribbon with Peeled Paint Distress Stain and used the ribbon to decorate the squares.  If you haven’t tried Distress Stain, you really should.  It is so easy to make items the color you want .  I added a heart stamp and some flowers cut with Tim Holtz Tattered Flowers Sizzix die. 

Since I had some chipboard stars, I titled this page “Stars of My Life.”  (I apologize that the picture makes it difficult to read the title. ) Although it goes with the embellishments, it is also true – my aunts and uncles played a significant role in my life.  They continue to today.) I used  a large chipboard star for the title.  I covered it with Versamark and embossed it with Peeled Paint Distress Powder.  The remainder of the title was made with Pink Paislee Daily Junque wood alphabet.  

This month’s page map is one that  is easy to adjust to the pictures that you want to scrap.  Simply gather the 3” x 3” pictures.  Once you have these selected and placed, pick paper and embellishments for the other squares that reflect the theme.  You can make them frilly and pink for a girly girl, bold and modern for a hip look, fill with sports symbols for the big game, or since it is September you could use a school theme with a back to school picture of each of your kids.