Showing posts with label Border punches. Show all posts

Saturday, February 2, 2013

Exploding Box & Cards

Most people love to get handmade cards and gifts. I think it is especially nice for Valentine's Day.  On Saturday, February 9th Scrapbooks-Plus will offer a class in which you'll make four Valentine-themed items using a scoring board and BoBunny’s Love Letters line. 

You’ll make an exploding box that would be a great Valentines gift for one of your loves – grandmother, mother, daugter, husband.  It looks like a box but when you open it up out pops all kinds of spaces that are decorated.  You can add messages and pictures specific to the receipient. You could even include a gift card in one of the pockets.  If you have a child away at school one of these with gift cards would be most welcome. 

In addition, we’ll make a newly popular “matchbook,” which can serve the same purpose as a card, but is oh so cute. 

 A card and matching envelope will complete our projects. 

Although these projects are great and reason enough to take a class, but the real purpose of making these is to learn about a scoring board.  After making these item, you can decide whether this is a tool you need in your papercrafting tool box.  Whatever you decide, you’ll have completed some projects, learned how to make some new items and had a fun afternoon. 

This class is part of a series I'm teaching to share new tools and techniques so that we are continuing to expand our papercrafting skills.  I always feel that I make better decisions when I get to use somehting before I buy it and you'll definately gain that experience with this class.  And you'll have a lot of fun!

The class is on February 9, 2013  from 10:30am – 2:30pm with a cost of $45.   The items are on display at the store if you'd like to look at them up close.   To sign up stop by or call Scrapbooks Plus at
703-263-9503.   Space is limited.

Sunday, December 23, 2012

Creating A Great Layout without Great Pictures

The most interesting story from last Christmas in our family was the challenge my son and niece had in putting together a ping pong table for my nephew.  Even though it was an important aspect of our Christmas that I wanted to journal, I did not have great pictures so I couldn’t tell the story with pictures.  Using a little creativity, I created a layout that tells the story in an attractive way with only two small pictures and not great ones at that.  Perhaps this layout can inspire you to tell some stories even though you don’t have great pictures.  Alternatively, you could use this layout  with a large picture in the photo box.

I used the KaiserCraft Just Believe Magic paper for the background and added an almost square piece of Keepsake paper to the right bottom corner.  I punched the left side with  a small scallop edging punch. 

I really like the metallic paper (sold at Scrapbooks Plus in a variety of colors) so I used the turquoise metallic paper for title and accents.  Since I didn’t have good pictures, I made a large title the focus of this page.  I cut letters in three different sizes, three fonts and two different papers with my Cricut.  To add a graphic representation of their rush against time, I added an alarm clock cut with the Tim Holtz Sizzix Movers and Shapers.  I made a photo mat using a 6” square of metallic paper  and a slightly smaller square of Keepsakes.  I added two small photos and a subtitle using the line’s Alpha Sticker set. 

I printed the journaling on a 2 ½” x 11” piece of Hymm paper.  I punched the bottom with the same edging punch used on the background.   To add some focus, I added a strip of the metallic paper at the top of the journaling and punched the bottom with the edging punch.  I added the label strip from Keepsakes paper to the metallic strip and added natural-colored small rickrack at the top.  To add the final touches, I added the date from the sticker set and ½ of one of the journaling blocks from the Collectibles set.

Friday, December 7, 2012

Spectacular Spin in Wurzburg

Kaisercraft’s Just Believe Collection was a great line for a two-page layout on a day in Wurzburg, Germany during a Holiday Markets cruis.  I had a lot of pictures so wanted to design a layout that could be used for several photos.  This one displays five.

The left and right backgrounds almost identical.  Each is made using four pieces of paper (both sides of Hymm & Magic paper)  On the left side, they are  squares of 12” , 11 ½” , 10 ¾” and 10 ¼”.    On the right side, I made the Magic pages just a little smaller (10 ¾” x 10 ½” and 10 ¼” x 10”) and added a 10 ¾” x 1 ½” strip from Glisten that has an interesting design that coordinates well with the other papers. On the second side of Hymm, I punched two sides with a stamp around the page punch so that they meet in the middle.

A few of the die cuts from the Just Believe Collectables added some charm, but the real highlight of this layout is three embellishments made with the Spellbinders Spectacular Spin die.   I saw this die at ScrapbooksPlus and knew I had to use it.   What is unique about these dies is that you cut out the design with the die, then you fold certain parts and tuck them so they stay.  The result is a fun design that looks kind of like a quilt square.  I used the Keepsakes paper, producing a nice contrast with the red on one side and a white with green on the other.  The sets includes three dies (1 ⅝”, 2 ⅝” & 3 ¾”). I used one of each in the layout, adding a button for the center and putting some light cardstock on the back as I used them in places that I didn’t want the background to show through. 

The title was created with the Winter Wonderland Cricut cartridge using Keepsakes for the shadow and Hymm for the letters.  I wanted to show what I purchased so I added a little arrow cut with Tim Holtz Sizzix Movers and Shapers die and wrote “My Purchases” on it to point from the bag to a tiny picture on a small die from the Just Believe Collectables.  I think it actually looks better without this, but for me telling the story is always the most important part.

Saturday, July 7, 2012

Road Trip

This KaiserCraft line has great paper and ephemera for either national or international trips.  My Dad always wanted to go somewhere.  He’d drive 4 hours each way for a day trip.  This seemed the perfect opportunity to make a record of his love of road trips and those that we shared with him (even though we didn’t always like them). 

The Roam paper (red side) was used as the background.

After punching  the right side of an 11 ¼” x 8” Delayed (map side)  with an EK punch that gives you a finish like a notebook it was affixed to the bottom of the page ½” from the right edge). I affixed a boder on the left from the Check In Borders Sticker Sheet. The black bottom border also came from the Borders sticker sheet. 

I created an 8” x  5 ¾”  from Delayed (black side) and an inside mat 7 ½” x 5 1/4” from (tan side of Passport) for two horizontal  3 ½” x 4 7/8” photos.

I cut a square with message from the Tour paper. (This is the one I chose but there are other options.)   I inked it with Fired Brick Distress Ink.   

I cut the cut road trip icon from Tour paper; inked  it with Fired Brick Distress Ink and applied stickers for the city and “journey.”    Finally, I added a compass sticker. 

If you wanted to, you could add a small box above the message box with your journaling or you could use one of the boxes from the Tour, Voyager or Destination pages for journaling instead of the box with pre-printed message. 

This paper and related items offers so many possibilities.  Check it out!

Thursday, June 14, 2012

Using the Alora Line to Make A Thank You Book

I warned you last month that after I found out how great it was to make a book with coordinated papers and embellishments that my altered item might be a book every month.  Two months doesn’t always make, but the BoBunny Alora line had such cute items I couldn’t resist making a book as a thank you gift.  My aunt included three extra Moms, who weren’t going to be with their children on Mother’s Day,  in the celebration that she was having with her kids.   A book with some pictures of each Mom seemed a great way to say thank you.

And since this was a thank you for inviting us to her home, a house was the perfect shape.   I made the book with a house die that is available for you to use at ScrapbooksPlus.  It is just the right size for a book.  I made both covers from chipboard and then covered them with Alora papers.  One thing I love about making your own book shape rather than using a purchased one is that you can cut the papers to cover the pages with the same die.  Oh so easy!  For the inside pages, I simply glued two pages together.  Even though the Alora papers are double-sided, I still glued them together as I didn’t think a single-sheet was quite sturdy enough.  Another alternative is to make a chipboard base for each page.  This would make your book much more durable.  (One thing I would do differently is to cut off the edge of the roof on the side that I am binding together for the book as it catches.  If you just use your trimmer to cut that side straight the pages will turn easier.  I plan on doing this when I pick mine up.)  

I encourage you to take a look at the larger dies available at ScrapbooksPlus for you to use.  You can use them while you’re at a crop at no charge.  During non-crop hours, use of the room and all the tools (including dies) is free if you spend $5.00 .  You can buy the chipboard you need at the store.  Another advantage of cutting your book at the store is you only buy what you need.

I punched holes for the ribbon to hold the book together with my Crop-a-dile and inserted We R Memory Keepers Eyelets.  Not only do they keep the holes from ripping, but they add a bling.   The turquoise ribbon that I used to hold the book together is a bit shimmery as well.

On the front and back cover, I stamped “thanks a bunch” and a heart inside a jar with a stamp available at Scrapbooks Plus.  (The stamp includes some other cute items you can include inside the jar.)   On the back cover, I wrote below the jar what the “thanks” was for with a pen, making the book like a thank you card.  I decorated the covers and pages using letters, borders and designs from ComboStickers, Tiny Type Cardstock Stickers, Alora Brads and Alora Jewels.  The Alora Jewels are practical because they include rhinestones and pearls in a variety of sizes. I love using them for flower centers.  On one page, I used a flower border sticker and put a jewel inside every flower.  I found two more  great ribbons at ScrapbooksPlus to use as accents in the book.   And I cut out Alora papers in a variety of shapes to add to the pages and serve as photo mats.  I especially like the alarm clock and fan cut with the Tim Holtz Movers & Shapers dies.

I think my aunt is going to like this a lot better than the usual thank you note. 

And as I’ve discovered, if you simply buy paper and embellishments from the same line, you can make a book quickly.   You can choose from pre-made shapes of chipboard and cover them with paper, make your own shapes as I did or simply use a square or rectangle shape.  Whatever shape you choose,  I’m confident the recipient will be happy.


Saturday, April 14, 2012

A Graceful Holder for Your Magazines, Patterns or Papers


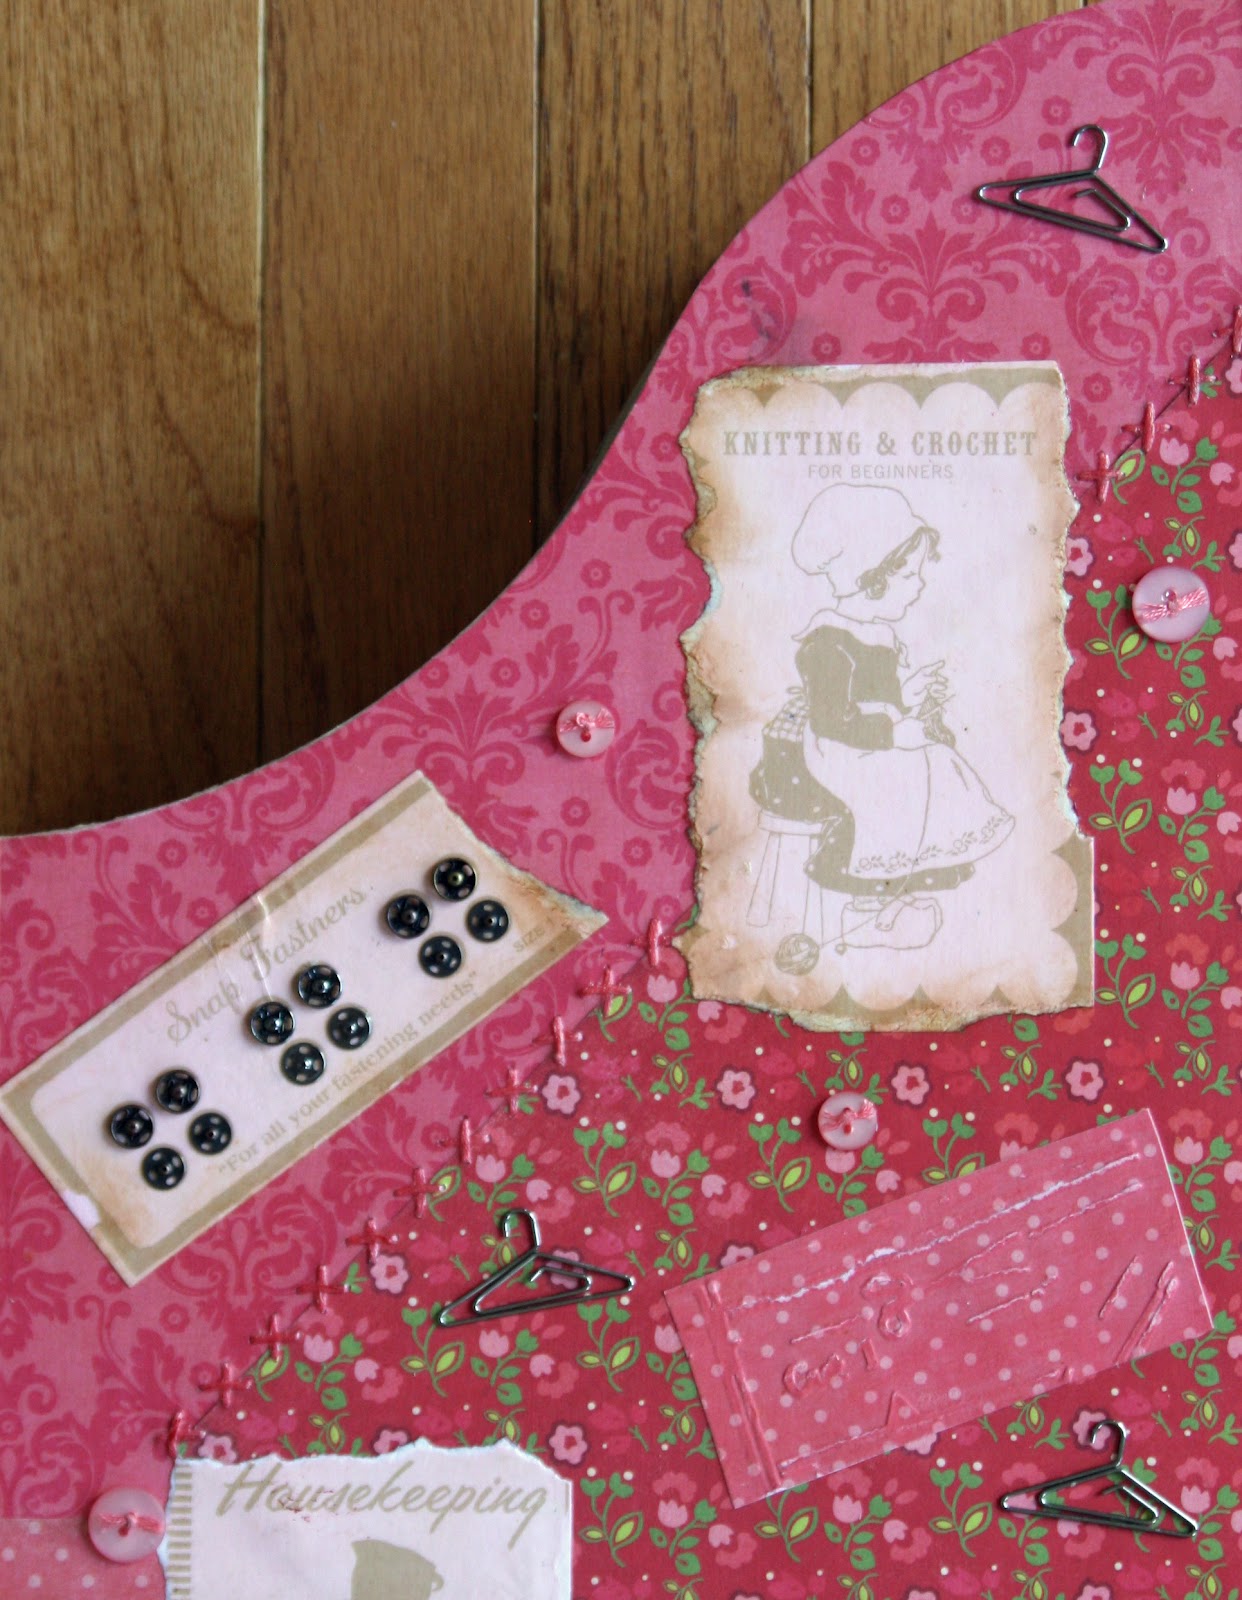
For years, I’ve had my knitting and crocheting books in an unfinished wood magazine holder but now I have a charming decorated holder using the This & That Graceful line from Echo Park and a few embellishments.

To do this, you use the basic decoupaging  technique.  If you haven’t done this, you simply affix paper to the wood object using Decou-Paige, Mod Podge,  or any waterbase sealer-glue-finish product.   To make sure it is flattened, I roll brayer over each piece I add a few times.  Once you have the entire object covered, you add a coat or two on top. It only needs to dry about 20 minutes between coats.  You can glue embellishments on before or after the coats of finish. 

Here’s the specifics of what I did. I painted the inside with a light color of acrylic paint before I began. (Alternatively, you could cover the inside with paper.)   Then I covered the outside with coordinating colors of coordinating paper.   I used a variety of sizes and shapes, scalloping the edges of some; tearing the edges of others.   Since I am going to use the magazine holder for needlecrafts, I stitched some of the pieces using the Sew Easy tools before affixing them to the holder.   It puts the holes in the paper for you so that they are all even in the pattern you choose. Then you sew them with coordinating thread.  I used a couple of different stitches. 

Once you have the base cover you can add embellishments and decorations.  The rectangles on the other side of the Red Floral were perfect for this holder since referred to buttons, lace, snaps and knitting.   I tore them and inked them.   With the exception of the “Lace,” I affixed  them to the holder prior to adding embellishments.    On the one that said “Lace” I added some lace that I had inked with Scattered Straw Distress Ink.  (I put this one before coating with finish so that the lace would be protected from wear and tear.  I cut out letters for my title using Tim Holtz Sizzix Market Sizzlets Decorative Strip die.  After adding some decorative stickers from the This and That line, I put 2 coats of finish all over the outside of the holder. 

After it dried,  I added Tim Holtz Hangar Clips, Tim Holtz snaps and buttons with thread tied through  the holes.    I affixed  these with Glossy Accents.

On the narrow sides of the holder, I added KaiserCraft Wooden Doilies.  I affixed them to each other with Glossy Accents, added a small circle of paper and buttons. 

This is a great project to make during a crop.  You can complete it in one evening.  By doing it a crop, you can pick up just what you need as you go. 

Monday, November 7, 2011

Thanksgiving Place Cards

Thanksgiving is the perfect time to use some scrapbooking techniques to decorate your table.  Using paper and corrugated chipboard shapes from the Little Yellow Bicycle Hello Fall line,  I made Thanksgiving place cards.  I made a set of four using different approaches so you could see different options.   You can easily make these to match your style your color scheme.  Make a matching set or make coordinated ones. 

You need two tags of the same size from brown Bazzill paper for each place card.  I used the large tag on the Sizzix Tag, Traditional die.  Score a line across one of the tags so that the place card will stand up.

The fun part is decorating the place card.  You use one of the corrugated chipboard shapes.  Eighteen different shapes come in the set.  I used two flowers, a bird and a squirrel.   I used a nail file to scrape off a little of the brown finish and then inked with some distress ink. I used colors to coordinate with the embellishments I would be using.  I  then sprayed the shape with Marmalade Glimmer Mist. 

I embellished the place card with paper, a few leaves from Prima’s Splendor Fall Mix and jewels from Little Yellow Bicycle Hello Fall Jewel stickers.  

To put the place card together, glue the top of the back to the top of the front.  I then affixed a metal eyelet to hold in place.

I added a Tim Holtz Memo Pen to hold the name tag in place.  I cut the name tags From cream Bazzill paper using the Cricut Celebrations die.   I inked then  with Spiced Marmelade Distress Ink. 

Write the name on it and you are all set.

Thursday, June 30, 2011

Making a Curtain Frame for Your Picture

An old publication that Scrapbooks Plus was giving away showed a card with a curtain. It seemed that this would make the perfect frame for a picture of my aunt as a homecoming attendant. Here’s how you make a curtain frame. Cut three strips of paper – two equal ones for the sides of your curtain and a shorter one for the valance (top). The size of each will depend on the size of your pictures. Punch a scallop design on the bottom of all three pieces. To make the folds, score the pieces that will be the side of your curtain every 1/4th of an inch. (You can score however you like but I like to use a scoring blade on my Cutterpede trimer. It is easy to keep all your lines straight and you have all the measurements you need.) You do need to score each line on the opposite side of the paper of the previous one because you are going to pleat the paper. Then you simply pleat the paper along the scored lines. This part can be a bit tedious. I made my pleats 1/8” and admit I screamed several times. If you make the pleats ¼” rather than 1/8” it is a lot easier. Apply Glossy Accents to the top of each side when you finish making the pleats to hold the pleats in place at the top. Once both sides are complete, glue the top of the curtain to the sides and fold the side edges of the top down to make a drape valance just like you’d have on your window at home. Gluing a plain paper frame inside the curtain makes it easier to affix to your scrapbook page. The final touch is to tie the sides back with small pieces of ribbons. Your curtain is now ready to glue to the page.

Everything else on this page was super simple. As you can see, I placed a strip of the green side of the Time of My Life to the background made of Sunday Afternoon. Another piece of Time of My Life was used to frame the main picture. By using pieces with the brown dots around the outside as spacers, I was able to quickly add self-adhesive Pebbles Pearl Candy Dots Brown all around the picture, creating emphasis on the main picture. I made a base and a journaling block using Tim Holtz Sizzix ATC & Corners Die. The Ladies & Gents stickers were used for the lettering, with a little Vintage Photo Distress Ink to tone down the turquoise a bit. Other accents include ribbon from the Ladies & Gents line, a crown and some books cut out of the Sunday Afternoon paper, a Tim Holtz hangar and some tags for lettering.

Not only do I have a special page for our family, but my aunt enjoyed the trip down memory lane that it provided her.

Saturday, February 5, 2011

Hello with a border punch and doily jar project

I am Laura Petruso and I am thrilled to be a member of the Scrapbooks Plus design team this year!  Have you taken a look at the Design Team Wall in the Crop Room at the store?  The designers are all such talented artists.  I am honored to be a part of the team.

Let me take a moment and introduce myself... some of you may know me as the Copic Marker instructor at Scrapbooks Plus.  I have been crafting of some sort for as long as I can remember.  My Mom always had craft supplies around the house when I was young so I naturally had to get into them and start creating!  I have been 'officially' scrapbooking for about 5 years but have albums of photos and mementos from as far back as grade school.  I actually resisted scrapbooking for a long time because I didn't need another crafting hobby.  I have been a stamper for 15 years and over the years I had accumulated a lot of 'stuff'.  Then a friend invited me to a crop and I realized I could use stamping (and all my supplies) to create my scrapbook pages of my children's mounting photos that were sitting in boxes (or still on the computer) and the rest is history.  I have two children and a very tolerant husband and we live in Western Loudoun.

I don't know that I really have an official style to my work but I would describe it as clean and classic in appearance.  I love to create projects and gifts with my scrapbooking and stamping supplies.  As I said, I've accumulated a lot of 'stuff' over the years... mostly smaller things, not major purchases.  However, I did break down and get a Cricut Expression a few years ago.  I kept reading that people were getting rid of their punches and just had this one machine, cutting any size you wanted.  People I knew raved about their Cricuts.  Don't get me wrong, I like my Cricut and use it a lot, however, get rid of punches?!?  Not me!  They are far too handy for a quick project.

If you've checked out the what's new wall at Scrapbooks Plus lately there are several  new large border punches.  I love these punches!  The ones I have in my stash are Fiskars, Martha Stewart or EK Success.  I am attending my first all weekend away crop this weekend and needed a quick gift for my roommates as I've been crazy busy getting ready. 

I pulled out a few Mason jars- the kind that once held spaghetti sauce (I like to repurpose/recycle).  I covered the top with a scallop punch of patterned paper I had on hand.  I wrapped the sides of the lids with the trendy rayon seam binding type ribbon.  I then wrapped wide grosgrain ribbon around the middle and used my newest large border punch from EK Success to cut out a really cool 'ribbon' to go on top.  I have been using a ton of doilies lately and used a lacy stamp to fancy up a small round doily for the front of the jar.  I used a letter sticker that I had on hand for the center (for my friend's first name).  I then filled with some yummy candy and off I went.  Pretty and quick thanks to my punches!!  Here are the finished projects...
I hope you have a great weekend.  I know I will!

Thursday, May 14, 2009

Border punches and a sneak peek later in the day


I have a new love in my life....border punches. I find that I am using them more and more in my designs. With the month's kit, I used 2 of the new punches from EK Success. ScrapbooksPlus has a great variety of border punches- including the ones that I used in my LOs this month! I love the way the Binding Edge punch works on my Bunnies LO. I wanted to put some bling on my Sisters LO but wanted it to be subtle. So I used my Postage Stamp border punch on some of the AWESOME glitter paper by Best Creations that ScrapbooksPlus carries. The glitter paper comes in a variety of beautiful colors and the best thing about it..the glitter stays on the paper- no glitter everywhere! It put just the right amount of bling for me.


I will posting later today about a workshop that I am planning for in the next month or so. Stop by and check it out!
Enjoy!
Lisa