Showing posts with label layouts. Show all posts

Sunday, December 23, 2012

Creating A Great Layout without Great Pictures

The most interesting story from last Christmas in our family was the challenge my son and niece had in putting together a ping pong table for my nephew.  Even though it was an important aspect of our Christmas that I wanted to journal, I did not have great pictures so I couldn’t tell the story with pictures.  Using a little creativity, I created a layout that tells the story in an attractive way with only two small pictures and not great ones at that.  Perhaps this layout can inspire you to tell some stories even though you don’t have great pictures.  Alternatively, you could use this layout  with a large picture in the photo box.

I used the KaiserCraft Just Believe Magic paper for the background and added an almost square piece of Keepsake paper to the right bottom corner.  I punched the left side with  a small scallop edging punch. 

I really like the metallic paper (sold at Scrapbooks Plus in a variety of colors) so I used the turquoise metallic paper for title and accents.  Since I didn’t have good pictures, I made a large title the focus of this page.  I cut letters in three different sizes, three fonts and two different papers with my Cricut.  To add a graphic representation of their rush against time, I added an alarm clock cut with the Tim Holtz Sizzix Movers and Shapers.  I made a photo mat using a 6” square of metallic paper  and a slightly smaller square of Keepsakes.  I added two small photos and a subtitle using the line’s Alpha Sticker set. 

I printed the journaling on a 2 ½” x 11” piece of Hymm paper.  I punched the bottom with the same edging punch used on the background.   To add some focus, I added a strip of the metallic paper at the top of the journaling and punched the bottom with the edging punch.  I added the label strip from Keepsakes paper to the metallic strip and added natural-colored small rickrack at the top.  To add the final touches, I added the date from the sticker set and ½ of one of the journaling blocks from the Collectibles set.

Sunday, November 18, 2012

Simple Stories and Great Country Farm

Simple Stories Harvest Lane is so fun!  I love all the Fall colors and wood tones!  I used the fun stickers that coordinate with the Harvest Lane line to make my layouts come together quickly.  The coordinating papers are really fun and have a homespun, fun feel to them.  The colors coordinate well with just about any photos so if you don't have any fun pumpkin or farm photos, don't worry, you will definitely have photos to match this great paper line!

Wednesday, June 27, 2012

Hot July Make & Take

This week’s Make & Take, using Basic Grey’s pb&j line, provides space for three 4” x 6” pictures.  Your free element is  a metallic & blue vintage fan made with Tim Holtz Sizzix Movers and Shapers die,  In addition you use five colors of twine (the big spool kind so you can buy just what you need) and wooden buttons.  As designed the page is for “Hot July” memories, but use your letters to make a different title and the layout’s bright summer colors are great for a birthday, spring, garden, pet, family, life or love layout.  This layout gives you lots of flexibility so I’m sure you have some important memories to scrap that will be perfect on this page. 

Tuesday, June 12, 2012

Mother's Day Layout with Recipes

I created a 2-page layout to capture a special Mother’s Day that I spent with my aunt and several other mothers.  It was a potluck where everyone brought something so I thought it would be nice to include a picture of all the mothers along with the  recipes for the item each brought.  

The background is Alora Squiggles  I chose one of the less busy backfounds since I was going to have so many pictures.  I used one of the Cut Outs to make a frame for the title.  I cut off the two outer frames so it would fit my page better and used the Combo Stickers for the title.

A holder for each person’s recipe was made from Alora Wish and affixed to the background with  1/8” Wondertape so the recipe cards would fit and the tape would hold as the cards are pulled in and out.  I made the recipe cards by cutting rectangles from Blue Alora Dimples and  cutting the top with the Sizzix Tim Holtz on the Edge File Folder die.  (This die is great to make all kinds of file folders of any size you want.)   Each recipe can then be printed on white paper and glued to the recipe card. 

I put a picture of a Mom on each recipe holder and their name (made with a labelmaker) on each recipe card.  Some of the pictures were made with a circle punch and a slightly larger circle punch made the photo mat.  To call attention to the hostess I used a chipboard frame for her picture.  Each recipe holder was decorated  with a variety of Alora items – chipboard, stickers, brads, journaling cards and jewels.  I also used three different Bazzill Half the Edge strips.  These come in a package of 2 each of 10 different designs in a variety of colors.

I think with this page I'll remember the special day that my aunt hosted so that all the mothers she knew had a special Mother's Day.

Thursday, April 26, 2012

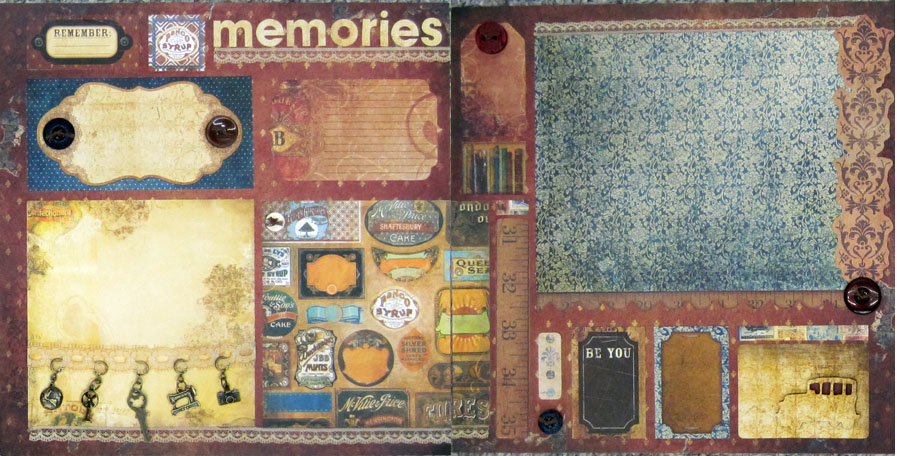
Memories Make & Take


Make & Take April 25th
Create a beautiful  layout to showcase those wonderful family or travel memories with this year's Make and Take.

When I say the new BoBunny Weekend Market line I fell in love with it.  I especially loved the tiny charms—a sewing machine, globe, camera, key and fan.  I was thinking of a variety of different things I could use them for.  A card for my seamstress sister with the sewing machine.  A page for my travel pictues with the globe.  I had at least one idea for every charm.  

Instead, I designed this week's Make and Take using all five charms.  Combining the charms, lace and the BoBunny papers created a antique looking page that is great for family, travel or even food memories.  

It is designed with room for pictures of a variety of sizes since if you’re like me, my older pictures aren’t always a standard size.  And even if they are, I sometimes want to cut something out of the picture.  With matching stickers, buttons and diecuts, making an interesting page is easy as can be.  The free element is a card with a Tim Holtz Jalopy cut out. 

Head to ScrapbooksPlus for everything you need to make this page.  Buy a couple of extra pieces of paper and use the leftovers to create another great layout. 

Tuesday, December 13, 2011

The Year In Review

 
This month's Design Team paper kit inspired me to scrapbook 'the year in review' for 2011.  I scrapped July and May but I hope to finish all of the months over the next month.  This paper kit really makes it a snap to scrapbook the months and with all of the coordinating paper, stickers and other embellishments.  The paper itself has great 6 x 4 blocks with the months on them such as the one below for May.  I also used one for my July layout above. The pages come together in no time so I'll easily be able to complete a quick album for 2011 in review to hit the highlights each month. What a great gift it would make to put together an album like this for that special person this year!

Stop by Scrapbooks-Plus to pick up your kit today!


Wednesday, November 30, 2011

Fall Layouts with Hello Fall Papers

I used the fall themed paper to create a showcase for the photos of a day I spent at Giverny.  The background is Red Splendor.

I used half of the left page to creat the title.  Using the Cricut, I cut “Fall” from Burnt Orange Knit and sprayed them with Spiced Marmelade Glimmer Mist.  I cut “at” out of a circle using the Word Party Cricut Cartridge and placed it on a scalloped circle.  Giverny is made with Daily Junque wooden letters.  To make them cooridinate with the colors of the papers of stamped the letters repeatedly until I got the color I wanted.  I used Tea Dye, Frayed Burlap, Scattered Straw, Spiced Marmelade & Fired Brick Distress Inks.

Burnt Orange Knit rectangles sprayed with Spiced Marmelade Glimmer Mist fill the space between pictures. 

Using many of the items available in the Hello Fall collection  I was able to create a showcase for the pictures, quite simply.  A canvas strip ties the title to the pictures.  Crepe lace stickers, a quote from the Cardstock Die Cuts and the journaling cards embellish the page.  Prima leaves and unique buttons from Scrapbooks Plus finish the page.

Another completely different layout was made using the same papers.  This one uses Little Leaf Pile for the background giving it a much more fun them.  All that is added is a few cutouts made using Tim Holtz dies and a strip of Tim Holtz film strip.  A Tim Holtz samp was used to add a quote about my experience was added to the photo mat. 

This demonstrates two different looks with the same basic colors.

Saturday, November 5, 2011

Hello Fall and Accordian Flower tutorial

I was so excited to be able to choose this month's Design Team kit!  This is such fun paper and the colors are amazing.  While the line is 'Hello Fall' from LYB, it is easy to use for so much more than Fall layouts and projects!  I scrapped a photo of my daughter from this Summer.  The paper matched her her shirt almost perfectly and the yellow matches her sunny personality making it the perfect choice.

I used two of the canvas borders and layered them to help balance the large photo.  The brown and white flower is from the chipboard pack that is available from LYB that matches this kit.  It came out of the package as a rich dark brown and I used a white gellato from Faber Castell (also available at Scrapbooks-Plus) to enhance it and give it some shine.

The yellow print flower I made with a strip of yellow flowered paper from the kit.  The directions for making the accordion flower are below.  They are really simple and can be plain like this one with a simple scalloped edge or you can cut with a fancy edge using a border punch-- think of the fun possibilities!
 Decide how large you want your flower and cut the strip at 1/2 the size of the completed flower by 12".  Use your scoring board-- if you don't have one, stop by the store and pick one up!  They are awesome for all kinds of techniques!  The Martha Stewart version- which the store sells-comes with its own scoring tool and an envelope template-- all stored in the board itself!!).  Place at the top of your scoring board and score every 1/4".  If you don't have a scoring board, you can still do this but it will take much longer!
Once you have scored all the way across the 12" strip, accordion fold the strip.  Then trim off the very last fold.  Use a super sticky tape to adhere one end of the strip to the other.
You will then have a 'cupcake liner' (hmm... another project!?!) which you'll need to adhere to something to get it to lie flat-- it doesn't stay easily!!  I used Quick Dry Adhesive from Helmar-- great stuff that you can get at S-Plus and use for just about anything you need to glue!  (In retrospect, I should have punched a larger circle given the size of my rather large accordian flower to give it more support.  I would recommend using a circle that is about 1/2 the size of your completed flower or larger.  It is hidden so it doesn't matter if it is exactly a circle- I just grabbed the closest circle punch!)  
Here's the completed flower on my layout!  I edged the outside and top with a teal colored Copic marker for contrast.  I love using Copics for this type of thing because they 'bleed' some if you touch them in one spot for more than a second and give a fuzzy look... great for flowers!

Thursday, October 13, 2011

Let your paper do the talking!

Let your paper do the talking for you!  That's what I did with this fabulous paper from Fancy Pants... appropriately named, October 31st!  All of the Design Team paper kits have been so fun to work with and this kit is no exception! 

I usually start my layouts with relatively plain paper and then build from there.  In this case, the frame on the bottom right corner with the Oct. 31 date is part of the paper and saved me a lot of 'building'.  I let the paper do the talking for me.  I only needed to enhance the paper base with my photos and a few embellishments.  This layout came together super quickly!  I used black paint to darken my corners opposite the paper design, added a few strips of striped paper, ribbon and a few embellishments to go with my photos.

Super fast, fun and so rewarding when the paper lays it all out for you!!

Sunday, August 14, 2011

Using the Page Map to Create a Special Page

This month I used the page map almost exactly as designed by Erica and love the result. You can make a great page quickly by using the page map.

The Teresa Collins Notation paper goes great with the vintage look papers of the Off the Record line so I combined papers from these two lines to create my page. Just pick the papers you want to use and cut them into the various shapes shown on the page map.

I did a few things to make this page unique.

The circles on the page map screamed flowers to me so I made flowers using the Tim Holtz Sizzix Tattered Flowers Die. The die cuts four flowers and I cut a couple of times using the Fabric store paper. When putting the flowers together, I used some on each side of the paper and used different numbers of flowers for each one. To finish the flowers, I added red buttons from the Doodlebug Boutique Button ladybug garden assortment. Before affixing them to the flowers, I threaded them with black string and tied a knot on top.

I made the accent lines on the page map by sewing. As a seamstress in my younger days, I fought against sewing in my scrapbooking saying that if I wanted to sew, I would sew. But the lines on the page map, suggested flower stems and I thought they’d look best if sewed. For me this meant buying a Sew Easy Stitch Piercer. This tool creates holes in the paper so sewing is a snap. You simply use it to put the holes where you want them. I made the flower stems. Using brown floss, I sewed the stems. Two great things with sewing. You don’t need to invest a great deal in the supplies. Scrapbooks Plus has a wide variety of floss and many can be purchased by the yard. You are not limited with straight lines like I have used. There are 7 different heads for the Sew Easy Stitch Piercer at Scrapbooks Plus so you can sew a variety of patterns. I’ve already got another one for my future pages.

For the background, I used a circle cutter to cut a partial circle in each corner to create tabs to slip another piece of paper in. To make each circle the same size and in the same location, I put making tape on the circle cutter to line up with the corner. (This sounds harder than it is. It is really quite easy.) I inked the tabs, inside and outside edges with Black Soot Distress Ink. I wasn’t quite happy with the little flowers on the tabs in two corners. I fixed that by coloring them with Copics. I used YG63, YG67 and R29.

I used the Tim Holtz Sizzix Tattered Banner die to cut the title. Since the die also includes smaller banners, I used these smaller ones for my journaling.

Check out the page map. This one really allows you to create a great page in no time at all.

Saturday, July 30, 2011

4th of July Barbeque Page with Recipes

My 2-page layout this month gave me the opportunity to preserve our traditional 4th of July barbeque. I used pictures from two different years and included the recipe for the barbequed ribs that are the featured item every year. Most of the paper was from My Mind’s Eye American Made line.

To make this page, I started with Petticoat Plaid Red Polka Dot paper for the background. I added a 2 ½” strip of My Mind’s Eye Celebration Banner across the top. To make it a little more interesting, I cut the bottom of the strip in large scallops rather than a straight line. I added a 3” strip of Pieced Pinwheels across both pages.

I used two techniques to make the rather boring title (4th of July Barbeque) more fun – a banner & a chipboard star frame. I painted a chipboard star frame white. After inking it with Weathered Wood Distress Ink, I added some solid blue cardstock to fill in the inner star. For the banner, I cut individual flags using the Celebration Cricut cartridge. After string these on Lime Twist Fly a Kite “ Soar” Twine, I tied a small bow on each end and affixed with Glossy Accents. The “4th of July” was cut from the Petticoat Plaid Red Polka Dot paper using the Cricut. The “4” was made much larger. The “Barbeque” part of the title was cut from solid blue cardstock using the From My Kitchen Cartridge. The smaller “Barbeque” and “Chef” and the background ovals for each were also cut using this cartridge.

I printed my journaling on The Day We Celebrate paper so that I could create a box that overlaps the two pages and would use the papers border on three sides. In addition to journaling this box serves as a photo mat for two pictures. I also inked this. After printing the two recipes on The Day We Celebrate paper, I hand cut the recipes into the shape of recipe cards. To draw more attention to the recipes, I cut an outline for each recipe from polka dot paper (one red and one blue). The remaining photo mats were cut from Pieced Pinwheels paper.

To finish the page, I embellished with flowers, buttons and stars. All buttons were tied with twine. The buttons and the stars came from the BoBunny Liberty Button set. To make the flowers, I stamped plain white flowers with Weathered Wood Distress Ink very lightly. I tied twine in the center of buttons for the center.

I love this page and even more love that our 4th of July barbeques will not be forgotten.

Tuesday, May 3, 2011

Birthday Pictures Make & Take

This week’s Make & Take will help you scrap those many birthday pictures you have. The fun design and bright colors make it perfect for boys or girls of any age. Stop by the store on Wednesday to get all the products you need and the instructions to make this fun layout using Basic Grey’s Life of the Party Line. Your free element is a birthday cake with icing.

Wednesday, April 13, 2011

More Ribbon Fun

Hi!  Laura here with a few more ribbon techniques for you to try that I used on this month's Design Team projects!  I'm using 1" Satin ribbon for on my project but you could use these techniques with any width or type of ribbon.
The first technique is quick and easy...ribbon pleating with my secret weapon... a stapler!
Here's a photo so you can see my ribbon pleating in progress.  I added pleated ribbon to the bottom of my layout by using a sturdy piece of cardstock because I wanted to hide my staples-- although you could easily staple right on your project for a different look.  I folded the ribbon over on itself to create the first pleat, adding a staple with my Tim Holtz Mini Attacher (love, love, love the tiny staples!).  If you don't have this tool, you must add it to your stash!  They are located in the store in the tool area near the other Tim Holtz tools.  Then I created another pleat, stapled and kept repeating until my pleats were well, com-pleat (sorry, I couldn't resist the pun!).  I then glued my cardstock to the back of my project so the pleats peeked out from the bottom.  Super easy!  See bottom of post for a photo of the completed (I resisted the pun here) look!

On this same project, I used the same 1" Satin ribbon and made a gathered ribbon flower.  This is easy also but to create you'll have to dig out a needle and thread. 

I chose a matching color thread, tied a knot at one end of my thread and stitched a running stitch along one side of my ribbon.  I know, I can't sew straight or even stitches-- I'm a little embarrassed to show you my terrible stitching but this just demonstrates that anyone that can thread a needle can do this! 

Once you've stitched all the way through your ribbon piece (mine was about 14 inches), hold the end of the thread opposite your knot and start pushing your ribbon down to gather it by the knot. 


Then I held it in place and stitched a few stitches through the center of the flower to hold it together and then knotted my ribbon to tie it off.  You can then move it around to shape it how you want it.  You might also try taking a short cut and use wired ribbon.  This saves you from stitching-- just secure the wire on one end of your ribbon so you don't pull it out of the ribbon and start scrunching your ribbon down the ribbon on one side.  Once fully scrunched you can twist the two ends of the wire together to secure. 

And here's my completed layout with both ribbon techniques...
Get out your ribbon and have some fun!


Wednesday, March 30, 2011

Family Photos Make and Take -- March 30

Take advantage of today’s Make and Take and you’ll have a two-page layout featuring family pictures done in no time. This layout uses BoBunny’s Timepiece collection, which features a variety of products in browns, maroons and black that highlight the passing of time. Using paper, buttons, chipboard and stickers, I created space for four pictures that can show the generations of your family – either showcasing your family’s history or scrapping today’s generations for the ones that will come. The other advantage is that although the layout includes many different textures, colors and embellishments it does not include complicated techniques. You only need to ink a couple of items with black ink, cut and glue. It can’t get much easier than this. As with all Make and Takes, buy the items you need to make this page and you will get the instructions and an element needed for the page free of charge. Another great reason to come on Wednesday is that you can print the coupon from the web site and get 40% off of one item (subject to a few exceptions). This coupon is only good on Wednesday so make it a point to stop by the store on Wednesday. If you can’t make it on Wednesday, you can check later in the week to see if the supplies are still available.

Thursday, April 23, 2009

Fact: 5 Year Olds Ask the Most Interesting Questions...

This layout was started months ago when Method Playground had a challenge up for making a page with a resist technique. I used a white crayon and water colors to create the centerpiece of page 1, then it kind of laid around my scrap room until I got the MME Bloom & Grow papers for this month. This layout is not my usual style, but I like the way it turned out. I (gasp) tore paper - although I must admit I did not do it free hand - I used a tearing ruler, which gave me enough control that I didn't freak out. Then I made up for all that tearing by using plenty of crisp straight edges, too. I also used a label maker for the first time - I see more of that in my future - it kind of reminds me of the strip journaling that I have been admiring in Loretta's layouts. The Bazzill Edge die cuts were lots of fun to work with - a quick way to add a funky element. I really like the PINK Heidi Swapp letters and the way they contrast with the orange paper - HIGH VOLTAGE!
I think the contrasts on this layout are what makes me happy - or maybe it is just looking at my daughter's little red boots and thinking about her curious nature that turns up the corners of my smile...

Wednesday, April 8, 2009

Spring Fling by Loretta Cooper


I loved this paper as soon as I saw it! Great choice Deborah. It's the Bloom and Grow line from My Mind's Eye. The inspiration for the layout was really the great colors in the line. As you can see I layered several prints and created chip board embellishments out of some of the coordiating stickers.

The oranged scallop piece was part of the kit, but I balanced it with a scalloped white stripe placed horizontally across the bottom. You can purchase all kinds of pre-cut scallops, but if you love the look you might consider investing in a cutter that includes various decorative blades. Debbie or any of the girls at Scrapbooks Plus can help you choose one you are sure to love.

Thanks for dropping by the DT Blog,

Loretta

Thursday, April 2, 2009

This Little Piggy

The weather has been so nice lately that I took my guinea pig outside to enjoy some fresh greens...and there were so many beautiful spring flowers, I turned it into a photo shoot! Not many tips to share from this layout. It went together so quickly because I used several elements from the My Mind's Eye Die Cut sheet - a scalloped border, the journaling block, the parentheses, and two cute little floral paisley embellishments!
.

Because I chose to put the scalloped border on top of paper with similar colors, inking the edges definitely helped the die cut stand out - and the vellum did the same thing for the smaller letters in the title. This is actually one of my favorite uses for vellum because it lets the background show through, but provides just enough contrast to separate the title. The die cut parentheses provided the perfect little frame.

.
And don't you just LOVE the Heidi Swapp Foam Letters?!?! They are so thick and the adhesive on them is great. I always try to add a little dimension to my projects - there are pop dots under the paisley embellishments - but the Heidi Swapp letters just JUMP off the page - perfect for a title!

.

I actually took waaaay too many pictures of my cute little piglet! I was going to make an exploding box for the rest (what a surprise, right?) but I think I will turn this 1 page layout into a 2 page layout when it comes home. I hope Debbie has ordered more of those die cut sheets...

Monday, March 23, 2009

Elephant Walk

I knew I wanted to scrap these pics of my son & his cousin as soon as I saw the Basic Grey papers this month. Even the exotic names were inspirational: African Nectar, Orchid Oolong, & Madagascar Mint! It just made me think of these pictures from a visit to the zoo years ago.I am afraid I got carried away decorating the elephant, but the die-cut stickers from the Marrakech line made it really easy. The peacock was such a fabulous element to add to the LO - and since it was a sticker I didn't have to do any fussy cutting!
.
I must say that I love having all the resources at Scrapbooks Plus at my fingertips when I scrap. The ferns on the bottom right are from an Accu-cut die in the classroom. I decided to add a little dimension by cutting them from chipboard, which is always available at the front counter. I used the Cricut Expression to super-size the elephant and I cut the palm trees using the store's Stretch Your Imagination cartridge. It was beyond easy to find the right shades of cardstock since I was right there, and running a tab on my supplies as I worked meant it was quick, too. It goes without saying that there were all kinds of creative and friendly people around when I needed input. It was just fun!

The fancy-shmancy picture frame on the 2nd page was actually from the die-cut sticker sheet. It started out life as a journaling block. I cut out the center with an exacto knife, added some bling, mounted it on the Palace Blue paper, and popped it up over a matte of African Nectar - I just love saying the name of that paper! I do plan to add journaling when I get the LO home. It will go above and below the small picture on the far right...maybe handwritten with some metallic gold ink, which I think will really "pop" off of the Green Tea paper - the shading on this stuff is awesome!

Here's a bit of trivia - you can tell what country an elephant originated from by looking at his ears. The ears on an African elephant are shaped like the continent of Africa. The ears on an Indian elephant are smaller and similar in shape to India. Interesting...

Thursday, March 5, 2009

Spice Up Your Layouts!

Cardamom is the "secret" ingredient in my favorite homemade Christmas cookies. I picked up the tip from a friend's mother who has travelled the world. According to Wikipedia, cardamom has a "strong, unique taste, with an intensely aromatic fragrance". Used in a very small amount, it just changes everything.

Cardamom is also the fabulous stripe found in the Marrakech line of Basic Grey papers, and it is also strong, unique and intense! Just adding a small strip down the left side of this page changed the whole feel of the layout.

When I opened this month's kit and found the Masala Bella paper, I fell in love with the rich colors and bold, exotic floral pattern. This (adorable) picture of my daughter had such a rich blue in the background, I knew it was a perfect match. When I laid it down, though, I had a problem. Even with such a large scale picture, I felt like the paper was taking center stage. So I decided to add a little Cardamom! This paper echoes all the beautiful colors in the floral pattern, but it also adds bold stripes of brown and a nice soft gray. The pattern and the colors have a "muting" effect on the layout. From the stripes, I picked up the color brown and added the scalloped cardstock to create a frame for the picture. (I did a little fancy cutting on the inside to scallop the inner edge.)
When I picked up my kit at the store, I also selected some coordinating Bazzil and I used that to back the page, letting it peek through in between all the elements...kind of a color blocking technique. I left a tiny strip of blue on each side of the ribbon and around the page edges.
For the title I chose the "Daddy's Little Girl" stamp, which was in my stash. I used Stazon pumpkin ink and clear embossing powder and centered it on the flower and topped it with a button - I just love adding dimension! When Deborah Mahnken came back from CHA she brought a product from ScraPerfect and she shared it with me...the Perfect Printing Pouch. I used it on the petals of the flower and then stamped some descriptive words using a soft orange ink...and the ink didn't bleed! It was perfect!
Since I was in the stamping mode, I decided to add some butterflies from a really cute set I bought at Scrapbooks Plus (Making Memories/Flower Patch - on the *NEW* wall in the front of the store - if there are any left!). Using Stazon, I stamped onto some of the distressed "solids" from Marrakech - Palace Blue and Mandarin Slice - and used clear embossing powder again. They are little jewels of color sprinkled around the frame.
The glittered swirls were cut using the Accu-Cut die in the classroom at Scrapbooks Plus. I glittered directly onto the chipboard - no painting a base color - with Ladybug Glitter/Doodlebug Design. I actually had made these for one of my January pages, but they just didn't work. I am very glad I saved them because I think they really are the perfect touch!
.
Sooo - I used a handful of easy techniques to create this layout - color blocking, fancy cutting, mixing papers, stamping, embossing, glittering - but what really makes it work is the amazing Marrakech papers from Basic Grey! Spice up your layouts with some Cardamom!

Tuesday, February 3, 2009

Recital 2005

I have been looking for ages for the right paper to use for scrapping my daughter's first dance recital and this month I found it with MME's Laundry Line.
It may sound silly, but I really liked the journaling card, so it was actually my starting point for this layout. There is a place to record the event and the date, but it also adds a bit of whimsy with a choice of emotions. EXCITED was how my daughter felt for her first time on stage, so I used some Glitter from Doodlebug Designs to accent a chipboard arrow. A brad in the center holds it pointing in the right direction. Next to the journaling card, the program from the recital actually was just too bright and clean, so I swiped the front with a light brown inkpad to match the tones a bit. The background paper ties in the pinks & browns from the photos. The picture frame on the first page was cut using an Accu-Cut die you can find in the classroom area of Scrapbooks Plus. I used pop dots under this picture because I wanted it to lay on top of the program, giving it a bit more prominence in the layout.

Page 2 went together very quickly. I used the light brown ink pad to distress the cream colored background paper. Using a square punch and a corner rounder I created a border using pieces of coordinating papers. I also used (2) slide frames in the border, covered in coordinating paper, to highlight a couple of detail shots of my daughter. (I just love the little awkward angle of her tiny dancing feet!)

I plan on adding journaling over the long block on the right side of page 2. I will print it on vellum and use some brads to hold it in place...and I may use Erin's glittering technique to give them some shine! (Thanks for the tip, Erin!)
Or I might add the journaling as a pull out from inside the program on page 1...decisions, decisions...