I love the music paper with perforations! It was really fun to work with and I split it up and used on several projects! I also played with die cutting and embossing the red suede paper. It cut like butter with my Cricut and embosses beautifully! Here's a close up of the embossing- it was tough to photograph- but it really looks cool in person!
Showing posts with label page map. Show all posts
Thursday, January 5, 2012
The Final Page Map
This is my version of the final DT Page Map. The Page Map is being retired and replaced with more layouts around the store by Design Team members. This is a fun change this year that will give you many more layouts to 'scraplift' from around the store with a variety of paper lines each month.

I love the music paper with perforations! It was really fun to work with and I split it up and used on several projects! I also played with die cutting and embossing the red suede paper. It cut like butter with my Cricut and embosses beautifully! Here's a close up of the embossing- it was tough to photograph- but it really looks cool in person!

I also added some Liquid Applique' to my Santa hat cut from the suede paper. This is an old product that I've had in my drawer for years but I pull it out for at least one project at this time of the year. It is made by Marvy and Scrapbooks Plus can easily order this for you if it is out of stock when you need it. You simply squeeze it on your project in a thick layer and then heat with your embossing gun until it puffs. Just be careful not to over-puff as it will burn. Have fun with your own creation using this fun pagemap!
I love the music paper with perforations! It was really fun to work with and I split it up and used on several projects! I also played with die cutting and embossing the red suede paper. It cut like butter with my Cricut and embosses beautifully! Here's a close up of the embossing- it was tough to photograph- but it really looks cool in person!
Friday, December 23, 2011
Using Simple Stories Line to Scrapbook Your Life (Easily)
My last two pages for December show how easy it is to match the Simple Stories to the pictures you have.
My first page uses the page map to make a Christmas page. I was delighted to use these paper as my family wears a lot of orange and rarely does Christmas paper go with orange. Using a page map makes it easy to make a page. It shows where to put the picture and the title and you fill it in with the paper you like and the embellishments. I used the striped side of Everyday Life for my background. To give it a little shine (I always like shine for the holidays), I sprayed the edges with Spiced Marmalade Glimmer Mist. I used an 11” x 11” square of Green/Notebook for the inner background. I distress the edges of this square before gluing down. Finally, I made photo mat of Orange/Grid from a 10 ½” x 10 ½” square. (I cut it along grid lines so it may not be exactly a 10 ½” square. I distressed the edges and inked the edges with Spiced Marmalade Distress Ink. I scalloped a strip of Green/Notebook on both sides and placed it below the bottom pictures to complete the frame. I used the pieces left over after scalloping to separate the pictures. The title was made from two different size and colors of stickers from the set. I added a Christmas tree sticker and a scalloped circle on which I placed another Christmas tree sticker. The final embellishment was a scalloped circle cut from the Grid paper. I inked it with Spiced Marmalade Distress ink and added a circle from the set and a “24” sticker to show that picture was from Christmas Eve. The other one-page layout truly scraps an everyday event. A relative and I had driven to Georgetown (45 minutes from my house) just to get a cupcake. We had such a great time that I wanted to be reminded of the day. When I saw the pink paper from this line, I thought it was perfect. Georgetown Cupcake colors are pink but the line lent itself to a less girly pink picture that totally fit the bill. I used pictures of a variety of sizes; most I cut to fit the space/look I wanted, but I did use Photoshop to make a 2” x 6” picture of the three types of cookies we tried. I used several items from the line to add to the page. For example, I cut circles in half and then put below the picture to label each type of cupcake. Similarly, I cut out a scalloped circle that said “Celebrate, today” to put beneath a picture of my relative eating a cupcake. I cut out a heart and a strip of paper that said “Life is Sweet,” clearly appropriate for a page about cupcakes. I again stitched to match stitch design on the paper. (I just made holes where you needed them with my needled and then went back and stitched.) I used a sticker to add “May” and “28.” The small title, “Georgetown Cupcake” also came from the line. I put a journaling tag on a piece of red paper. I stitched across the top (as the journaling card showed) and added the year with stickers on the bottom.
This line really offers stickers, journaling tags, etc that allow you to personalize a page just for your event. Even if you don't see exactly how they work for your pictures, just buy paper, stickers and journaling cards. Take them home and look at them. I guarantee by the next morning you will be thinking, "Oh yeah, that message really fits this day."
Sunday, September 18, 2011
Page map and the rest of the story!
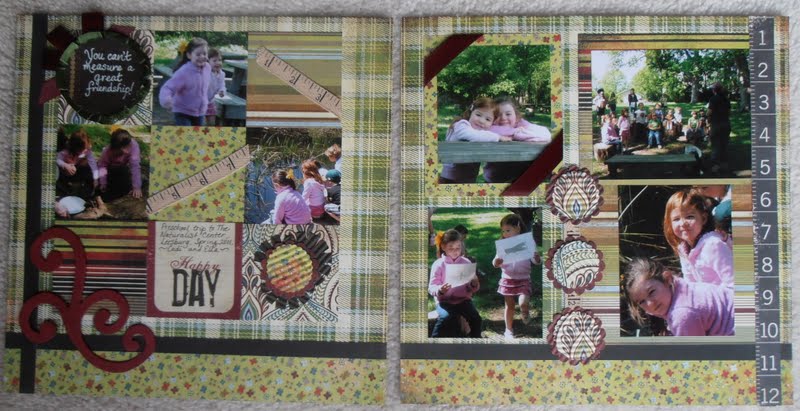
Using the Design Team page map this month I crated this layout. I had some really great photos from my daughter's school trip that I also wanted to use, so I created a second layout to go with the given page map!
One of the fun things I've pulled out of my scrapbooking tool stash recently is my Fiskars crimper. I haven't used it in years but have been having a fun time making patterned paper look like corrugated cardboard- which is so hot right now!

Pull out your old crimper and give it a try!
One of the fun things I've pulled out of my scrapbooking tool stash recently is my Fiskars crimper. I haven't used it in years but have been having a fun time making patterned paper look like corrugated cardboard- which is so hot right now!
The crimper adds fun texture and dimension to any project. It is great to distress the ridges or leave as it. I used it on my card set as well!
Pull out your old crimper and give it a try!
Wednesday, September 7, 2011
Stars of My Life
This month’s page map gives you lots of options for how to make it your own. You have 9 squares in the center. It is up to you whether you use them all for pictures, all for decorations or a combination of pictures and decorations. My squares included some with pictures, some with embellishments and some words. My page includes a picture of me with each of my aunts and uncles when I was young. Since I have only four, that left me five squares to use as accents.
I used the Oxford Frat House paper for the background. To bring the focus to the center where the pictures are, I made a large photo mat (10” x 10”) to hold all the pictures and other décor. I printed 3” x 3” pictures and placed them equally on the grid. I cut 3” x 3” squares from coordinating paper. In the center square, I placed a subtitle made from letters cut from Oxford Fencing paper. Instead of a square in the upper left, I used a journaling block from Life Documented Flash Cards. I inked it with Peeled Paint Distress Ink. All squares were inked with Peeled Paint Distress Ink. I inked ribbon (available atScrapbooksPlus) and Tim Holtz idea-ology trimming lavish flower ribbon with Peeled Paint Distress Stain and used the ribbon to decorate the squares. If you haven’t tried Distress Stain, you really should. It is so easy to make items the color you want . I added a heart stamp and some flowers cut with Tim Holtz Tattered Flowers Sizzix die.
Since I had some chipboard stars, I titled this page “Stars of My Life.” (I apologize that the picture makes it difficult to read the title. ) Although it goes with the embellishments, it is also true – my aunts and uncles played a significant role in my life. They continue to today.) I used a large chipboard star for the title. I covered it with Versamark and embossed it with Peeled Paint Distress Powder. The remainder of the title was made with Pink Paislee Daily Junque wood alphabet.
This month’s page map is one that is easy to adjust to the pictures that you want to scrap. Simply gather the 3” x 3” pictures. Once you have these selected and placed, pick paper and embellishments for the other squares that reflect the theme. You can make them frilly and pink for a girly girl, bold and modern for a hip look, fill with sports symbols for the big game, or since it is September you could use a school theme with a back to school picture of each of your kids.
Labels:
Basic Grey,
chipboard,
cricut,
embossing,
family photos,
flowers,
page map,
pink paislee,
ScrapbooksPlus,
Tim Holtz
Sunday, August 14, 2011
Using the Page Map to Create a Special Page

This month I used the page map almost exactly as designed by Erica and love the result. You can make a great page quickly by using the page map.
The Teresa Collins Notation paper goes great with the vintage look papers of the Off the Record line so I combined papers from these two lines to create my page. Just pick the papers you want to use and cut them into the various shapes shown on the page map.
I did a few things to make this page unique.
The circles on the page map screamed flowers to me so I made flowers using the Tim Holtz Sizzix Tattered Flowers Die. The die cuts four flowers and I cut a couple of times using the Fabric store paper. When putting the flowers together, I used some on each side of the paper and used different numbers of flowers for each one. To finish the flowers, I added red buttons from the Doodlebug Boutique Button ladybug garden assortment. Before affixing them to the flowers, I threaded them with black string and tied a knot on top.
I made the accent lines on the page map by sewing. As a seamstress in my younger days, I fought against sewing in my scrapbooking saying that if I wanted to sew, I would sew. But the lines on the page map, suggested flower stems and I thought they’d look best if sewed. For me this meant buying a Sew Easy Stitch Piercer. This tool creates holes in the paper so sewing is a snap. You simply use it to put the holes where you want them. I made the flower stems. Using brown floss, I sewed the stems. Two great things with sewing. You don’t need to invest a great deal in the supplies. Scrapbooks Plus has a wide variety of floss and many can be purchased by the yard. You are not limited with straight lines like I have used. There are 7 different heads for the Sew Easy Stitch Piercer at Scrapbooks Plus so you can sew a variety of patterns. I’ve already got another one for my future pages.
For the background, I used a circle cutter to cut a partial circle in each corner to create tabs to slip another piece of paper in. To make each circle the same size and in the same location, I put making tape on the circle cutter to line up with the corner. (This sounds harder than it is. It is really quite easy.) I inked the tabs, inside and outside edges with Black Soot Distress Ink. I wasn’t quite happy with the little flowers on the tabs in two corners. I fixed that by coloring them with Copics. I used YG63, YG67 and R29.
I used the Tim Holtz Sizzix Tattered Banner die to cut the title. Since the die also includes smaller banners, I used these smaller ones for my journaling.
Check out the page map. This one really allows you to create a great page in no time at all.
The Teresa Collins Notation paper goes great with the vintage look papers of the Off the Record line so I combined papers from these two lines to create my page. Just pick the papers you want to use and cut them into the various shapes shown on the page map.
I did a few things to make this page unique.
The circles on the page map screamed flowers to me so I made flowers using the Tim Holtz Sizzix Tattered Flowers Die. The die cuts four flowers and I cut a couple of times using the Fabric store paper. When putting the flowers together, I used some on each side of the paper and used different numbers of flowers for each one. To finish the flowers, I added red buttons from the Doodlebug Boutique Button ladybug garden assortment. Before affixing them to the flowers, I threaded them with black string and tied a knot on top.
I made the accent lines on the page map by sewing. As a seamstress in my younger days, I fought against sewing in my scrapbooking saying that if I wanted to sew, I would sew. But the lines on the page map, suggested flower stems and I thought they’d look best if sewed. For me this meant buying a Sew Easy Stitch Piercer. This tool creates holes in the paper so sewing is a snap. You simply use it to put the holes where you want them. I made the flower stems. Using brown floss, I sewed the stems. Two great things with sewing. You don’t need to invest a great deal in the supplies. Scrapbooks Plus has a wide variety of floss and many can be purchased by the yard. You are not limited with straight lines like I have used. There are 7 different heads for the Sew Easy Stitch Piercer at Scrapbooks Plus so you can sew a variety of patterns. I’ve already got another one for my future pages.
For the background, I used a circle cutter to cut a partial circle in each corner to create tabs to slip another piece of paper in. To make each circle the same size and in the same location, I put making tape on the circle cutter to line up with the corner. (This sounds harder than it is. It is really quite easy.) I inked the tabs, inside and outside edges with Black Soot Distress Ink. I wasn’t quite happy with the little flowers on the tabs in two corners. I fixed that by coloring them with Copics. I used YG63, YG67 and R29.
I used the Tim Holtz Sizzix Tattered Banner die to cut the title. Since the die also includes smaller banners, I used these smaller ones for my journaling.
Check out the page map. This one really allows you to create a great page in no time at all.
Labels:
Copic Markers,
layouts,
page map,
paper piecing,
sewing
Thursday, July 7, 2011
Easy Sports Pages using Page Map
Using the page map for this month (available at the store), I made a baseball-themed page to showcase pictures of my 8-year-old nephew throwing out the first pitch at an Arizona Diamondbacks game. I followed the page map reasonably closely except since all my pictures were vertical I replaced the four horizontal photos with three vertical ones. The background is I Love America #IA404 paper. The flags for the banner were cut using the Cricut Celebrations cartridge and strung on Lime Twist Fly a Kite Soar Twine. I cut the letters using Sizzlits die and affixed them to the banner flags with Glossy Accents. I used two brads from the Bo Bunny Liberty Brads set to anchor the banner to the background. (I wrapped the twine around the brad a couple of times and then stuck the brad in the paper.)
The white pleated banner that divides the page horizonatally is a pre-pleated Bazzill paper strip. Called Perfectly Pleated, it reminded me of the bunting often used at ball parks for special games, especially when I added a scalloped piece of Bazzill Red Glitter paper.

For my journaling, I cut out a strip of tickets with Tim Holtz Sizzlits Ticket Strip die. I stamped them using blue ink and stamps from the Stampers Anonymous Tim Holtz Collection (Odds & Ends). Journaling in red continued the red, white and blue theme. I used glittered stars from the Bo Bunny Liberty Brads collections. Other were cut from Bazzill Glitter paper using Sixxiz dies and affixed with Glossy Accents. Although I used “I” throughout this blog, I must confess I had some help. I had some ten-year-old visitors over the holiday, who helped me. They loved using the Vagabond to cut out shapes. It is so simple to use that I just described it to them once and they cut out shapes while I did other things. Kale Barnett not only helped me finish this page, but he and his twin sister, Saige, made a page for their sports photos. As a result, I can share three variations of this month’s page map – a baseball one, a basketball one and a football one. These pages show how easy it is to use the page map as a guide and vary the page with your interests.

Scrapbooks Plus has lots of items (like the basketball brads Saige used) to make your sports page, no matter what your sport. If you don’t have a cutter or sports dies, there are plenty of items such as bats, helmets and balls that can replace those in these pages. There is also a wide variety of twine. I used the Lime Twist, which comes in a variety of colors, but Kale used the Sew Easy fancy floss (baker’s twine primary) which comes in 3-color packages.
Have fun making a page for the special athlete in your family!
Labels:
bb,
Bo Bunny,
cricut,
eyelets,
glitter paper,
Glossy Accents,
page map,
scrapbooks plus,
stamps
Tuesday, July 5, 2011
Jenni Bowlin Stickers
One of the elements in this month's kit that I had fun using is the Jenni Bowlin star stickers with letters. When I first started scrapbooking years ago I used a lot of stickers. I don't use them as much anymore as there are so many more embellishments out there to experiment with but there are so many ways to be creative with stickers that I really need to get back to using them!
I used these stickers as a banner on the layout I did for the Page Map provided this month. I first put the letters on my star stickers. Then I used some twine I had on hand and used a half star on the back so they could hang nicely (like a real banner) on my page. I only used half so I could stick them in place. These are really nice stickers as they are so forgiving. If you put them in the wrong spot initially, you can easily move them if you do it pretty soon after the incorrect placement. This makes them so nice to work with!
Here's my banner on my page!
Check out these great Jenni Bowlin stickers to add some fun to your layout! You get quite a lot so you'll see that I was able to use them on some other projects this month as well!
Here's my banner on my page!
Check out these great Jenni Bowlin stickers to add some fun to your layout! You get quite a lot so you'll see that I was able to use them on some other projects this month as well!
Sunday, June 5, 2011
Check out the Page Maps!
Have you checked out the PageMaps that the Design Team does each month? They are in a new spot in the store- just to your left as you walk into the crop room. This is one of my favorite things that we do on the Design Team because everyone uses the same basic design but all of the pages are so very different! I love the different interpretations of each team member!
This is mine for this month using the Webster's Pages goodies. I incorporated almost all of the elements on this page- the paper, the coordinating vellum, the die cut paper, the dimensional ribbon roses (green), the canvas ribbon and even a canvas tag! I threw in a few more items that I show you how I made later this month- the pink circle ribbon flowers and some green tulle. This was so fun to create! Here's a close up of canvas tag, the canvas ribbon (which I've pleated-pink- as well as used flat- blue zig zag), my circle ribbon flowers and the awesome green ribbon flowers that I cut into sections. Pick up a PageMap at the store and give it a try!
Sunday, May 1, 2011
New Design Team Projects & Page Map Available

It’s May 1st and that means today the new Design Team projects for May are unveiled. This month’s paper will appeal to all. You can choose flowers or modern graphic designs in shades of pink, orange, green and brown. Each paper in BoBunny’s Vicki B line has a print side and a near solid side, which has depth from subtle design. Using the matching items you can create gorgeous pages in a snap. The sticker set includes letters for titles or messages, borders and some fun decorations. Decorate your pages with the flowers and borders rubons. Add bling with the jewels and trinkets. The Design Team is also using shapes made from a couple of the Tin Holtz Sizzix dies, a KAISERCRAFT wooden key, glass squares, FloraDoodles butterflies and a very large chipboard letter.
Visit the store to check out the new projects and get ideas for the fabulous scrapbook pages, cards and altered items that you can make. Take a picture of the ones you like, get this month's page map, pick up the paper and supplies you need and you’ll be well on your way to completing some great new projects.
Saturday, April 30, 2011
Creating a Sea Layout

I had fun with this month’s page map, which is available at the store. I liked the proposed placement of a trio of pictures so I began there. I had three pictures that went well with the papers. I went with a theme-based layout to tell the story of an attempted fishing trip that was miserable due to “Rough Seas.”
A few elements worth noting. As you know, I am a big fun a canvas and that seemed to fit with a nautical theme so I cut “SEAS” for my title out of a piece of canvas and raveled the edges. I put a bit of brown paper behind the letters so that the letters would pop a bit more. For the “rough,” I used another favorite. I cut the letters out of grungepaper and embossed them with vintage photo embossing powder. The anchors were made using the same technique.
The page map had a line near the bottom. I decided to use the “sea” for the bottom section of the page. To create the sea, I cut several strips of paper with the top being wavy out of the turquoise side of “Little Lady” Fine Flowers paper. To create the white caps on top, I distressed the edges of the waves. I glued this to the background at varying levels, overlapping the strips.
Journaling was done on cream cardstock. To make it fit the colors and theme better, I distressed it with three colors of Distress Ink (Vintage Photo, Scattered Straw & Wild Honey).
Just a few Stella and Rose Brads completed the page.
The page map had a line near the bottom. I decided to use the “sea” for the bottom section of the page. To create the sea, I cut several strips of paper with the top being wavy out of the turquoise side of “Little Lady” Fine Flowers paper. To create the white caps on top, I distressed the edges of the waves. I glued this to the background at varying levels, overlapping the strips.
Journaling was done on cream cardstock. To make it fit the colors and theme better, I distressed it with three colors of Distress Ink (Vintage Photo, Scattered Straw & Wild Honey).
Just a few Stella and Rose Brads completed the page.
Subscribe to:
Posts (Atom)