Showing posts with label Lily Bee French Coutoure. Show all posts

Friday, December 14, 2012

Just Believe Christmas Memory Book

I loved the tags in the KaiserCraft Just Believe line and thought a little Christmas book would be a great way to use them.  As I got started, I found that there were lots of things about this line that worked well in this book, like the reverse side of the labels made great embellishments.  I found so many other embellishments that that I ended up only using a few tags.  I think this would be a great gift for a grandmother.  Just add a few pictures of the kids at Christmas.

The covers and all pages were made with  5” x 8” Tim Holtz Idea-ology Grungeboard, although any chipboard would work just as well.     

To make the covers, cut the Grungeboard to 5” x 7 ½”.  Affix the desired paper to both sides the Grungeboard using a glue stick and a brayer.  After affixing paper, cut the edges with the Tim Holtz Sizzix On the Edge
Scallops die.  (It has two edges and I made the front cover with one and the back with the other producing designs that were different but coordinated.)

 I also used the Grungeboard for the pages, but again chipboard would work.  For pages, heavy cardstock would work.  The pages are  5” x 6 ½” and the paper is applied with glue stick and brayer. 

 Decorating the pages can be done anyway you like.  I decorated each page with a variety of items – journaling items, tag, buttons, bows, die cuts, even the reverse side of the paper label .  I made a fun embellishment for the cover with Spellbinders Spectacular Spin die and a center of Peeled Paint Stickles.  These are really fun to make. See blog for December 7th to learn more about this.  On each page, I created photo corners with the Martha Stewart Crafts Embossed Punch and affixed them so I could add pictures later. (This makes it really easy if you give the book to someone who is not a crafter.) Once all pages were decorated, I punched holes in each page and used a binder ring to hold together.  On the top outside ring, add  three charms from the BoBunny Rejoice button set on Tim Holtz Charm Clasps.  Tie ribbon between each charm on top ring and on the bottom ring.  Tie ribbon to the rings between each page so the pages lay better. 

For those that want to make one, just like the one on display at ScrapbooksPlus, I’ve included a list of what I used for each page. Except for the items listed below all of the items are from the KaiserCraft Just Believe .  I loved the reverse side of the label strips on this paper and used some of them as embellishments for the book.  The items used that are not part of the KaiserCraft line are: Turquoise Metallic paper, ribbon (red & cream) and buttons, all of which are available at ScrapbooksPlus. 

Part of the fun is using leftovers and having fun so this should be just a guide. 


Paper
Photo Corners
Photo Mat
Embellishments
Front Cover
Winter
N/A

Snowflake square; inked with Silver IncaGold
Inside Front Cover
Starlight
Keepsakes
 4” x 6” Keepsakes
Tag w/cream ribbon
Page 2

Starlight
Magic

Friends & Family formed with letter stickers; Snow tag  with cream ribbon inside Snowflake square.
Pages 3 & 4
Wish List
Magic

Strip from Hymm paper; Button
Pages 5 & 6

Remember
Hymm

Poinsettas made with Tim Holtz tattered poinsetta die and Magic paper; Tag; Buttons (leftovers); Tree made with letter stickers
Page 7

Remember
Turquoise Metallic

A small and large tag on left side with cream bow. Strip from Magic paper.
Inside back cover

Winter
Turquoise Metallic
4x 5 ½ Remember  

Strip from Magic paper.
Tag with cream ribbon horizontal in right corner.
Back Cover
Wish List
N/A
N/A
Snowflake square, Tag, Button


Friday, December 30, 2011

Share Your Sentiments with an Exploding Box

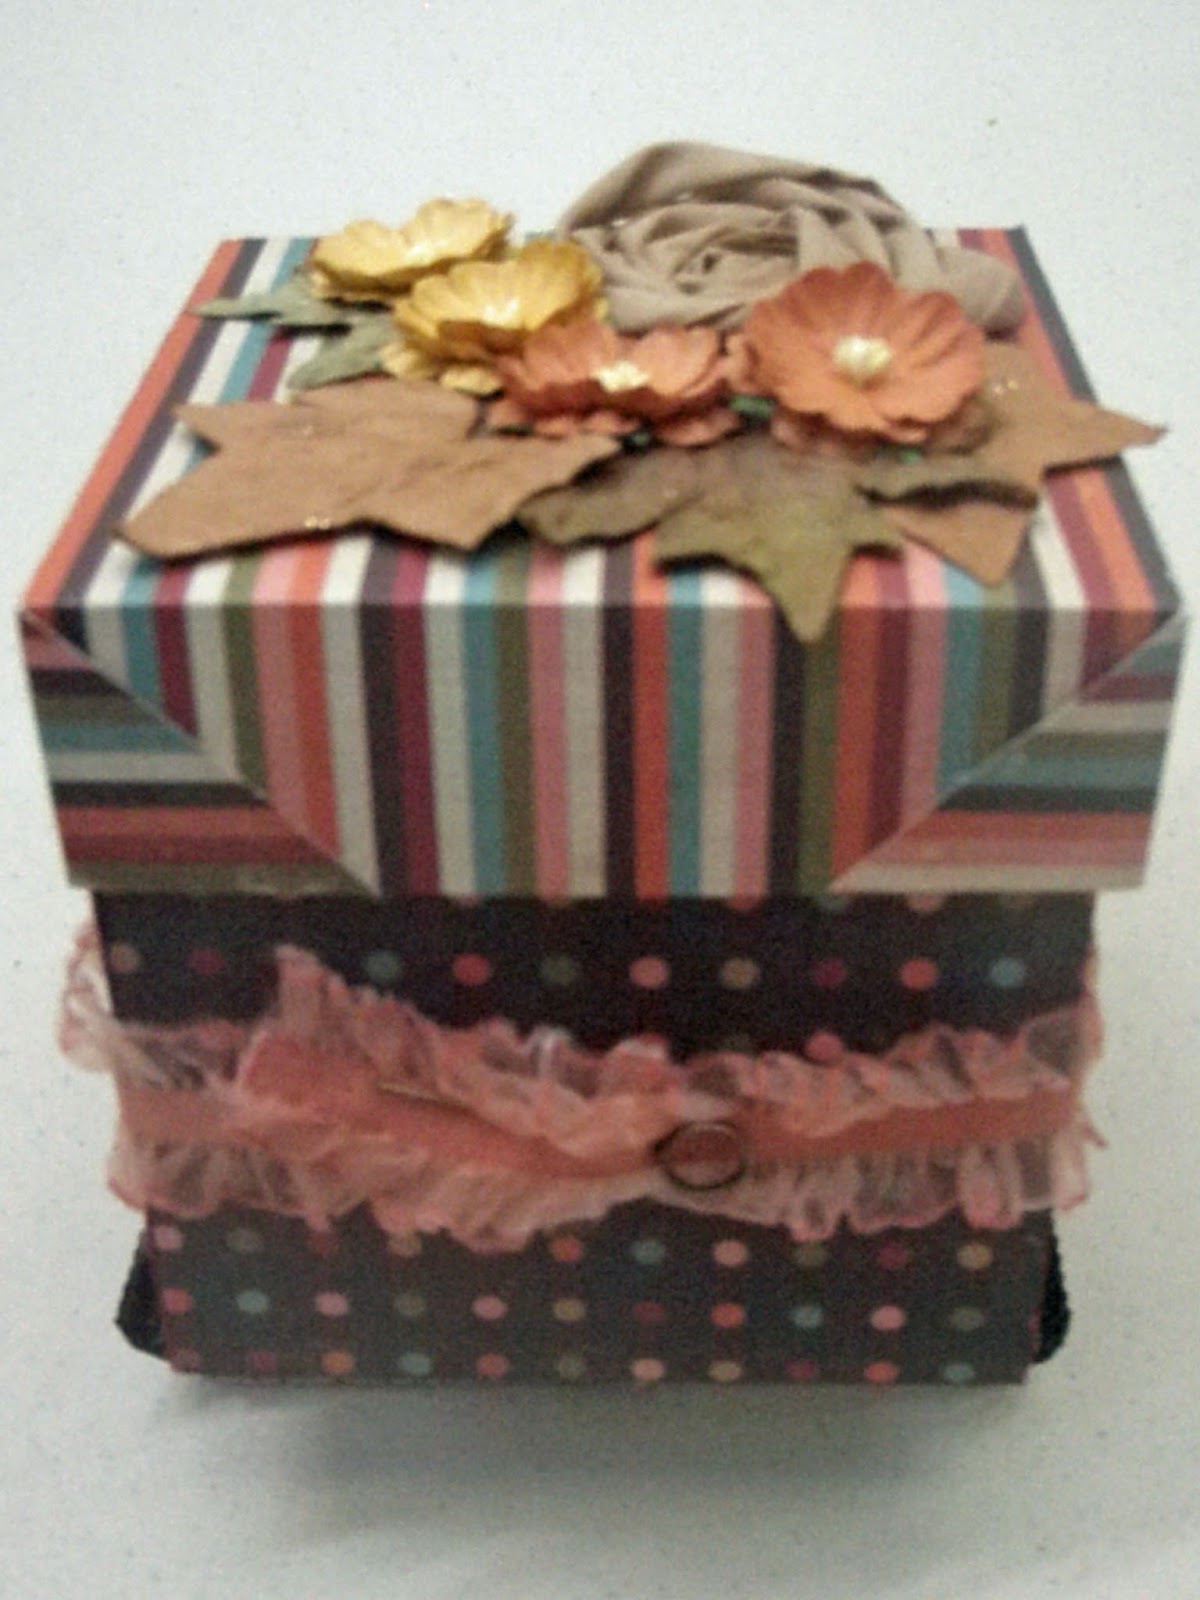
An exploding box is a small box that when opened has pages and pockets for pictures or messages, giving you a special way to share your sentiments.  They are great for special relatives or friends.  My  box is filled with inspirational messages for a friend, who is going through a tough time.  You have a total of 20 sides inside the box on which you can put messages, pictures or embellishments.  In addition, you have pockets for 8 tags or special memorabilia.  This is one of the projects that looks tough but the basic framework is easy if you follow the pattern.  The Simple Stories Life Documented collection works especially well.  The double-sided coordinating papers are of just the right weight – they are easy to work but thick enough for a box.  The embellishments can be as simple or complicated as you want. 

For this project you need four pieces of paper/cardstock – three for the boxes and one for the top.  For the outside of the box, I used Live Life 24/7.  A 12" x 12" piece forms  the outside of the box and one set of inside flaps. For the middle box, you need a 10.5” square.  I used Newsprint.  And for the inner box, which requires a 9” square,  I used Orange/Grid. 

Begin with the 12" x 12" paper.  Imagine your paper is a grid with 4" squares as in the image below.  (My drawing is not to scale; all should be 4" squares.)   Score on dotted lines and cut on solid ones.  To assure that all my lines were straigiht and corners square, I used my trimmer, changing from a cutting blade to scoring blade as needed.   Score a diagonal line from the outside corner of A to the inside corner of A.  Repeat with C, G & I.


A

B

C

D

E

F

G

H

I

Inside of Outer Box
Fold along score marks.  The four corner squares will become triangles once you complete folding.  Use glue to hold the corners in the triangle shape.  The flatter they are the better it will be when you fold the box.  I inked all the edges with Fired Brick Distress Ink.  The four squares that you have on the inside can be decorated.  I would recommend that you decorate these with flat objects as the two other sets of “pages” will be on top of these.  I stamped messages on coordinating paper and affixed to the squares.  If you use, a lighter paper on the inside you could stamp your design directly on the flap.  Cut out objects, border trim, etc. would be really great for this. 
 
Middle Box Pocket & Tag

For the middle (10.5" square) and inner (9" square) boxes, score and cut as shown in diagram above.  Squares should be 3 1/2" and 3" respectively.  (Note: Do not score diagonal lines as you did for the outer box.)  For these two boxes, you fold along the scored lines to make four pockets for each.  Seal the side edge of the square.  I used 1/8” redline tape to hold the pockets in place. You only need to adhere on side since once box is glued in place a bottom will be formed.  Remember in selecting colors and folding to consider what color you want the pockets to be.  The pockets will be the color of the paper that is facing down.  

Inner Box Pocket & Tag


I inked the inner box with Spiced Marmalade Distress Ink and the middle box with Weathered Wood Distress Ink.  I stamped a variety of  positive messages, butterflies and birds using Tim Holtz stamps. (Stampers Anonymous Odds & Ends, Stuff to Say,)   I used some hearts cut from the papers, circles and scalloped circles.   Life Documented provides lots of circles and messages that could be used.  On the inner pockets, you can use items with a little more depth.  For example, I used some Bazzill flowers.   (Since you are going to decorate the bottom, it is best to put the thicker embellishments at the top.)

 
I used the Simple Stories journaling cards to create tags to put in the pockets. I trimmed them to fit the size of the pockets.   I affixed an eyelet and tied a ribbon to the top.  (I used white ribbon and sprayed it with Spiced Marmalade Glimmer Mist.  The tags can include a message, a picture or one on each side.

Inner Box
Once you have all boxes decorated, glue the boxes together.  You can use your favorite adhesive.  I used Glossy Accents because I wanted to make sure it stuck.  Once the boxes are together, you can decorate the bottom of the inside of the box.   I made one flower with a Gluber and a strip of linen ribbon that is available at ScrapbooksPlus.   (If you  haven’t used Glubers, you need to try them.  They are really easy to use to make a variety of flowers.)  You simply roll the ribbon and push down into the massive (and strong) glue dot.  Of course, you could use any kind of flower or other embellishment you like.  The remainder of my flowers are  Bazzill paper flowers. This is where you can make the box fit your theme and use lots of the fun embellishments available at Scrapbooks-Plus.  The only limit is the space you have.


Inside of Box When Closed


Fold the box closed and secure with a ribbon.  I used the elasticized ribbon from the Tim Holtz Ideo-ology Lavish Trimmings set.  After it was sprayed with Spiced Marmalade Glimmer Mist it looked great with the paper.  I fastened the ribbon with a Tim Holtz Idea-ology Memo Pin.  An Idea-ology Trinket Pin would work the same way – perhaps even better because it wouldn’t have a sharp edge.  You can tie it shut with any ribbon, but using this elastic ribbon means you don’t have to re-tie every time you open the box.

Voila!
A Beautiful Box wtih a Special Inside

For the box top, you need a 5 ¾”  piece of paper/cardstock.  Score 1½” around all four outside edges of the box.  In the corner squares, cut a straight line from the out edge to the inside edge of the square.  Fold along the scoring lines, gluing the corner edges. 

All that is left to do is decorate the top of the box.  I made mine match the decorations that I put in the bottom of the inner box so I used another flower made with a Gluber and linen ribbon and the same Bazzill flowers.  I added a few Prima leaves.

These are perfect when you want to give a little more than a card, but not a big gift.  What grandmother wouldn’t love one of these with pictures of the grandkids?  Or it would be a great way to share your  feelings or memories with your Valentine?  I’m thinking it would also be a great thank you gift for a hostess.  And you get the fun of making it.  Try it!


Sunday, August 16, 2009

A Place for Everything - Scrap Oranization by Loretta Cooper

One of my grandmother's (many) cliches... "A place for everything, and everything in it's place". This is the first essential rule of organization. And it was an absolute necessity for my grandmother, as she never threw out anything.

In this, she unwittingly taught me the second essential rule of organization: Be willing to part with anything you 1.) don't use 2.) don't like 3.) can't remember why you bought it in the first place.

One of the things I've observed about scrappers as a group is that we are all collectors. It's part of the hobby. It's a little impulsive and and little obsessive... and frankly, that's why we love it. But it's also very easy to get overwhelmed or frustrated if you can't put your hands on "the stuff" you need when you finally carve out those few moments to play.


For this blog, I'd like to invite you into my scrapping space-- a small extra bedroom upstairs -- and show you some of my organizing tips. As you can see, I use every inch of space. I added the little daybed because somebody is always coming in to chat. ( It's the perfect resting place. Stiff as a board so nobody stays too long! )


My workspace is a standing workdesk I found at Ikea eons ago. I am certain they have much nicer things now, but I'm afraid to look.

Underneath and to both sides storage of the things I use the most... cutters, inks, distressing tools.

Good lighting is important too! This room has two huge windows. But I scrap a lot at night-- and I am really particular about color, so I have three lights in this room -- the two you see here and another on the opposite side of the space.


Above the work space I have a magnetic bulletin board also covered in tools and a few published projects that inspired me.

Again, I try to keep the tools and materials I use most within arms reach. If I have to take even a few steps away, I get distracted...

Storing supplies get's complicated.
I used to keep all my paper, sorted by color in paper racks. I've pretty much abandoned that. It got too complicated trying to figure out where all those multi-colored prints should go.


Now my card stock stays sorted in racks and most of my paper is is sorted by manufacturer in these very cool paper bins.

I have discovered I really like this system. Even though I can't see it all, it's fun to flip through the files and discover all those wonderful prints.


I have several of these bins. One with only holiday or special event papers (Christmas, Halloween, Summer, Fall) Another holds project categories (Sports, Travel, Family, etc.)

In the second closet I keep all the other goodies separated into drawers.
Brads, snaps, flowers, chipboard ... Basically anything that can be used to embellish a page lives in here. This is also where punches and circle cutters live.

And finally, there's the computer center. I've only recently moved my old laptop up here.

I use my computer a lot (unloading and retouching photos- printing out journaling -- you know.) Running up and down the stairs to the desktop was really cutting into all that good "scrapping karma" I had going. I also moved my good Cannon Printer and my wide body scanner up here too.

And in case you're wondering ... that big thing full of stickers is called a scraprack. It's a new addition to my organizational system. The jury is still out on it's usefulness for me. Let's say I like it a lot "in theory".

I'd love to hear (and see) how other scrappers are organizing their loot! A well organized stash means there is that much more room for more!

Happy Scrapping!
Loretta

Tuesday, August 11, 2009

Gift Tags by Esther


Making a gift tag was easy with the variety of patterns and colors of decorative papers in this kit. I began with a basic shape of cardstock to cut a 4” x 6” rectangle. The decorative pieces can be some of your scraps. Cut, shape and glue them to the base rectangle. Add ribbon, lace, buttons, die cuts and brads or jewels. The Lily Bee French Coutoure patterns lend themselves to flowers and decorative elements.

Shape the tags after adding the decorative pieces. The corners were rounded with the chomper that I found at the Scrapbooks Plus store and the tops were shaped with scissors. Add a hole or an eyelet for the thread loop to hang from the bag or gift and tie a loop of ribbon or string.

Put the words “To” and “From” on the tag. Mine are on the back so that more decorative elements can be on the front. It was so easy to create the tag that I made several. It was great therapy. Get as creative as you want with gift tags.

Sunday, August 9, 2009

Young Love

My parents as high school sweethearts...16 and 17 years old. I usually pack my 2 page layouts with pictures, but I wanted these 5" x 7" portraits to be the focal points. The large blue and white element on the right page actually overlaps the page on the left. I have decided to frame these pages for my mom, so I don't need to cut the overlap section.
.
There is lots of texture in this project - Bazzill polka dot paper, chipboard die cuts, velveteen paper, MME die cuts, Prima flowers and buttons. Mom will add journaling when it comes down off of the wall at the store.

Sunday, August 2, 2009

Bath Time

I *love* the paper from Lily Bee!
Most of my projects were vintage this month (check back on the 9th to see a layout) but I had a lot of fun incorporating the foam letters from Heidi Swapp on this picture frame: The contrast of the colors just makes it POP! I let the letters peek over the top of the frame because I like the dimensional effect. The foam letters have adhesive on the back, so I was careful to only remove the backing from the portion of the letters that would be attached to the frame. I did this by carefully scoring the backing material with my craft knife before peeling off the bottom half. I added the rubber duckies and soap bubbles for even more dimension. I actually think I have the perfect picture for this frame...but it is in Virginia and I am in Florida...so it will have to wait until I get back!

I loved working with the Lily Bee papers and I am excited to see what you guys come up with. Be sure to stop by the display in the crop room and get started on your entry for this month's challenge - a gift certificate to Scrapbooks Plus awaits the winner!